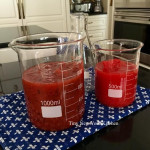
Lately I’ve been working in my kitchen as if it were a creative kitchen laboratory. The kitchen is really a food laboratory isn’t it? I’ve begun to add more science-like tools to my collection of cooking equipment. This week I purchased a bunch of beakers in various sizes. I use them as measuring cups as well as a place to hold liquids and chopped things. I’m not certain exactly why this makes me so joyous, but it does.
“Work With What You Got!”
© Victoria Hart Glavin Tiny New York Kitchen © 2016 All Rights Reserved

Less Stress Holidays
Holiday time is a wonderful time of year, but let’s face it, there is plenty of stress that comes with it. During the holidays, it’s better to keep things as simple as possible.
Appetizers & Hors D’Oeuvres: Keep it simple. Serve a simple, but beautiful cheese platter. Add bowls of dried fruit and nuts, as they’re always very festive. I like to set up a small snack table set with bowls of olives, savory popcorn, and Marcona almonds. I also like to serve a crudité platter for guests who may not want to eat rich foods or are perhaps trying to eat a bit healthier around the holidays.
Plan Your Menu: If you’re having a sit-down dinner, try to make a menu that can be prepared somewhat in advance. Some great options might be a beef Bourguignon, braised short ribs, coq au vin or any other main dish that can be made the day before. I am a big proponent of choosing things to cook that can be prepped ahead of time. I like to start off a dinner party with a nice salad that incorporates some seasonal ingredients like pomegranates, pears, citrus or candied nuts. A winter squash soup is also a nice way to begin a meal. Dessert can be a simple winter fruit crisp or a spice cake served with ice cream.
Get A Head Count: When it comes to a holiday meal, any time of year, depending on the number of guests, a simple yet broad menu works best. For buffet holiday parties with over a dozen people, you might want to offer a couple of different entrees. Add a vegetable and perhaps roasted potatoes or roasted root vegetables. Offering a nice crisp green salad always rounds out the menu as well. Add some delicious small rolls or a sliced baguette and you’re good to go.
Serving A Nice Beverage: Then there are the beverages. Having a festive specialty drink is always welcomed by your guests. If you’re mixing the drinks yourself, keep it simple. Please don’t spend all of your time being a bartender at your own party. That’s no fun! You could mix a nice holiday punch bowl with an adult kick ahead of time. A splash of pomegranate liqueur or elderflower liqueur is a nice addition to prosecco or champagne. A white Christmas cosmo (made with white cranberry juice) is a holiday favorite. Make it in advance and when you’re ready to serve just shake with ice and serve.
Make In Advance: Many things can be done days before the party. Shopping for non-perishable foods like spices, flour, sugar can all be purchased many days before your party. You can also make your holiday cookie dough or pie crusts in advance. All you need to do is to make sure you freeze them until you’re ready to use them.
Keep Calm & Have Fun: The most important thing is to keep calm and have fun. A holiday party of any kind should be a time of joy for everyone, even the host. If you find yourself working way too hard to throw and plan a party then ask friends or family members for help. Perhaps a few good friends could bring a dish or two to help ease the stress on your kitchen. The goal is to have a good time with family and friends.
Happy Holidays From Tiny New York Kitchen!
“Work With What You Got!”
© Victoria Hart Glavin Tiny New York Kitchen © 2015 All Rights Reserved
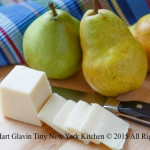
Bartlett Pears
Bartlett pears are the only pears that change color when they’re ripe. Eat them out of hand like an apple, slice them onto a salad, or present on a platter with cheese & nuts. Poach them in fruit juice, or bake them into tarts, quick breads, or muffins.
In 17th century England, a schoolmaster named John Stair sold some pear tree cuttings to a grower named Williams, who quite narcissistically named the variety after himself. The Williams Pear became a staple variety, and when brought to the New World at the end of the 18th century, one Enoch Bartlett of Massachusetts planted it on his farm. Mr. Bartlett named it after himself and, from then on, throughout the United States, the Williams Pear became known as the Bartlett Pear.
“Work With What You Got!”
© Victoria Hart Glavin Tiny New York Kitchen © 2015 All Rights Reserved

Apples are available year-round with peak season September through November.
When choosing apples, look for firm apples, free from bruises or soft spots. Apples are sold ready for eating. Select variety according to intended use.
Refrigerate for up to 6 weeks. Store bulk apples in a cool, moist place.
“Work With What You Got!”
© Victoria Hart Glavin Tiny New York Kitchen © 2015 All Rights Reserved

Umami is considered the fifth flavor (after sweet, sour, salty, and bitter). Umami is difficult to define, but is “something” that makes a meal memorable. Often used by chefs, umami is a rich, savory taste imparted by the amino acid glutamate and ribonucleotides-molecules containing the sugar ribose that are components of RNA – that occur naturally in many foods. You can take your meals to the next level with ingredients rich in umami like anchovies, beef, fish sauce, miso paste, mushrooms, Parmesan cheese, or sun-dried tomatoes.
“Work With What You Got!”
© Victoria Hart Glavin Tiny New York Kitchen © 2015 All Rights Reserved

5 Reasons To Love Coconut Oil
Coconut oil is an edible oil extracted from the kernel or meat of mature coconuts harvested from the coconut palm. Because of its high saturated fat content, it is slow to oxidize and is resistant to spoiling.
1. Butter Replacement. Coconut oil can replace butter, which is great for vegans, who up until now have had few good choices when converting non-vegan recipes that contain butter.
2. Great For Athletes. Coconut oil is great for athletes because it converts to energy faster than many other fats, making it a smart addition to workout snacks.
3. Weight Loss. Coconut oil may help you slim down. A study undertaken a few years ago suggests that coconut oil may help you lose weight, when consumed in small quantities instead of other fats.
4. Sautéing. Coconut oil is great for sautéing. Use coconut oil occasionally instead of olive oil to add a subtle flavor that is delicious in tropical or Indian recipes.
5. Good Cholesterol. Coconut oil boosts good cholesterol. While coconut oil is full of saturated fat, about half is medium-chain fatty acids, which seem to help raise HDL (good) cholesterol. Coconut oil is still high in fat, however, so consume in moderation.
“Work With What You Got!”
© Victoria Hart Glavin Tiny New York Kitchen © 2015 All Rights Reserved
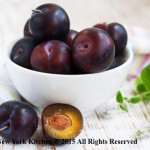
5 Ways To Make The Most Of Plums
RAW
Pit and thinly slice for Spinach Salad with Plums and Goat Cheese
BAKED
Stone fruit crumbles, cobblers and crisps are hallmarks of late summer. Swap in plums for other stone fruits in your favorite recipes.
ROASTED/GRILLED
Roasting and grilling fruit brings out its inherent sweetness. Serve with crème fraiche, ice cream, or yogurt.
CANNED
Preserve plums by making jam, chutney, salsa, or a spicy sauce to enjoy the taste of summer year round.
DRIED
Dry slices in a low temperature oven for a sweet, chewy on the go snack, which are perfect for packed lunches.
“Work With What You Got!”
© Victoria Hart Glavin Tiny New York Kitchen © 2015 All Rights Reserved

Soaking Wood Chips In Beer For Grilling
Here is a secret. You can turn your gas or charcoal grill into a smoker by just using beer. Soak wood chips in beer before you fire up the grill. The beer will be imparted into your smoked food.
Soak wood chips in beer for at least 30 minutes. The wet wood chips will produce more smoke and flavor. Drain wood chips and sprinkle a handful of soaked chips over the hot coals when they are ready and covered with a white ash. Put the lid on the grill and wait for the smoke to start to pour out of the grill. Then place the food on the cooking grate.
For charcoal grills, position it so that the vent is on the side of the grill opposite the charcoal. This will draw the heat and smoke over the food and out of the vent.
For gas grills, when using wood chips with a gas grill, follow the smoker box instructions for best results.
A couple of handfuls of wood chips will provide 10 to 20 minutes of smoke, depending on how hot the fire is.
Keep the grill lid closed as much as possible to allow the smoke to fully permeate the food.
Always use heat-resistant barbecue mitts or gloves when operating your grill.
“Work With What You Got!”
© Victoria Hart Glavin Tiny New York Kitchen © 2015 All Rights Reserved
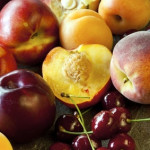
5 Ways to Make the Most of Seasonal Stone Fruit
Ripen: Ripen peaches, nectarines and apricots at room temperature. Once ripe, they can be refrigerated for just a few days to help keep them at their best.
Speed Up: Speed up the ripening process by placing fruit in a brown paper bag on the counter, checking a few times each day.
Can: Preserve stone fruits by canning them (make jam, syrup or salsa) to enjoy the taste of summer year-round.
Dry: Bake or grill halves or slices at 200 degrees for about 3 hours, turning every 30 minutes or so, until dehydrated yet still soft. Store in the refrigerator.
Freeze: Lightly poach halved and pitted fruit in water (sugar optional), portion and freeze for later use in smoothies, baking, desserts or fruit sauce for pancakes.
“Work With What You Got!”
© Victoria Hart Glavin Tiny New York Kitchen © 2015 All Rights Reserved
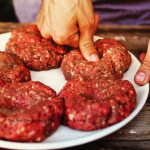
Burgers 101
Whether you’re cooking on a gas or charcoal grill or in a fry pan on the stovetop, here are tips on making the perfect burger that is meaty and satisfying, yet never dense and bricklike. To make the best burgers, use a light touch with the meat.
DON’T FEAR THE FAT For the juiciest beef burgers, use ground chuck (80% lean/20% fat) or sirloin (85% lean/15% fat). Leaner cuts and grass-fed beef will yield a drier burger. When buying chicken or turkey, opt for dark meat. It’s still lower in fat than beef and will result in a much tastier burger than white meat.
FRESH IS BEST Keep in mind that you don’t need to buy ground meat. You can choose any boneless cut and then ask your butcher to grind it for you or grind it yourself. Use a coarser grind to avoid a mushy texture. For a special treat add some freshly ground short ribs, dry-aged steak, brisket or a combination.
MAKE AN IMPRESSION The edges of a burger cook faster than the center, which can cause the burger to puff up into a sphere. To avoid this, when shaping the patty, press your thumb into the center to make a dimple about the size of a quarter.
HOLD THE SALT Wait to add salt until after the patties are formed and just before cooking, and then season generously. Salt inside a patty will start to dissolve the protein strands, which will adversely affect the texture of the burger.
GRILL OR GRIDDLE Burger lovers are divided about the best cooking method. Grilling adds terrific smoky flavor, but some insist that a griddle or fry pan allows the flavorful fat to stay with the burger during cooking. Whichever method you choose, DO NOT press down on the meat with the spatula because it will release the juices and fat. Resist that urge!
DON’T FLIP OUT Flip the burgers only once, and only after they have formed a nice brown seal. Don’t flip too soon, and don’t move the burgers around. When the burgers are ready to be flipped, they should dislodge from the cooking surface easily. If they stick, let them cook for a few moments more.
COOKED TO PERFECTION The surest way to measure a burger’s doneness is to check the internal temperature with an instant-read thermometer. The thickest part of a beef burger should register 130 degrees for medium-rare, 140 degrees for medium, and 150 degrees for well done. Let your burgers rest for a couple of minutes before serving to allow the internal juices to redistribute evenly through the meat.
“Work With What You Got!”
© Victoria Hart Glavin Tiny New York Kitchen © 2015 All Rights Reserved


