
Slow Cooking
If you have an old family recipe that you would like to make in the slow cooker, just follow these easy steps.
Cut the liquid required by a third to a half.
Brown meat first for extra color and flavor.
Add vegetables like onions, carrots, and squash at the beginning. Quicker cooking vegetables should be added later.
For a recipe that usually takes around an hour, cook for 4 hours on high or 8 hours on low.
No peeking! Because slow cookers can take awhile to reach optimum heat, it is important to keep them covered throughout the entire cooking period. Every time you lift the lid to check on progress, the cooker loses heat and it can take some time for it to get back up to the correct temperature.
“Work With What You Got!”
© Victoria Hart Glavin Tiny New York Kitchen © 2015 All Rights Reserved

Now that the weather has begun to get cooler it’s time for roasts. Standing rib roast is my all-time favorite minus the price tag.
So easy to make, too. Turn oven to roast at 350 degrees. Thyme and basil on top along with garlic and olive oil. Place uncovered in oven until it’s how you like to eat it. Remember to let it stand for a bit when removed from the oven as it will continue to cook while it’s resting.
“Work With What You Got!”
© Victoria Hart Glavin Tiny New York Kitchen © 2015 All Rights Reserved
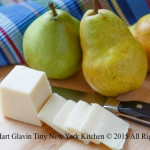
Bartlett Pears
Bartlett pears are the only pears that change color when they’re ripe. Eat them out of hand like an apple, slice them onto a salad, or present on a platter with cheese & nuts. Poach them in fruit juice, or bake them into tarts, quick breads, or muffins.
In 17th century England, a schoolmaster named John Stair sold some pear tree cuttings to a grower named Williams, who quite narcissistically named the variety after himself. The Williams Pear became a staple variety, and when brought to the New World at the end of the 18th century, one Enoch Bartlett of Massachusetts planted it on his farm. Mr. Bartlett named it after himself and, from then on, throughout the United States, the Williams Pear became known as the Bartlett Pear.
“Work With What You Got!”
© Victoria Hart Glavin Tiny New York Kitchen © 2015 All Rights Reserved

Bell Pepper Basics
Bell peppers are also called sweet peppers. They are not hot in flavor and come in lots of colors. Bell peppers are an excellent source of vitamin C & B6.
Green: Most common and less sweet than others.
Red: Fully ripe green peppers turn red and are sweeter than green. Green bell peppers cost less and store longer than other types.
Yellow and Orange: Bright in color with a mildly sweet fruity flavor.
Purple, White or Brow: May be available from farmers’ markets or by growing your own.
Choose bell peppers that are firm and heavy for their size with bright coloring and glossy skin. If stems are still attached they should be firm and green.
Fresh peppers are more available and tastier while in-season during the summer and early fall.
Avoid peppers that have thin wrinkled skin or brown patches.
Buy only what you will use within a week or plan to freeze extras for future use.
Keep bell peppers fresh by washing just before serving.
Cutting bell pepper: After washing, cut off stems and cut peppers in half – lengthwise or crosswise. Remove seeds and the white membrane from the inside. Cut peppers into rings, strips or dice them into squares. Cut peppers can be stored, covered, for 2 days in the refrigerator.
Whole peppers can be stored in the refrigerator for up to 5 days. They are easy to freeze for longer storage. No blanching is needed. Place peppers in freezer bags or containers. Seal and label with the date. Frozen peppers should be used within 8 months.
“Work With What You Got!”
© Victoria Hart Glavin Tiny New York Kitchen © 2015 All Rights Reserved

Umami is considered the fifth flavor (after sweet, sour, salty, and bitter). Umami is difficult to define, but is “something” that makes a meal memorable. Often used by chefs, umami is a rich, savory taste imparted by the amino acid glutamate and ribonucleotides-molecules containing the sugar ribose that are components of RNA – that occur naturally in many foods. You can take your meals to the next level with ingredients rich in umami like anchovies, beef, fish sauce, miso paste, mushrooms, Parmesan cheese, or sun-dried tomatoes.
“Work With What You Got!”
© Victoria Hart Glavin Tiny New York Kitchen © 2015 All Rights Reserved
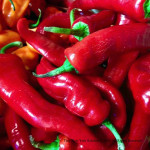
Drying Chili Peppers
As I sit here, on vacation, looking out at the ocean I’m thinking about chili peppers. I tend to think about all sorts of random things, most especially when I have an opportunity to block out the noise of the outside world. Chili peppers…my first REAL exposure to a wide variety of chili peppers was years ago spending time in New Mexico and then later in Arizona. I love the Southwest and very much appreciate the importance of chili peppers. One way to preserve chili peppers for future use is by drying them. There are two basic ways to dry them.
Wash the peppers with warm water and dry thoroughly with a cloth towel. You may want to remove the stems from your peppers. If you’re drying them in the oven or food dehydrator you may wish to slice the peppers length-wise as this will allow them to dry faster. It’s usually a good idea to wear gloves when handling peppers, especially if you are a contact wearer.
If you are in a time crunch, using a dehydrator is the fastest method. I like to let my chili peppers dry on their own for a week to 2 weeks BEFORE putting them in the dehydrator. Lay the peppers out on metal mesh racks and dry them whole. After 10 days slice them open and remove their seeds and stems. You may save the seeds for next year’s planting. Removing the seeds also cuts down on their spiciness. They are then dried in the dehydrator until crisp. This saves energy, as they only need about 12 hours in the dehydrator compared to almost a full day with freshly picked peppers.
Another way to dry chili peppers is by stringing them through the base of their stems with a needle and fishing line and hanging them to dry inside. It will take weeks for the peppers to dry out completely, but in the meantime you get to enjoy the aroma of the peppers. Whole dried chili peppers can last for up to two years for culinary purposes and up to 10 years for decoration. The peppers can be rehydrated and used for blended salsas and mole, used in brines for poultry and pork, or ground into a fine powder for seasoning. Dried chili powder can be used alongside salt and pepper for cooking most foods.
“Work With What You Got!”
© Victoria Hart Glavin Tiny New York Kitchen © 2015 All Rights Reserved

Ways To Use Your Roasted Chicken
Summer is over, the kids are back in school, and it’s back to busy life as usual. Already cooked chicken is a perfect way to save time in the kitchen. Here are some great ways to use roasted chicken for easy weeknight dinners.
Salads: Add to mixed greens, chopped tomatoes, chopped cucumbers, shredded carrots, and sliced red onions. Toss with your favorite low-fat or fat-free dressing.
Lettuce Wraps: Add 2 cups of chopped chicken to shredded carrots, green onions, and bean sprouts. Toss with teriyaki sauce. Spoon onto lettuce leaves and sprinkle with almonds. Fold sides of lettuce over filling and roll up.
Sandwiches & Wraps: Make a chicken salad filling with crunchy celery and apples. Use plain low-fat yogurt and add a touch of curry powder or cumin for dressing. Stuff into a pita pocket or spoon into a wrap and roll up.
Soups: Add 2 cups chopped chicken, your favorite chopped vegetables and 1 cup of uncooked rice or noodles to 6 cups of fat-free chicken broth.
Quesadillas: Combine shredded chicken with a pinch of cumin. Spoon on one half of a flour tortilla. Sprinkle with cheese and fold tortilla in half. Cook on a nonstick skillet for 3 minutes on both sides.
Burritos, Enchiladas, Fajitas & Tacos: Add shredded chicken to salsa, beans, sour cream and cheese. Or combine with sautéed onions & sweet peppers, shredded lettuce & chopped tomatoes, or mix with green chiles, spices, green onions and enchilada sauce. Serve on flour or corn tortillas.
Pasta Dishes: Use shredded chicken instead of ground beef in your favorite lasagna recipe.
Skillet Meals: Add 1 1/2 cups of chopped chicken to sautéed onions, broccoli, mushrooms, and rice. Cook in low-fat broth. Sprinkle on Parmesan cheese before serving.
“Work With What You Got!”
© Victoria Hart Glavin Tiny New York Kitchen © 2015 All Rights Reserved

Watermelon
Watermelon is the ultimate summer snack. As a kid growing up in Nebraska, my favorite way to eat watermelon was outside, with the juice running down my face and arms. Here is how I’m eating watermelon this summer.
Treat It Like A Steak
Cut watermelon into 2 inch slabs and drizzle with olive oil. Sprinkle with kosher salt and red pepper flakes. Eat with a steak knife.
Make A BLW
Forget the tomato and use a few thin slices of watermelon on your sandwich instead. Add some cheese for good measure.
Blitz It
Purée watermelon (seeds and all), strain, then add honey, and lime juice. Serve on ice with a mint sprig. Add rum or tequila if you want to be naughty.
“Work With What You Got!”
© Victoria Hart Glavin Tiny New York Kitchen © 2015 All Rights Reserved

Nebraska Corn
Growing up in Nebraska corn was a nightly summer menu item. The corn plant is Native American in origin and Nebraska is corn country. Driving through the state, one will see endless fields of sweet corn, feed corn, and pop corn. Small plot gardeners know that corn takes up a lot of space as it is greedy for soil nutrients, prone to weeds and disease, destroyed by small animals, wind and frost. So then why do we go through all the trouble of growing corn? Because no corn is as fresh and sweet as the corn you grow yourself.
The period of peak freshness for sweet corn is measured in minutes, not hours or days. The best corn is simply the freshest corn. Proper timing for harvest is crucial to the quality of sweet corn. Harvest sweet corn when the ears are full and blunt at the tip. The husks should be tightly folded and green. Using your thumbnail, poke and end kernel. It should squirt a milky white sap. Under ripe corn will contain a watery liquid. Overripe corn will have a tough skinned kernel with doughy interiors. Also look at the silk, which should be turning brown and dry on the end.
Storing sweet corn for long periods of time will destroy it. The sugar quickly turns to starch, losing flavor, quality, and most of all sweetness. If you must store sweet corn, use perforated plastic bags and get it into the refrigerator as soon as possible. Warm temperatures hasten the conversion process. Try to use the corn within 1 to 2 days and DO NOT husk until just prior to cooking.
“Work With What You Got!”
© Victoria Hart Glavin Tiny New York Kitchen © 2015 All Rights Reserved
For those of you who prefer an electric model ice cream machine, there are machines that can be had for under $50 that make a quart. The drum will need to be frozen before starting a batch. Larger machines range from $125 to $300. Cuisinart makes a model that produces two quarts in about 30 minutes, which is the ice cream maker that I used in this video.
Stores such as Williams-Sonoma sell ice cream starters that require a few simple added ingredients put into the machine to create ice cream. Personally, I don’t think that you need these starters.
There are endless combinations of ingredients that can be added to a batch of your homemade ice cream. Have fun experimenting with different flavors and add-ins. Enjoy summer with homemade ice cream that fits your personality.
“Work With What You Got!”
© Victoria Hart Glavin Tiny New York Kitchen © 2015 All Rights Reserved


