
Dried Beans
Purchase dried beans from a source with good turnover. When I’m travel to Tucson I love to stock up on dried beans from Native Seeds, who have a nice selection of beautiful beans (http://shop.nativeseeds.org/collections/beans) The longer the beans are on the shelf, the drier they become, and the longer they will take to cook. If you’ve ever cooked beans that just wouldn’t become tender, they were probably too old. Once you have them home, store them in an airtight container in a cool dark place.
Soaking dried beans reduces the cooking time and helps the beans hold their shape better during cooking. Although soaking isn’t necessary, the shortened cooking time cuts energy use, which is a good enough reason to soak. Spread the beans on a large baking sheet, and sort through them to remove stones or broken beans. Transfer the beans to a bowl and add enough cold water to cover by an inch or two. Let stand for 2 hours; longer will shrivel the beans. Drain before using.
For a quicker soaking method, place the sorted beans in a large saucepan, add cold water to cover, and bring to a full boil. Immediately remove from the heat and cover. Let stand for 1 hour, and then drain before using.
Cooks are divided over when to salt a pot of cooking beans. Some people believe that salting toughens the beans and thus lengthens their cooking time. Others believe that if beans are salted toward the end of cooking, the flavor is dull. So, in the interest of proper seasoning, go ahead and add a reasonable amount of salt at the beginning of cooking (about 1/2 teaspoon per cup of dried beans), as the add cooking time is minimal.
www.tinynewyorkkitchen.com
“Work With What You Got!”
© Victoria Hart Glavin Tiny New York Kitchen © 2016 All Rights Reserved

Rosh Hashanah
Rosh Hashanah is the Jewish New Year (the first day of the Jewish High Holy Days) and is also known as the Feast of Trumpets. The holiday , which is also a day of remembrance, is at once solemn and festive. Joy comes not only from trust in God’s compassion, but also the anticipation of renewal and fresh starts.
The Rosh Hashanah meal becomes more than mere rejoicing as it is also a form of prayer. The table is transformed into an altar to supplicate God, partaking of symbolic foods: honeyed and sugared treats for a sweet year; round foods for a fulfilled year, unbroken broken by tragedy; foods that grow in profusion at this season and those eaten in abundance, such as rice, signifying hopes for fecundity, prosperity, and a wealth of merits.
Dinner begins with a prayer for a sweet year, dipping challah, or other sweet bread, and apples into fragrant honey. Some start with sugared pomegranates, dates, figs, or quince in rose petal syrup.
It is customary for the first course to be fish, which symbolizes fertility and God’s blessings. Seasonal vegetables like leeks, Swiss chard, black-eyed peas, and pumpkins appear throughout the meal in major and supporting roles. Delicious main dishes follow, and usually two or more sweet desserts (such as a plum tart, honey cake, or noodle kugel) conclude the meal.
A few foods, however, are unwelcome at the Rosh Hashanah table. Many Ashkenazi Jews do not eat nuts (because the numerical value of the Hebrew word for nuts is equal to the value of the word for sin). Others do not eat pickles, horseradish, or other sour foods, while Moroccans avoid foods that are black, like olives and grapes (which are considered bad omens).
“Work With What You Got!”
© Victoria Hart Glavin Tiny New York Kitchen © 2016 All Rights Reserved
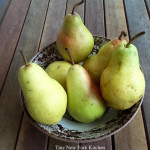
Pears
Season: June to October, but can be cold-stored until spring.
Pears are one of the few fruits that should be picked when under ripe. Buy hard pears a few days before you need them, and let them ripen at room temperature until they have a slight yield when given a gentle squeeze.
To core a pear, cut the pear in half lengthwise, and then scoop out the hard portions with a melon baller. Pear flesh (like apple) oxidizes when exposed to air, so rub the cut areas with lemon juice or white wine to keep them from turning brown.
“Work With What You Got!”
© Victoria Hart Glavin Tiny New York Kitchen © 2016 All Rights Reserved
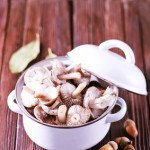
Make The Most Of Mushrooms
Keep fresh mushrooms in perfect condition after purchase. Here is what to do to make these gems last.
Keep The Original Store Packaging
You can’t see it, but the wrap on packaged mushrooms actually has tiny holes that prevent damaging condensation and gases from building up. You can, and should, store commercially grown mushrooms (presliced or whole) in their original container and wrap in the refrigerator, they will keep up to one week.
Keep Moisture At Bay, Wrap Loose Mushrooms In Dry Packaging
Storing mushrooms in a damp towel will shorten the length of time they stay fresh. Instead, refrigerator loose mushrooms in a brown paper bag; it will absorb any moisture and allow them to breathe. A partially opened ziplock plastic bag will also work.
Avoid The Crisper
The refrigerator’s vegetable bin is a moist place, not a friendly area for mushrooms. Instead, keep them in a spot where air can circulate, like an open shelf.
Keep Mushrooms Away From Pungent Foods
Mushrooms can take on the flavors of strong foods that are stored nearby. Keep them away from onions, garlic, and other foods with strong odors.
Rinse With Water
Clean mushrooms under cool, running water right before you’re ready to use them; then pat dry. It’s a myth that mushrooms easily absorb water, but if they’re rinsed too far in advance, they will discolor and deteriorate from the moisture. Cultivated mushrooms grow in sterilized compost, so you can also clean them by simply brushing any bits of dirt with a clean damp towel.
www.tinynewyorkkitchen.com
“Work With What You Got!”
© Victoria Hart Glavin Tiny New York Kitchen © 2016 All Rights Reserved

5 Ways To Use A Vegetable Peeler
The humble vegetable peeler has hidden talents.
Easily Peel Fruit: To peel soft fruits and vegetables, like tomatoes and peaches, you usually have to briefly dunk them into boiling water. Using a good vegetable peeler is so much easier and faster. Look for peelers with serrated blades for the best results and select not-too-ripe fruit.
Shaved Cheese: Give salads, pastas and roasted vegetables a restaurant-style finish by garnishing with generous amounts of shaved Parmesan or pecorino romano cheese.
Vegetable Pasta: Shave long strips of zucchini, carrots (even sweet potatoes and squash) to transform them into pasta substitutes. Serve raw or briefly steamed with your favorite sauce, or toss with a vinaigrette for a fresh and nutritious salad.
Spreadable Butter: Is there anything worse than trying to butter toast or bread with rock hard butter straight from the fridge? Use a vegetable peeler to scrape off thin and perfectly spreadable butter ribbons.
Chocolate Curls: Peel the edge of a slightly softened chunk of chocolate to create curls, or the flat surface of very cold chocolate to make shavings. Keep your creations in the freezer and use to garnish cakes, pies, puddings and seasonal fruit.
www.tinynewyorkkitchen.com
“Work With What You Got!”
© Victoria Hart Glavin Tiny New York Kitchen © 2016 All Rights Reserved
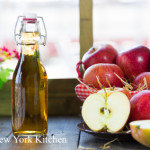
Know Your Vinegar
Pickling season is here and it’s important to know about the various vinegars. Vinegar is usually made by oxidation of the alcohol in wine, cider, or malt. Vinegar provides the tart pucker flavor in pickles, but it also acts as a preservative. If a recipe calls for vinegar, it will most likely call for a particular type. If a recipe does not specify the type, use a vinegar that fits the recipe. White vinegar has a sharp flavor and is used for pickling and in recipes where a clean, strong taste is desired. Cider vinegar, made from apples, has a faint fruity flavor and is used in recipes where a slightly milder taste is preferred. You can replace white vinegar with cider vinegar in pickling recipes, as long as the cider vinegar has a 5% acidity level.
Since vinegar is very acidic, bacteria grow very poorly in it, or not at all. However, vinegar will still deteriorate if exposed to air and/or heat. Keep your vinegar capped and store it in a cool, dark, dry place. Vinegars can be flavored by adding slightly bruised herbs or fruit, heating the vinegar almost to body temperature, and sealing the bottle.
www.tinynewyorkkitchen.com
“Work With What You Got!”
© Victoria Hart Glavin Tiny New York Kitchen © 2016 All Rights Reserved
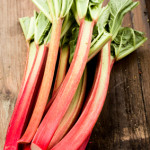
Rhubarb
Rhubarb is one of the first delights of spring, and there are many ways to use it. If you have an abundance of rhubarb in your garden, it will freeze successfully. After you have cut rhubarb up and thrown away the leaves, steeping it overnight has several advantages. You don’t need to use as much sugar as the average recipe calls for, the rhubarb will then cook quickly, and you have the dividend of pure rhubarb juice (no water added) to use as a cooking drink.
To cook rhubarb: Use a proportion of 4 cups sliced rhubarb cut in 1/2 inch pieces to 1 cup sugar. Toss the rhubarb and sugar together and let steep overnight (you will be amazed at how much juice the rhubarb gives off). Pour off 1/4 cup of the liquid and use for a drink. Cook the rhubarb slices in the remaining liquid until just tender, but still holding their shape (less than 5 minutes). The rhubarb is ready to eat as is, to freeze in containers, or to use in recipes.
“Work With What You Got!”
© Victoria Hart Glavin Tiny New York Kitchen © 2016 All Rights Reserved
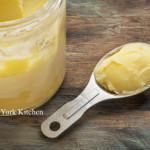
How To Clarify Butter
Some recipes call for clarified butter. To make it, just melt butter over a medium-low heat until the milk solids separate and rise to the top, 3 to 5 minutes. Let cool, then skim off the white foam and discard. Spoon remaining clarified (clear) butter into a bowl; discard the solids left at the bottom of the pan.
“Work With What You Got!”
© Victoria Hart Glavin Tiny New York Kitchen © 2016 All Rights Reserved
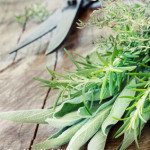
Freezing Fresh Herbs
Spring is here and it’s time to grow a variety of herbs, but what do you do when you have an abundance that you don’t want to go to waste? The answer is to freeze them. To freeze hardy herbs like thyme or rosemary, chop the leaves and put them in an ice cube tray. Cover with olive oil and freeze them for up to 6 months. When you’re ready to use them just melt as many as you need in a skillet and use for sautéing.
“Work With What You Got!”
© Victoria Hart Glavin Tiny New York Kitchen © 2016 All Rights Reserved
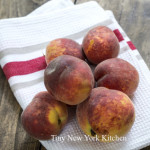
Because peaches can grow in most of the United States, as long as they’re in season (May through early October) chances are you’ll be able to find organic peaches near you. Look for peaches with flesh that yields slightly to subtle pressure without bruising. Another good indicator of ripeness is the fruit’s background color, behind the red highlights. For yellow peaches (the more tart variety), the background should be a deep gold; for milder white peaches, give them a sniff – they should have a rich, sweet fragrance.
“Work With What You Got!
© Victoria Hart Glavin Tiny New York Kitchen © 2016 All Rights Reserved


