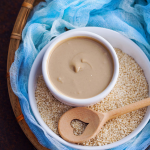
Tahini, a roasted sesame seed paste, is the key ingredient in hummus recipes, but you can also use tahini these ways:
Nut-Free Peanut Sauce
Combine with soy sauce, lime juice, brown sugar, and crushed red pepper. Check labels to be certain that your tahini is nut-free.
Veggie Burgers
Add a spoonful to help bind bean or lentil burger mixture together instead of using an egg.
Oatmeal
Drizzle over a bowl of oatmeal topped with sliced bananas, a dollop of yogurt, and maple syrup.
Dressing
Stir together with lemon juice, olive oil, and minced garlic as a dressing for salads or grain bowls.
Brownies
Swirl into a pan of brownie batter before baking to balance the sweetness of the chocolate.
©Tiny New York Kitchen © 2021 All Rights Reserved

Rhubarb is a fabulous spring crop. The sour sweetness of rhubarb is absolutely nice in cakes, breads, pies, cobblers and jams, as well as sweet and savory compotes, chutneys, and sauces. Savory rhubarb chutney, cooked with onions and hot pepper is an exciting accompaniment to grilled pork, chicken, or shrimp. Sweeter versions employing brown sugar and lemon peel are superb served with pancakes, French toast, waffles or pound cake. Ladled atop frozen yogurt or ice cream, sweet rhubarb sauce is perfect for a spring sundae when the sun burns bright. This same sauce can be strained to yield a perfectly pink syrup. Combine with cold sparkling water or seltzer for a refreshing mocktail, or add to prosecco for a beautiful brunch beverage.
Rich in fiber, protein, vitamin C, potassium and calcium, rhubarb provides many valuable nutrients. A natural laxative, rhubarb may help east constipation. In fact, it is written that rhubarb was utilized in ancient Chinese medicine for treating stomach ailments. The vitamin K found in rhubarb may help strengthen bones, as well as possibly inhibiting inflammation in the brain. Rhubarb also supplies the body with vitamin A, which may help diminish signs of aging, particularly skin damage.
When choosing rhubarb at the supermarket or farm markets, look for glossy, firm stalks. Trim the leaves off when you bring your rhubarb home, as they are toxic. Store the stalks wrapped in a paper towel in your vegetable drawer. Wash before using. Rhubarb freezes beautifully, place chopped stalks on a parchment paper lined baking sheet and place in the freezer. When the chunks are frozen, store them in freezer bags and use within one year.
“Work With What You Got!”
©Tiny New York Kitchen © 2020 All Rights Reserved

Have you ever found yourself making a recipe and realize that you don’t have an ingredient that it’s calling for? Here are a few ingredient alternatives that you might have on hand instead.
Mayonnaise
For 1 cup of mayonnaise use 1 cup sour cream or 1 cup plain yogurt with a pinch of salt.
Honey
For 1/4 cup of honey use 1/4 cup maple syrup or light corn syrup.
Buttermilk
For 1 cup of buttermilk use 1 tablespoon vinegar or lemon juice mixed with enough milk or plant-based milk to reach 1 cup.
Butter
If butter is used for baking or in a solid form, solid coconut oil is a good 1 to 1 substitution. If it’s melted or for cooking use olive oil.
Oil
When it comes to oil for baking, applesauce is a great substitute. For 1 cup of oil, use 3/4 cup applesauce mixed with 1/4 cup melted butter. In cooking, any neutral refined oils like canola, olive, vegetable, corn, and peanut oils are interchangeable.
Breadcrumbs
For 1 cup of breadcrumbs use 1 cup of cracker crumbs, finely crushed potato chips, tortilla chips, or pretzels pulsed in your food processor.
Brown Sugar
For 1 cup of light brown sugar, use 1 cup white sugar plus 1 tablespoon molasses. For 1 cup of dark brown sugar, use 2 tablespoons molasses. The sugar and molasses should be mixed together thoroughly.
Baking Powder
For 1 teaspoon baking powder, stir or sift together 1/4 teaspoon baking soda plus 5/8 teaspoon cream of tartar.
“Work With What You Got!”
©Tiny New York Kitchen © 2020 All Rights Reserved

Healthy snacks give your family the energy and nutrients they need throughout the day. As you plan snacks, think of them as “mini meals” that include two of the four food groups.
Try these simple nutritious snack ideas:
1. Whole grain crackers with a cheese stick
2. Fresh cut fruit with a yogurt dip
3. Nut-free trail mix. Mix dried cranberries, raisins, dried apricots, and apple rings with sunflower and pumpkin seeds, along with your family’s favorite cold cereal.
4. A small tortilla wrap spread with Greek yogurt, some jam and a banana.
5. A smoothie made with vanilla yogurt, blueberries, apples and some orange juice.
6. Vegetable sticks (like cucumbers and carrots) dipped in hummus.
Make snacks interesting by using a variety of shapes, colors, and textures.
• Offer different types of cheese (mozzarella, cheddar, Jack, Swiss) in different forms (cubes, strings, slices, and balls)
• Switch up the vegetables and fruit. Make sure you have a colorful variety in the fridge to choose from.
• Kids love to dip. Use cottage cheese, hummus, yogurt, or guacamole as healthy dips.
From planning to packing, get everyone in the family involved when making snacks. Take children grocery shopping and let them choose some of their favorite foods like breads, vegetables, fruit, and yogurts. Set aside time in the evening to pack lunches and snacks. You’ll be happy you did during the next day’s busy morning rush!
Food Allergies: Schools have different policies when it comes to food allergies. Many schools have a nut-free policy throughout the whole school, and some have policies just for some classrooms. Find out about the food allergy policy at your child’s school. Once you know about the foods that need to be avoided, keep them in mind when reading the ingredient list on food labels and when packing lunches.
Back to school snacks can be nutritious and delicious. With a little planning and creativity, your kids will love snack time at school.
“Work With What You Got!”
©Tiny New York Kitchen © 2019 All Rights Reserved

Shop the peripheries of the supermarket and stay out of the middle. Most supermarkets are laid out the same way. Processed food products dominate the center aisles of the store, while the cases of mostly fresh food (produce, meat, fish, dairy) line the walls, Keep to the edges of the store and you’ll be much more likely to wind up with real food in your shopping cart. This strategy is not foolproof, however, since things like high-fructose corn syrup have crept into the dairy case under the cover of flavored yogurts and the like.

When You Have Leftover Crumble Serve It For Breakfast With A Dollop Of Greek Yogurt.
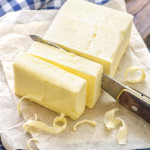
Salted & Unsalted Butter
Butter comes either salted or unsalted (also called sweet). Although all salted butter contains some amount of salt (salt used to be added as a preservative, but today it’s added primarily for flavor), some salted butters are noticeably salty. The problem is the word some. Since the amount of slat can vary from butter to butter, it’s best to use unsalted butter in kitchen and add as much salt as you’d like to each dish. If you prefer salted butter, use it – just remember to adjust the salt in each dish.
Cultured Butter
With this kind of butter, the cream is treated with cultures (like yogurt), allowed to ferment and then churned. The result is a fuller flavor with noticeable acidity. It’s easier to find cultured American butters these days, but as with salted butter, not all cultured butters are the same. A favorite, made by Vermont Creamery, has tang and produces a different sensation on one’s tongue due to its very high butterfat content. Cultured butter is very good to use in baking.
European Butter
The standards for the minimum amount of butterfat in butter are different in Europe and America. Abroad, the minimum is 82 percent; in America it’s 80 percent; everywhere it’s lower for salted butter. When you use European butter you’re likely to have a much richer dish. When I use European butter I don’t make any adjustments to my recipes to make allowances for the difference in butterfat.
Room Temperature Butter
Proper room temperature butter is still slightly cool; it’s really more about texture than temperature. The butter should be soft, but not squishy. The stick should hold it’s shape (a little pressure should leave an indentation), and it should be pliable – if you smash it with a spatula, you shouldn’t have to fight it.
Storing Butter
Keep butter in the refrigerator, well wrapped and away from foods with strong odors. It can be kept in the freezer for almost forever, but let’s call it a year. Defrost overnight in the refrigerator. Butter can keep out at cold room temperature for a day in a butter bell or crock. However, store butter in the refrigerator and then pull it out about 20 minutes before using it.
Clarified Butter
Clarified butter is a magical thing. It’s butter without water (you simmer it away) that won’t burn when used over a high heat. To clarify butter, place the butter in a saucepan, bring it to a simmer, let it bubble gently until it’s covered with foam. Keep simmering the butter until the foam sinks to the bottom and the bubbling just about stops. Line a fine-mesh sieve with cheesecloth or a coffee filter, pour the butter through it into a container, cool and cover. The butter will keep in the fridge for at least 2 months.
“Work With What You Got!”
©Tiny New York Kitchen © 2019 All Rights Reserved
These little tweaks really do add up to lighter and more nutritious meals.
CUT CARBS
All types of vegetable noodles, from beet to squash, are available in the produce aisle or make your own. Serve in place of pasta or mix with whole-wheat spaghetti to bump up the fiber and cut calories.
SAY YES TO YOGURT
Creamy and delicious, yogurt is a great way to add calcium and probiotics to dishes that require cream or mayonnaise. Enjoy it baked into muffins, stirred into sauces, or whisked into dressings.
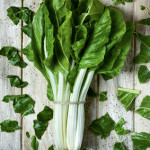
GO GREEN
Greens like kale, collards, and Swiss chard bring color and nutrients to your plate. Stir them into soups, sauté them for a side, or add them to sandwiches.
“Work With What You Got!”
©Tiny New York Kitchen © 2018 All Rights Reserved

Grilled pineapple is so very versatile because you can use it for savory or sweet, hot or cold dishes. Grill over indirect heat and the sugars in the pineapple concentrate bringing out a sweet and meaty fruit that is ideal for endless summer recipes.
6 Ways To Use Grilled Pineapple
Slice and serve with grilled pork or fish.
Cut into chunks and toss with salt and lime juice for a smoky fruit salad.
Muddle and use as the base for a sweet-savory cocktail.
Dice and mix with chopped cilantro and chiles for salsa.
Purée and spoon over vanilla ice cream or good Greek yogurt.
Top with ice cream or sorbet.
“Work With What You Got!”
© Victoria Hart Glavin Tiny New York Kitchen © 2017 All Rights Reserved

Grilling season is officially here, although I grill all year round, and many are dusting off their grills. I grill everything from meats to fruits and vegetables, but I’m partial to grilling sausages.
The great thing about sausages is that the work is already done. It’s the quick cooking, preseasoned protein your dinner has been waiting for. Here are ways to use that beautiful & delicious sausage.
Potato Salad: Add lightly charred andouille to potato salad.
Burgers: Form loose spicy turkey sausage into patties, then cook. You’ll have instant burgers.
Kebabs: Skewer sliced smoked kielbasa for easy kebabs.
Tacos: Wrap grilled fresh chorizo in a tortilla with avocado and pico de gallo for instant tacos.
Sandwiches: Grill bratwurst with onions and peppers and throw it inside a roll.
Main Dish: Serve grilled merguez (North African sausage) with cucumbers and mint with a dollop of yogurt.
www.tinynewyorkkitchen.com
“Work With What You Got!”
© Victoria Hart Glavin Tiny New York Kitchen © 2017 All Rights Reserved


