
Hungry for halibut or craving clams? There’s an easy way to prepare fish and seafood to perfections. Fish is ready when you can flake it easily with a fork. Shrimp and shellfish are done when they are opaque in color.
Bake: Best for fish fillets. Baking or roasting fish is an easy, hands-off method, especially good if you have a crowd to feed. As with any fish cooking technique, follow the recipe to avoid overcooking.
Wrap: Best for any fish fillet and shellfish. Cooking fish in foil is one of the most versatile ways to prepare fish, resulting in moist, flavor-packed dishes. And because you can load up on tasty ingredients, like herbs, citrus and spices, it’s a great way to cut back on fat and sodium without sacrificing flavor. Plus, cleanup is a breeze.
Poach: Best for any fish fillet and shellfish. Poaching simply means gently cooking the fish in liquid, such as water, broth, beer, or wine. It ads subtle flavor without drying out the fillets or adding any extra fat. To poach, simply cover the fish or seafood with liquid and bring to a simmer, just don’t let the liquid boil. You’ll only need a few minutes for your fish or seafood to be ready. You can also use the poaching liquid as a base for a sauce when you’re done.
Broil: Best for thick and meaty fish fillets, shrimp, and lobster tails. This method is especially good when you want to quickly bake fish and seafood. This is also a good method when you don’t have access to a grill or you’re adding a glaze. To make sure it doesn’t cook or brown too quickly, cook the fish at least 6 inches away from the broiler and watch carefully.
Steam: Best for clams and mussels. The traditional cooking method for clams and mussels, steaming is an easy way to add delicate flavor quickly without overcooking. Just add the seafood to a lidded saucepan with a little liquid like beer, wine, or broth, cover and bring to a simmer until the shells open up. Discard any that don’t open. You can also steam lobster, but it’s worth checking to see if your store’s fish department will steam lobsters for you.
Sear: Best for scallops, shrimp, and fish fillets. Use this cooking method for fish with a crisp, browned crust and a tender interior. Use a non-stick pan if possible and add a little oil before adding your fish, in batches if necessary, Don’t crowd the pan. Cook without stirring or turning for 2 to 3 minutes to brown the fish and crisp up any breading.
Grill: Best for any fish fillet or shellfish. Once grilling season rolls around don’t forget to add fish, shrimp, and even clams and mussels to your summer menus. Fish fillets take well to grilling and are easy to flip. Use a grilling basket for anything that might slip through the grate. Don’t forget skewers, which are the perfect way to grill shrimp.
“Work With What You Got!”
©Tiny New York Kitchen © 2020 All Rights Reserved

To flavor your food reach for herbs and spices rather than high-sodium table salt. Make sure to read the labels of seasoning mixes because many of them contain salt.
Seasoning Suggestions
Pasta: Basil, Fennel, Garlic, Paprika, Parsley, Sage
Potatoes: Chives, Garlic, Paprika, Parsley, Rosemary
Rice: Cumin, Marjoram, Parsley, Saffron, Tarragon, Thyme, Turmeric
Seafood: Chervil, Dill, Fennel, Tarragon, Parsley
Vegetables: Basil, Caraway, Chives, Dill, Marjoram, Mint, Nutmeg, Oregano, Paprika, Rosemary, Savory, Tarragon, Thyme
“Work With What You Got!”
©Tiny New York Kitchen © 2019 All Rights Reserved

Going out for dinner on Valentine’s Day is a risky affair. Even the best restaurants can have “overload difficulties” on such a busy night where couples have expectations of restaurant perfection. A better way to manage expectations is to take control of them yourself. Food is a language of love. You know what you like and what your loved one likes. No need to worry about cheesy love songs or a perfumed soaked lady sitting next to you. Nothing says I love you more than taking the time to make a special meal for the person you love. Visit the local farmers’ market, butcher, or seafood shop to buy their favorite seasonal ingredients. Come up with a meal that celebrates love. Turn off the lights, fire up all the candles and put on your favorite music.
Keep it easy and made make it special. Plan out the meal from beginning to end to get organized and make sure you have a solid menu. If you’re not a seasoned cook make sure to keep it simple and I recommend not trying to make complicated dishes that you’ve never made before. Make it easy with three courses. Begin with a beautiful cheese plate. Embrace easy, big impact dishes. Start off with prosciutto-wrapped scallops finished with a squeeze of lemon. Warm things up with braised short ribs or steaks finished off with butter and herbs. Keep desserts simple, but sweet. Decorate bakery cakes with fresh fruit or edible flowers or warm up slices of pie and top with caramel sauce and a gourmet ice cream or try your hand at an easy dessert of chocolate pots de crème. Don’t forget that nice bottle of wine or champagne.
“Work With What You Got!”
©Tiny New York Kitchen © 2018 All Rights Reserved

Everyone who’s cooking for the holidays wonders what he or she should make for the holidays. I like to keep it simple and typically follow the “don’t experiment on your guests” rule.
Hors D’oeuvres
Mini Crab Cakes With Remoulade Sauce
Cold Seafood Platter (Lobster Tails, Jumbo Shrimp, Jumbo Lump Crab Meat)
Stuffed Mushrooms (Crab, Sausage, Cheese Stuffing)
Chicken Tenders With Honey Mustard Sauce
Chicken & Beef Satay With Asian Dipping Sauces
Jumbo Shrimp Cocktail Platter With Cocktail Sauce
Grilled Shrimp With Aioli
Mini Southwest Chicken Quesadillas With Salsa
Beef Franks In a Blanket With Whole Grain Mustard Sauce
Antipasto Platter With Imported Meats, Cheese, Peppers, And Olives
Assorted Mini Quiche
Bacon Wrapped Sea Scallops
Grilled Citrus Shrimp With Mango Aioli
Tenderloin Of Beef On Crostini With Horseradish Sauce
Salads
Mesclun Salad With Goat Cheese, Maple Candied Walnuts, Dried Cranberries And Balsamic Vinaigrette
Traditional Caesar Salad With Croutons & Shaved Parmesan Cheese
Traditional Caesar Salad With Shrimp Or Chicken
Dinner
Chicken Or Veal Marsala (Sautéed With Fresh Mushrooms & Red Roasted Peppers With Marsala Wine)
Chicken Or Veal Francese (Bathed In Light Egg Batter & Sautéed With White Wine & Lemon Sauce)
Chicken Or Veal Picata (Sautéed With Artichoke Hearts With Lemon Caper & White Wine Sauce)
Chicken Or Veal Parmigiana (Breaded & Sautéed Crispy, Topped With Marinara Sauce, Mozzarella & Parmesan Cheese)
Poached Salmon With Dijon Dill Sauce
Stuffed Filet Of Sole (Stuffed With Crabmeat & Baked With Lemon, Butter & White Wine)
Roasted Tenderloin Of Beef (Serve With Mushroom Sauce Or Creamy Horseradish Sauce & Oven Roasted Potatoes)
Roasted Turkey Breast (Serve With Traditional Stuffing, Gravy & Mashed Potatoes)
Smoked Country Ham (Serve With Roasted Sweet Potatoes & Whole Grain Mustard)
Cheese Ravioli With Marinara Or Bolognese Sauce
Manicotti Stuffed With Ricotta Cheese, Spices & Parmesan Cheese (Topped With Marinara Or Bolognese Sauce)
Stuffed Shells With Ricotta & Parmesan Cheese (Topped With Marinara Or Bolognese Sauce)
Baked Rigatoni With Herb Ricotta & Topped With Mozzarella Cheese
Classic Meat Lasagna
Vegetarian Lasagna
Flour Cheese Lasagna (Ricotta, Parmesan, Romano & Mozzarella)
Eggplant Parmigiana
Eggplant Rollatini
Sausage & Peppers In Tomato Sauce
Sausage & Broccoli Rabe Sautéed In Olive Oil & Garlic
Tuscan Sausage Cook With Broccoli Rabe & Cannelloni Beans In Creamy Tomato Sauce
Desserts
Pies
Cakes
Cookies
Zabaglione
www.tinynewyorkkitchen.com
“Work With What You Got!”
© Victoria Hart Glavin Tiny New York Kitchen

Black Garlic
Black Garlic has been around for quite awhile and is an ingredient that chefs have been using across the country. Think of it as “sweet meets savory.” Black garlic is made when heads of garlic are aged under very specialized conditions until the cloves turn black and have a sticky date-like texture. The taste is delicious and unique with a sweet and earthy umami flavor that intensifies nearly any dish you’re creating.
Garlic bulbs are kept for weeks at low temperatures in a humid environment. The enzymes that give fresh garlic its sharpness break down. These conditions also facilitate the Maillard reaction, the chemical process that produces wild new flavor compounds responsible for the deep taste of seared meat and fried onions.
Black garlic’s flavor is described as tasting like aged balsamic, prunes, licorice, molasses, caramel, and tamarind. Use the cloves as you would roasted garlic. Purée with olive oil for a dense and sweet flavor all its own that compliments steaks, chicken, fish and seafood. Smear the paste on crostini or incorporate it into dressings. Use in a braise to intensify the umami-rich flavor of spare ribs. Add to soups, risotto, noodle and rice dishes, and cheese dips. Black garlic also pairs well with blue cheese.
Black garlic also comes in a dehydrated powder that is considered an umami pixie dust. Just sprinkle a bit of it on anything that begs for depth and earthiness.
Most likely you won’t find black garlic at your local neighborhood market, but some Whole Foods will carry it. I’m lucky enough to get mine at Kalustyan’s in New York City. You can certainly get it online at Amazon or other specialty online food sources.
“Work With What You Got!”
© Victoria Hart Glavin Tiny New York Kitchen © 2016 All Rights Reserved

Seafood
Keep your seafood fresh with safe handling and cooking tips.
Selecting Seafood
The first step in putting the best seafood on your plate is making sure that you put the best seafood in your shopping cart. Make the best choices at the store and you’ll enjoy great taste at the table every time.
When you’re shopping, make seafood the very last thing you pick up before you check out. Make sure to place it in an insulated bag for your trip home.
When purchasing clams and oysters in their shells, make sure they are alive. Shells of live clams and oysters may open naturally, but will close tightly when tapped, indicating that they are alive. Throw away any dead ones.
Fresh whole fish should have a shiny surface with tightly adhering scales, gills that are deep red or pink, free of slime, mucus and off-odor, and milk, briny aroma, similar to the ocean.
Fresh steaks, fillets, and loins should have a translucent look, fresh that is firm and not separating and a mild briny odor, similar to the ocean.
Handling Seafood
Shore to store is only one leg of the journey. It’s important to continue following safe handling recommendations once you take your seafood purchase home.
If your seafood is frozen make sure to thaw seafood in the refrigerator. Never thaw at room temperature.
Wash your hands with hot soapy water before and after handling raw seafood.
Thoroughly wash containers that held raw seafood before using them again.
Cooking Seafood
Now that your seafood is home safely, it’s time to get cooking.
Make sure that you cook fresh fillets and shellfish 1 to 2 days after purchasing.
Keep seafood refrigerated until it’s time to cook.
A general rule for baking and broiling fish is 10 minutes per inch of thickness at 400 to 450 degrees.
Fish is done when the flesh becomes opaque and flakes easily at the thickest part.
Scallops, clams, oysters, and shrimp become opaque and firm when fully cooked. Don’t overcook as this will result in loss of moisture, which affects texture and taste.
To boil, place shrimp and scallops in a large pot of boiling water (four cups of water per pound of meat) and simmer three to five minutes.
Broiled scallops and peeled and deveined shrimp will be cooked in 3 to 5 minutes.
Broiled shucked clams and oysters will be cooked in 3 to 5 minutes.
Oysters and clams should be steamed until their shells open completely. Throw away any that do not open.
Most seafood should be cooked to an internal temperature of 145 degrees. Consuming raw or undercooked seafood or shellfish may increase your risk of foodborne illness, especially if you have a medical condition.
“Work With What You Got!”
© Victoria Hart Glavin Tiny New York Kitchen © 2016 All Rights Reserved

Paleo Diet
The Paleo Diet (short for Paleolithic) is fashioned around the eating habits and available foods of our hunter-gatherer ancestors. These ancestors had to nourish themselves with the meat, fish, fruits, vegetables, nuts, and fats available to them in nature. With the benefit of large supermarkets, it’s easy today to mimic these foods in wider variety. Specific recommendations for eating Paleo will vary; however, the main ideas are the same: Reduce the risk of debilitating diseases and optimize health by eating whole, fresh, unprocessed foods and avoid foods that were not available prior to the advent of modern agriculture.
Research studies looking at the Paleo Diet have noted that eating a Paleo Diet for a short term improved the glucose control and lipid profiles in people with type 2 diabetes, compared to eating a diet containing low-fat dairy, moderate salt intake, whole grains, and legumes. Additional research indicates similar results may be possible in people without type 2 diabetes as well. The Paleo diet may result in higher levels of satiety (fullness) throughout the day when compared with a low-fat, low-calorie diet.
Paleo Do’s
Eat plenty of non-starchy vegetables and fruits.
Make fresh meat, poultry, fish, and seafood your primary sources calories.
Avoid highly processed meats that contain preservatives, artificial flavors, and sugar, such as some sausages, bacon, deli meats, and smoked fish products.
Consume nuts and seeds.
Use coconut oil, grass-fed butter, olive oil, avocado oil, nut and seed oils, and animal fats, such as goose fat or duck fat, for cooking and eating.
Balance the intake of acid-producing foods (meats, fish, salt, and cheese) with base-producing foods (fruits and vegetables) for optimal health.
Use sea salt to season foods, but try to decrease sodium intake in general.
Paleo Don’ts
Consume highly processed packaged foods.
Get heavy handed with the salt shaker.
Eat grains of any kinds. Quinoa, bulgur, rice, wheat, bread, pasta, etc., are all out.
Consume sugar (including honey and maple syrup), sweets, candy, or desserts.
Use artificial sweeteners, such as monk fruit extract, stevia, NutraSweet or Equal (aspartame), Splenda (sucralose), or sugar alcohols, such as xylitol, sorbitol, or maltitol.
Eat legumes, beans, peas, lentils, or soy, or foods make from soybeans.
Use canola or soybean oils or consume hydrogenated oils (trans fats).
Consume dairy, with the exception of fermented dairy or raw milk cheese on occasion.
“Work With What You Got!”
© Victoria Hart Glavin Tiny New York Kitchen © 2016 All Rights Reserved

Cooking Fish
Here is the simple secret to cooking fish successfully: Just don’t overcook it. Cook it until the flesh is just opaque throughout, as it will continue to cook after it has been removed from the heat.
Before cooking fillets, especially thick ones, run your fingers over the flesh to feel for any stray bones. Remove them with tweezers set aside for that purpose.
To check fish fillets or steaks for doneness, use the tip of a small knife to separate the flesh in the thickest part. It should be uniformly opaque. To check whole fish, make an incision at the backbone to see if the flesh is opaque or insert and instant-read thermometer in the thickest part near the backbone. The thermometer should read 135 to 140 degrees.
Before cooking clams, mussels, or oysters, scrub the shells well under cold running water to remove any surface sand and grit.
“Work With What You Got!”
© Victoria Hart Glavin Tiny New York Kitchen All Rights Reserve

Basic Seafood Cooking Rules
Keep your fish or shellfish in the refrigerator until right before you cook it to keep it as fresh as possible. Don’t leave it siting on the counter while you prepare the rest of the meal.
Don’t work in the same area with raw seafood and cooked seafood. There is too much danger of cross contamination.
Cook seafood with the skin on whenever possible and appropriate. It helps fillets and steaks hold their shape and keeps moisture in whole fish. Make two or three shallow slashes across the skin of the fillet or whole fish to prevent the fish from curling while cooking.
If you are baking fish that is of different thicknesses, as in fillets that taper to very thin ends, fold the thin ends under so they won’t overcook.
Try to turn fish just once, if at all, during the cooking process so there is less risk of it falling apart.
If cooking fish in a coating or batter, use small or thin pieces so both batter and fish cook at the same rate.
“Work With What You Got!”
© Victoria Hart Glavin Tiny New York Kitchen All Rights Reserved
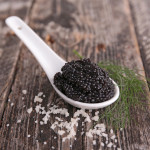
New Year’s Eve is about celebration, which most definitely calls for caviar and champagne. If you’re having a party or small get-together here are a few important tips about caviar.
Keep it simple! When serving caviar, keep it simple. You certainly don’t want to spring for something so speak jut to cover up the flavor with a lot of overkill. Caviar is intensely flavorful, and it goes well with crème fraiche or sour cream and blini. Try it with small boiled potatoes, seafood, soft or hard boiled eggs, or buttered pasta. Caviar can be used almost like a precious garnish, which can also be a great way to stretch out a small amount of it.
Keep it cool! When you bring caviar home, place in the refrigerator immediately in its tin. Place in the coldest part of your fridge, which is usually in the back of the deli drawer. If you’re making hors d’oeuvres, make sure to work quickly and serve immediately or place the completed snacks back in the fridge so that the eggs are sitting out on the table or counter. If you plan on serving the caviar straight up, place the tin or place in another bowl over crushed ice. The caviar doesn’t need to be freezing cold, but should be kept cool so the eggs hold their shape and freshness.
No metal please! Probably the most important rule with caviar is making sure it doesn’t come into contact with reactive metal. You certainly don’t want your precious caviar tasking like metal. This also goes for that beautiful tiny metal spoon you’ve been dying to use. Traditionally, a mother-of-pearl spoon is used to serve caviar. If you don’t have a mother-of-pearl spoon then don’t fret. Wood, ceramic, and glass utensils all work. Just make sure whatever non-metal spoon you use is a dainty little thing.
Leftovers you say? Holy moly, if you’re lucky enough to have leftover caviar please don’t throw it out or freeze it. Eat some more the next day and go out and buy yourself a lottery ticket. Leftover caviar is like seeing a unicorn. There are a number of ways to enjoy it by tossing it with buttered pasta or top your scrambled eggs with it. The good news is that your leftover caviar should last in your refrigerator for about a week.
Happy New Year’s Eve!
"Work With What You Got!"
© Victoria Hart Glavin Tiny New York Kitchen


