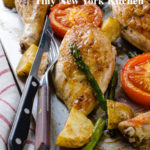
Roasting refers to proteins and vegetables cooked mostly at high temperatures in the oven. Baking uses a lower temperature to cook breads, baked goods, and casseroles.
Roasting makes any vegetable taste better. It brings out their flavor, caramelizes their natural sugars, and adds crunch. If your family doesn’t love certain vegetables like broccoli or Brussels sprouts, roasting is a great way to change their mind. Double what you’re roasting and then turn extra servings into quick meals later in the week. Cooking a little extra with one meal lets you make the most of value-sized packages of proteins and other store sales. With leftover already planned, you won’t need to lean on takeout.
Why we love to roast:
It’s Affordable! Inexpensive ingredients are tastiest when roasted. Root vegetables are browned and crisp, tomatoes and grapes are extra juicy and sweet, and tough cuts of beef are fall-apart tender. You also don’t need any special equipment to roast.
Roasting Is Healthful! Roasted foods need very little fat to cook compared to frying or sautéing. Roasting also intensifies flavors without added salt, sugar, or other ingredients.
It’s Easy! Roasted foods need little prep before they cook. And once the oven door closes, you can walk away. Fewer pans and utensils are needed, making cleanup easier too.
Essential Tools For Roasting:
Rimmed Sheet Pan: The rim keeps vegetables from falling off the sides and catches any juices from meats and fish.
Oven-Save Skillet: Go from stovetop to oven and back. Sear meats before roasting or make a pan sauce with the meat drippings after roasting.
Roasting Pan: Best for large roasts, hams, and turkeys. An inner rack lifts the meat so it can brown and crisp underneath.
Parchment Paper: Line pans to keep foods from burning and sticking, then toss for easy cleanup. If roasting at a higher temp or broiling use foil.
Metal Tongs: Flip and stir foods on a hot pan with ease. Look for tongs with a heat resistant grip.
Silicone Brush: Brush on a sticky glaze or baste foods with sauce. The silicone bristles are easy to clean.
Tips For Sheet Pan Roasting:
Jump Start Browning by preheating your sheet pan before adding vegetables.
Pat foods very dry with paper towels so the outside browns while the inside cooks through.
Cut foods to the same size and thickness so smaller pieces don’t burn.
Space out foods on the sheet pan so they have room to crisp and brown.
Let sheet pans cool before rinsing to keep the metal from warping.
©Tiny New York Kitchen © 2021 All Rights Reserved

Some people are natural bakers and some people learn as they go. I’m guessing that most people are the “learn as you go” types. Here are some little things that, are not giant revelations, but are useful tips to help you through your holiday baking.
Unwrap Butter Before Bringing To Room Temperature
Many recipes call for softened butter and if you’re using it, here’s a trick. Instructions for softening butter usually directs one to leave the butter on the counter until it reaches room temperature. It’s much better to unwrap the butter straight from the refrigerator and let it soften in the mixing bowl. When butter is cold, it lifts cleanly off the wrapper as opposed to much of it sticking to the paper and the mess it makes.
Use Butter Paper To Grease Pans
If you don’t unwrap your butter when cold and you have butter-globbed butter wrappers, use them to grease pans.
Use A Large Slotted Spoon To Separate Eggs
For separating eggs, break the whole egg into a small-size bowl. Grab the yolk with a metal slotted spoon. Use the wall of the bowl to help and let the white slink off the edge of the spoon, jiggling if the white is stubborn. The white doesn’t actually go through the wholes of the spoon, but the holes somehow seem to facilitate their departure. Do one at a time and transfer each one after so as not to taint the batch should a yolk break. If you are using just the whites and don’t need the yolks right away, stick them in the freezer for later use.
Use The Right Kind Of Measuring Cup
Use spouted cups for the measuring of wet ingredients. Use the scoop/cup type for dry ingredients. It’s hard to get an accurate amount of flour or sugar in a big glass measuring cup, and it’s hard not to spill oil or water when it’s filled to the brim in a scoop measuring cup. For wet ingredients, get to the eye level with the quantity marks and make sure they are even. For dry ingredients, spoon ingredients into the cup and then level it off with a knife.
Better Yet, Use A Scale
Unlike the rest of the world, American recipes use cups for measuring. Baking can be an exact science and as long as the recipe includes weights the scale is the most accurate way to measure.
Don’t Measure Over The Bowl
If you measure your ingredients over the bowl you just may get more in the bowl than you intended. Measure to the side of the bowl, even if it means having to wipe up a few grains of salt from the counter.
Know Your Oven’s Moods
Each oven heats differently. Ovens have hot and cool spots, which might explain uneven baking. Get into the habit of moving shelves around (middle rack is a good bet) and setting a timer to rotate pans halfway through baking. Test your oven by turning your oven to 350 F degrees, line the racks with slices of white bread and cook until they start to toast; remove them and analyze the results for a pattern. Are they even? Are the ones from the back darker than the rest?
Use An Oven Thermometer
Your oven dial may not be giving you an accurate read. The best way to avoid this is by purchasing an oven thermometer that sits inside the oven. Many bakers do this and having the ability to monitor the temperature in real-time allows you to adjust as needed.
Candy Thermometers
All candy thermometers are not created equally. Here’s how to calibrate your candy thermometer: Put the candy thermometer in a pot of water and bring it to a rolling boil, with constant and vigorous bubbles. The boiling point for water is 212 F (100 C), which is what your thermometer should read (if you are at sea level). You can leave it in there for a few minutes to make sure the reading is accurate.
Dark And Light Pans Are Not Perfectly Interchangeable
Are your cookies always overdone on the bottom? Are your roasted vegetables not getting browned enough? This one makes perfect sense. Dark pans absorb heat, light pans reflect it. Use light pans for cookies and cakes that don’t want a brown crust. Use dark pans for roasting vegetables, making pizza, or baking anything in which you want more of a crust.
Swapping Pan Sizes And Shapes
You might now want to use the pan that the recipe calls for. Pick up a copy of, Joy of Baking, and use the Baking Pan Sizes page. It has a list of every pan and its capacity, so that you can switch things around and swap pans with compatible capacities or adjust if needed.
Wear An Apron
Your apron will take a beating, but it will save your clothes!
“Work With What You Got!”
©Tiny New York Kitchen © 2019 All Rights Reserved

Chefs love cast iron’s durability and its ability to evenly retain heat. What’s old is new again. Cast iron comes in all sizes from pans that hold a single fried egg to 20-inch giants that weigh 25 pounds and take up two burners. You can pick up a cast iron pan for $25 to $300. I like 10-inch skillets for everyday cooking, which are between four to six pounds and can comfortably accommodate a pack of chicken thighs. Remember that a bigger pan is a heavier pan, which limits how easily you can maneuver it as you cook.
Make sure to season your cast iron pan. Use a paper towel to rub your pan all over with a very light coat of neutral oil like grapeseed or vegetable oil and then place in a 500-degree oven for an hour. You want your pan to have a matte dark finish. Remove from the oven and let cool. Rub another very light coat of oil all over before storing. The very best thing that you can do to maintain that new seasoning is to get cooking. Each time you cook a steak or chicken thighs, the fat adds another coat to the pan’s surface, which will create a glassy finish over time. Re-season when your pan starts to look dry and dull or if you can’t remember the last time you cooked in it. Always rub you pan down with a thin coat of neutral oil before storing.
Just because you can cook it in cast iron doesn’t mean that you should! There are some foods that you definitely should not cook in your cast iron. Fish is not something that I would cook in cast iron unless I want to infuse next day’s pancakes with the essence of fish. Tomato sauce’s high acidity reacts with cast iron, which creates an unpleasant metallic flavor. I’d skip cooking scrambled eggs in cast iron unless I want to be on dish duty for an hour or two after breakfast.
Wash your pan! Yes, you do need to wash your pan. Each time you cook with cast iron a few burnt and crusty food bits inevitably seem to stick to the pan. If you don’t scrub it clean between uses, those bits will fossilize under subsequent layers of seasoning, which create an irregular surface that will never become truly nonstick (the opposite of what you want). Wash your pan with hot water and a drop of dish soap while it’s still warm. Take care not to let the pan soak in water. Wipe down the pan and then set it over a low flame for a few minutes to fully dry. Rub all over with a very light coat of neutral oil before storing (just like you would after seasoning it). These steps are crucial for keeping your pan in fighting form against Public Enemy Number One – RUST! If you ever do have spot rust just use and old toothbrush dipped in distilled vinegar to scrub it off, let it dry, and then rub in a drop of oil. If you make a regular habit of cleaning your cast iron you’ll have a faithful companion for life.
“Work With What You Got!”
©Tiny New York Kitchen © 2018 All Rights Reserved
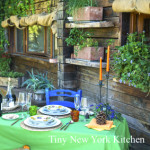
If you’re preparing for an outdoor party or get-together set the stage ahead of time by purchasing disposable plates, cups, silverware, and napkins. Make sure to have trash bags, paper towels, and cleaning supplies on hand. Clear off the counters and dishwasher in advance, so you have an open work space. If you’re dining al fresco for two then, by all means, use real dishes.
During your party or get-together make sure to leave trash and recycling bins accessible to guests. Because you’re unable to monitor everything, recruit a few people to help you take charge of specific tasks like replenishing drinks and periodically clearing away trash.
For cleanup use large trays for transporting food and supplies back to the house. Pack up leftovers, using resealable bags instead of more bulky plastic containers. Soak pots, pans, grill tools, and dishes to make them easier to clean. Designate a family member to clean one section of the yard.
“Work With What You Got!”
© Victoria Hart Glavin Tiny New York Kitchen © 2017 All Rights Reserved
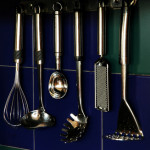
Kitchen Equipment
Great tools make for better food and a more pleasurable cooking experience, which tends to make you want to cook more often. This is a good foundation for good cooking and eating. Throw out the junk that clutters your kitchen drawers and cabinets, and invest in good quality knives, measuring cups, pans, and cutting boards. As your skills and interests progress, add more specialized tools, such as a a mandolin, a microplane grater, and a kitchen scale.
"Work With What You Got!"
© Victoria Hart Glavin Tiny New York Kitchen


