
5 Reasons To Love Coconut Oil
Coconut oil is an edible oil extracted from the kernel or meat of mature coconuts harvested from the coconut palm. Because of its high saturated fat content, it is slow to oxidize and is resistant to spoiling.
1. Butter Replacement. Coconut oil can replace butter, which is great for vegans, who up until now have had few good choices when converting non-vegan recipes that contain butter.
2. Great For Athletes. Coconut oil is great for athletes because it converts to energy faster than many other fats, making it a smart addition to workout snacks.
3. Weight Loss. Coconut oil may help you slim down. A study undertaken a few years ago suggests that coconut oil may help you lose weight, when consumed in small quantities instead of other fats.
4. Sautéing. Coconut oil is great for sautéing. Use coconut oil occasionally instead of olive oil to add a subtle flavor that is delicious in tropical or Indian recipes.
5. Good Cholesterol. Coconut oil boosts good cholesterol. While coconut oil is full of saturated fat, about half is medium-chain fatty acids, which seem to help raise HDL (good) cholesterol. Coconut oil is still high in fat, however, so consume in moderation.
“Work With What You Got!”
© Victoria Hart Glavin Tiny New York Kitchen © 2015 All Rights Reserved

Tips For Deep-Frying
Deep-frying is such a guilty pleasure because no cooking technique gives food that irresistible crunchiness. Because it is also one of the least frequently used cooking methods, here are some important tips to help you achieve Deep-frying nirvana.
Choose the right pot. To deep-fry properly, the food should cook in 2 to 3 inches of hot oil. Choose a pot that is at least 6 inches deep to allow for bubbling without bubbling over. Cast iron (enameled or not) holds the heat well, which makes a good choice.
Use reasonably priced cooking oil. Canola, cottonseed, safflower, or a generic vegetable oil blend will all do. Much is made of the smoke point of oil (the temperature where the oil starts to smoke and break down) for deep-frying, and expensive peanut oil is often singled out as being especially desirable (watch those peanut allergies). Food should not be deep fried at temperatures above 400-degrees because it will burn before it has a chance to cook through. Most refined clear cooking oils have a smoke point of about 425-degrees (except for olive oil), so if you are deep frying at the correct temperature, the oil’s smoke point is not an issue.
Don’t reuse deep frying oil. This is another reason to use reasonably priced oil. Although you can strain the cooled oil for another round or two of deep-frying, this is a sure way of transferring unwanted flavors to your food, and the freshness of the oil obviously is reduced with storage. You don’t want to cook your tortilla chips in the same oil you used for cooking fish and chips. Just budget the price of the oil into the cost of the recipe, throw away after using, and leave it at that.
Use a deep-frying thermometer. It’s the only way to get an accurate reading of the oil temperature. Be sure the end of the thermometer is totally submerged in the oil. Keep the heat on high to maintain the correct oil temperature.
To reduce deep-frying odors, cook outside if possible. There is no reliable way to avoid the odors caused by deep-frying inside. But when the weather is cooperating, plug in an electric kettle and do your frying on your porch or patio.
Let the oil return to its correct frying temperature between batches. In most cases, you may add the food to 375-degree oil, but the temperature will drop to 335-degrees or so for the actual cooking. After removing the food, be sure to reheat the oil over high heat to its original starting temperature.
Use a wire skimmer to remove food from the oil. Also called a spider, these wide-mesh skimmers do a better job of draining away oil than a slotted spoon or slotted skimmer. They are commonly used in Asian cooking, so look for them at kitchenware stores near the woks.
Don’t drain fried foods on paper. Most people use paper towels or brown paper bags to absorb the fat from drained foods. A crunchy coating can soften where it comes into contact with the paper because the steam builds up at the contact point and has nowhere to go but into the coating. For the crispiest result, drain the food on a wire cooling rack set over a rimmed baking sheet, so the food comes into contact only with thin wires.
Keep deep-fried foods warm in the oven before serving. Deep-fried food is best served piping hot right out of the pot, which isn’t always possible when cooking multiple batches. Once you have put the food on the wire rack and baking sheet setup, slip the whole thing into a preheated 200-degree oven for up to 10 minutes.
Add salt JUST before serving. Salt can soften homemade potato chips and other fried foods, so to keep them from losing their crunch, sprinkle on the salt at the last minute.
“Work With What You Got!”
© Victoria Hart Glavin Tiny New York Kitchen


Constitution Week – Foods of Our Forefathers Part II
The standard grains included wheat, barley, oats and rye. Finely ground wheat flour, “boulted” or sieved through a fine cloth, was used to make white bread for the rich early in the fifteenth century. Most of the gentry ate what we would call cracked or whole wheat bread. The poor ate bread of coarse-ground wheat flour mixed with oats, ground peas or lentils.
During the ocean crossing to the New World, immigrants subsisted on an even more monotonous diet for weeks. The Mayflower provisions were typical – brown biscuits and hard white crackers, oatmeal, and black-eyed peas, plus bacon, dried salted codfish and smoked herring for animal protein. The only vegetables on the trip were parsnips, turnips, onions and cabbages. Beer was the beverage.
As pilgrims set foot on their new homeland, they hardly knew what to expect. Each brought a stock of basic foods to get them through the first year, as well as a variety of basic utensils and kitchen tools. Also included were the essential accompaniments for whatever they found or could raise when they arrived – a bushel of coarse salt, 2 gallons of vinegar, a gallon of “oyle” and a gallon of aquavite.
Nothing they had been told, however, prepared them for the staggering variety of totally unfamiliar plants that were being used as food by the Indians – corn, sweet potatoes, peppers, pumpkins, squash, sunflower seeds and cranberries were examples. In addition to the strange food, there were strange ways of cooking. In Europe, meat was boiled; the Indians, lacking iron pots, roasted theirs on a spit over a fire. The Indians also had a long, slow cooking process that yielded what we now call Boston baked beans, and they used a fire-heated, rock-lined pit for what we would now call a clam-bake. Where the pilgrims were accustomed to raised wheat bread, the Indians introduced them to corn based spoon bread. Corn also provided hominy, used as a vegetable, and later, of course, as grits. For sweetening, the Indians used maple syrup and honey, as sugar was unknown.
Although many of the food the Pilgrims and other colonists found were totally strange, others had travelled the route before them. The Spanish had brought pigs, which thrived especially in areas where peanuts grew. Peaches and oranges were also native which spread throughout climatically suitable areas in a short time.
Even the white potato was an early migrant to the New World, following a zig-zag route, from its original home in Peru to Spain in 1520, from Spain to Florida forty years later, from Florida to England in 1565, always being treated as a culinary curiosity. By the 1600’s they had become a popular food staple in Ireland, and were carried by Colonists both to New England and Virginia, where they quickly established themselves. There they served as a valuable source of vitamin C, protein and trace minerals, in addition to the starch.
Potatoes, incidentally were significant in another, later migration to America: the climate in Ireland proved so amenable to their culture, and their nutrient content was so high, that many poor Irish farmers grew only potatoes on their small farms. In fact, as fathers subdivided farms for their sons, many found themselves supporting whole families on the potatoes grown on less than an acre of ground, while the family itself lived in a roofed-over ditch. When blight struck in 1845, the sole food source of millions of people literally withered away before their eyes. A half-million of the 8 1/2 million population died of starvation or disease, and 1 1/2 million emigrated to England or America – following the “Irish potatoe.”
Spices were in short supply in America’s earliest days. The English pretty well monopolized the trade with the New World. Within a few years, however, settlers had planted the seeds they had brought or imported, and most had adapted to the climate and were flourishing in orderly rows and patterns in kitchen gardens all along the Atlantic Coast. There were a few – ginger, pepper, cloves, mace, cinnamon, nutmeg, and allspice – that simply couldn’t cope with the weather or soil – and were scarce. Olive oil, lime juice, prunes and saffron were available, but only at high prices.
To Be Continued…
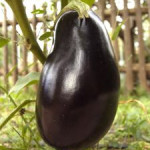
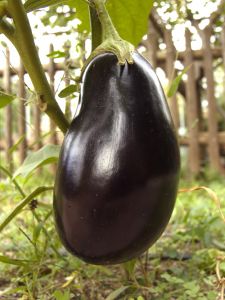 Eggplant Essentials
Eggplant (also known as Aubergine or Melongene) is an egg-shaped vegetable with a typically dark purple, shiny skin, though some are yellow or white. Eggplant was so named because the delicate white varieties that resemble eggs. Eggplant grows on a plant (Solanum Esculentum) in the nightshade family and is actually a fruit and not a vegetable. It is actually technically a berry. Eggplants have not always been popular. They were once known as “mad apples,” because it was thought that they caused insanity or death. They have been used in China since 600 BC. Thomas Jefferson first brought the eggplant to America from France in the eighteenth century. Male eggplants are rounder and smoother at the blossom end. They have fewer seeds which are bitter. Female eggplants are more oval and the blossom end is usually deeply indented. They tend to have more bitter seeds.
Eggplants are at their best from July through September. Select smooth, firm, glossy-skinned eggplants with green caps and stems. Smaller eggplants are sweeter than large ones. The fewer the seeds in an eggplant, the sweeter the eggplant. The more seeds in an eggplant, the older the eggplant.
Store eggplants in perforated plastic bags in the vegetable crisper of the refrigerator for four to five days.
Eggplants should be cooked immediately after peeling or cutting because the exposed flesh discolors rapidly due to oxidation. To prevent this start cooking as soon as you have cut it. If there is an unavoidable delay, promptly coat the surface with lemon juice or submerge with pieces in acidulated water.
Salt the flesh of a large cut-up eggplant to draw out any bitterness. For frying, it is always good to salt the eggplant or otherwise remove excess moisture. Only eggplants with tough, thick skins need to be peeled.
Eggplants should be cooked in only the minimum amount of fat or oil or without any at all because they have inner air pockets. Eggplants can absorb several times their weight in oil, even when breaded. Cooking with too much oil or fat breaks down the eggplant’s texture.
Slicing eggplants is so much easier when using a serrated knife.
 Sautéing Tips
Some foods need moist, long cooking to tenderize them while others just require a quick sauté in a skillet. Sauté means “jump” in French which describes the tossing and turning in the skillet during the cooking process. There are a few basic secrets to perfect sautéing that will help you get better cooking results.
The trick to successful sautéing is to use a medium-high heat and a small amount of oil. As a matter of fact meats and other protein-based foods should not be turned too often because extended contact with the hot skillet will brown the surface of the food which will deliver extra flavor. Heat the skillet over a medium-high heat and if the pan is too hot you will burn the outside of the food before the inside is cooked so turn down the heat a bit.
Do not use butter for sautéing. Use oil. Butter contains milk solids that burn and smoke at high temperatures. Some cookbooks call for mixing butter and oil which supposedly increases the smoke point of the butter. This does not remove the milk solids that are the problem. You can, however, use clarified butter, but it is easier to use oil for cooking meats. If you want a butter flavor then use it in a pan sauce.
Thick cuts of meat can be difficult to cook through when sautéing. You may want to use a double-cooking method for thick cuts. Double-cut pork and lamb chops, porterhouse steaks, and large bone-in, skin-on chicken breast halves are too thick to cook through in a skillet on the stove top. It is best to brown them in the skillet, and then finish cooking them in a 400° F oven. Be sure that your skillet is ovenproof.
Make a pan sauce to take advantage of the browned bits in the pan which are loaded with delicious flavor. Remove the meat from the skillet and tent loosely with aluminum foil to keep the meat warm. Pour off the fat from the skillet and return the skillet to the medium-high heat. Add a couple of tablespoons of minced shallots and a tablespoon of butter. Do not add the butter alone as the skillet may be too hot and the butter will burn. The shallots will act as insulation. Cook for a minute or so to soften the shallots and then add about 1 cup of an appropriate stock. Wine may seem like a good choice, but it can be too strong. Boil the stock, scraping up the bits in the pan with a wooden spoon or spatula until it is reduced to about 1/2 cup. Remove from the heat and whisk in 1to 2 tablespoons of cold butter (a tablespoon at a time) to thicken the sauce lightly.
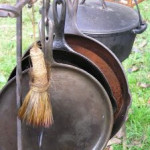
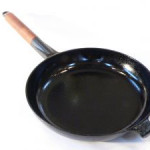
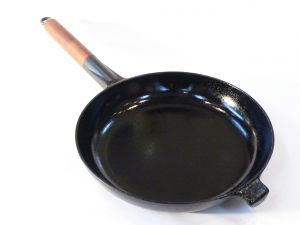
 Tiny New York Kitchen Household Hints Caring For Cast Iron Pans
Cast iron pans have become popular again. It is important to clean them properly. To make your own cast iron skillet cleaner just sprinkle lemon juice and salt on the rusty iron skillet. Wipe out the rust and then season with a lot of oil. Put the skillet into the oven (200° F) for one hour. Remove from the oven and wash the skillet. Dry thoroughly and apply with more oil. Wipe off any excess oil. Never let cast iron air dry or it will rust.


