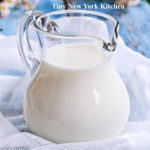
Buttermilk is a fermented dairy drink that was traditionally the liquid left behind after churning butter out of cultured cream. Today, most modern buttermilk is cultured. Cultured buttermilk was first commercially introduced in the US in the 1920s. Commercially produced buttermilk is milk that has been pasteurized, homogenized, and then inoculated with a culture of Lactococcus lactis to simulate the naturally occurring bacteria in the old-fashioned buttermilk. The tartness of cultured buttermilk is primarily due to lactic acid produced by lactic acid bacteria while fermenting lactose, the primary sugar in milk.
Condensed buttermilk and dried buttermilk are very important in the food industry. Liquid buttermilk is used primarily in the commercial preparation of baked goods and cheese. Buttermilk solids are used in ice cream manufacturing as well as being added to pancake mixes to make buttermilk pancakes.
Buttermilk reacts with the baking soda and powder to give quick breads their rise and tender crumb. The reaction is best at the beginning, you’ll want to get the loaf in the oven right after mixing the wet and dry ingredients. Buttermilk can also be used in marinating meats, especially chicken and pork, because the lactic acid helps to tenderize, retain moisture, and allows added flavors to permeate the meats.
©Tiny New York Kitchen © 2021 All Rights Reserved

Have you ever found yourself making a recipe and realize that you don’t have an ingredient that it’s calling for? Here are a few ingredient alternatives that you might have on hand instead.
Mayonnaise
For 1 cup of mayonnaise use 1 cup sour cream or 1 cup plain yogurt with a pinch of salt.
Honey
For 1/4 cup of honey use 1/4 cup maple syrup or light corn syrup.
Buttermilk
For 1 cup of buttermilk use 1 tablespoon vinegar or lemon juice mixed with enough milk or plant-based milk to reach 1 cup.
Butter
If butter is used for baking or in a solid form, solid coconut oil is a good 1 to 1 substitution. If it’s melted or for cooking use olive oil.
Oil
When it comes to oil for baking, applesauce is a great substitute. For 1 cup of oil, use 3/4 cup applesauce mixed with 1/4 cup melted butter. In cooking, any neutral refined oils like canola, olive, vegetable, corn, and peanut oils are interchangeable.
Breadcrumbs
For 1 cup of breadcrumbs use 1 cup of cracker crumbs, finely crushed potato chips, tortilla chips, or pretzels pulsed in your food processor.
Brown Sugar
For 1 cup of light brown sugar, use 1 cup white sugar plus 1 tablespoon molasses. For 1 cup of dark brown sugar, use 2 tablespoons molasses. The sugar and molasses should be mixed together thoroughly.
Baking Powder
For 1 teaspoon baking powder, stir or sift together 1/4 teaspoon baking soda plus 5/8 teaspoon cream of tartar.
“Work With What You Got!”
©Tiny New York Kitchen © 2020 All Rights Reserved

Just What Do Expiration Dates Mean?
Best If Used By/Before: Indicates how long the product will be at its best flavor or quality. After that date, it’s not necessarily unsafe to consume, but the quality might be degraded.
Sell By: Tells the store how long to keep an item on the shelf and when to take it off. Milk is a good example. A grocer has to sell a gallon of milk by that date, but milk past the sell by date is often still usable. When properly stored, milk, like other products will keep for several days after the sell by date. Before tossing, give it the “sniff” test. Odds are it’s still good.
Use By: Is the final recommended day to use the product for best quality. Eggs have a “use by” date which is similar to a “best if used by” date. That’s important; it’s hard to know when eggs go bad.
Absolute Dates: The expiration date on infant formula is absolute. Do not open or use expired formula.
“Work With What You Got!”
©Tiny New York Kitchen © 2020 All Rights Reserved

Here is another use for the whole grains and seeds that you’re seeing at the store. Top off with delicious flavoring, which are also tasty on oatmeal.
Amaranth (3/4 Cup)
Bring 2 1/4 cups water or milk to boil in saucepan. Stir in amaranth. Reduce heat to low, cover and simmer until tender. Cooking time is 25 to 30 minutes. Stir occasionally. Remove from heat and mix in or top with dried cherries, coconut sugar, macadamia nuts, vanilla, banana, or cacao nibs. Serves 2
Millet (3/4 Cup)
Bring 1 1/2 cups water or milk to boil in saucepan. Stir in millet. Reduce heat to low, cover and simmer until tender. Cooking time is 15 to 20 minutes. Stir occasionally. Remove from heat and mix in or top with chopped dates, demerara sugar, hazelnuts, cloves, clementine, or granola. Serves 2
Quinoa (3/4 Cup)
Bring 1 1/2 cups water or milk to boil in saucepan. Stir in quinoa. Reduce heat to low, cover and simmer until tender. Cooking time is 15 to 20 minutes. Stir occasionally. Remove from heat and mix in or top with dried apricots, agave syrup, pine nuts, cardamom, blueberries, or toasted coconut.
Serves 2
“Work With What You Got!”
©Tiny New York Kitchen © 2018 All Rights Reserved

The labels of many chocolate brands now state the amount of cacao (which means cocoa beans or any part of the beans, including cocoa butter) in their chocolate. The higher the cacao content, the less sugar the chocolate contains. You will also see chocolate described as bittersweet or semisweet. The USDA puts all sweetened dark chocolate, with cacao with a minimum of 35 percent chocolate liquor (ground cocoa beans without any additives), in the same category. These designations vary from brand to brand: one manufacturer’s bittersweet chocolate can be another manufacturer’s semisweet.
The average supermarket chocolate has 55 to 60 percent cacao. Chocolate with more than 60 percent cacao has what is considered a high cacao percentage. You may appreciate its bracing bitterness for eating, but because it contains so much more cacao than traditional chocolate, it can cause problems in cooking. Some contemporary cookbooks include the desired cacao percentage for the chocolate called for in their recipes, a plus for users. Unless a recipe specifically calls for a high-percentage chocolate, you are safest with a chocolate labeled 55 to 60 percent cacao.
Unsweetened chocolate is 99 to 100 percent cacao with no added sugar (some brands add a miniscule amount of vanilla and the emulsifier lecithin).
Milk chocolate has a minimum 10 percent chocolate liquor and includes dry milk solids and additional sugar to make it extra creamy and sweet. The latest trend is toward a higher percentage of chocolate liquor than in the past.
The best white chocolate has a base of cocoa butter, with sugar and milk solids added. Inferior brands substitute other plant fats, such as hydrogenated palm oil, for the cocoa butter, and are labeled white confectionary coating.
Traditionally, chocolatiers wanting a tiny, delicate chocolate coating for their creations would use couverture chocolate, which has a minimum of 32 percent cocoa butter to help it melt more smoothly and increase its fluidity. This extra measure of cocoa butter separated it from regular eating chocolate. However, the standard of today’s chocolate has improved to the point where virtually all chocolate has enough cocoa butter to be considered couverture, so the term is falling out of use.
Use a serrated knife to chop chocolate. Actually, think of shaving the chocolate from the block rather than hacking at it. Start at the corner of the bar and work backward, moving the knife about 1/4 inch after each cut. When you’ve lost the point of the corner, turn the bar around and start at another corner.
It may sound like a time-saver, but don’t use a food processor to chop chocolate. The chocolate can melt from the heat generated by the friction.
Small chunks of high-quality chocolate (pistoles) are a great time-saver if you need to melt chocolate and want to skip the chopping step. Semisweet chocolate chips may look similar, but they aren’t a good substitute. They contain a high percentage of lecithin, which helps them keep their shape during baking, so they don’t melt.
Chocolate has two enemies, heat and water. Use gentle heat when melting dark chocolate, as it scorches above 120 degrees F (milk and white chocolates scorch at 110 degrees F and need extra attention). Keep all surfaces and utensils dry. If you use a double boiler to melt chocolate, never allow the water to boil. The resulting steam can get into the chocolate and thicken it irretrievably, which is known as seizing.
The traditional method for melting chocolate is in a double boiler. It melts at below body temperature, so very hot water works fine. Just bring about 2 inches of water to a boil in the lower pan of the double boiler, then remove it from the heat. Place the top pan with the chopped chocolate over the low pan, making sure the top pan doesn’t touch the water. Chocolate holds its shape even when warm, so stir the chocolate frequently with a rubber or silicone spatula while it melts to check its progress. Be careful not to overheat chocolate, as it can scorch easily.
A variation on the double boiler method is good for large amounts of chocolate. Put the chopped chocolate in a wide stainless-steel bowl. Now place the bowl in a large skillet of very hot water, taking care not to splash any water in the chocolate. With a larger surface area of the chocolate exposed to heat, the chocolate will melt more quickly than in a double boiler.
You can melt chocolate in a microwave oven, but you must be careful not to overheat it. Use medium (50 percent) power for 40 seconds, and then check the chocolate. If it has not melted, continue to melt it, checking it at 20-second intervals. When you take it out of the microwave, the chocolate may not look melted, but sometimes brief stirring will push all or most of it to the melted stage. If all the chocolate has not melted, return it to the microwave for about 15 seconds at medium power. Because of the wide variability in the power put off by microwave ovens, you will have to learn to judge how quickly your microwave melts chocolate.
“Work With What You Got!”
© Victoria Hart Glavin Tiny New York Kitchen © 2017 All Rights Reserved

Generally animal products are higher in fat than plant foods, but it’s not necessary to cut out all meat and dairy products to keep your fat intake reasonable. Low-fat dairy foods, lean and well trimmed meat, and skinless poultry provide the same amounts of vitamins and minerals as their fattier counterparts. Skinless poultry, fish, dry beans, and split peas are the “slimmest” foods in this category. By removing the skin from poultry, you reduce the fat by almost one half. Most seafood is low in fat and also contains beneficial omega-3 oils, which have been linked to lowering blood cholesterol. Dry beans also provide the body with fiber, which is necessary for digestion.
You can enjoy red meat if you choose lean cuts and trim away all the visible fat (marbled fat cannot be trimmed away). Here are some good choices:
*Beef eye round, top round, tenderloin, top sirloin, flank steak, top loin, and ground beef. Choose ground sirloin; it’s 90 to 93 percent lean.
*Veal cutlets (from the leg) and loin chops.
*Pork tenderloin, boneless top loin roast, loin chops, and boneless sirloin chops.
*Lamb, boneless leg (shank portions), loin roast, loin chops, and leg cubes for kabobs.
Here are some suggestions to make trimming excess fat from your diet easier:
*Choose lean cuts of meat and trim off all the visible fat before cooking. Remove skin from poultry before or after cooking.
*Broil meat on a rack so the fat can drop away.
*Substitute ground chicken or ground turkey for ground beef. Look for ground turkey breast or chicken breast; otherwise, it may contain skin and therefore have as much fat as ground beef.
*Substitute protein-packed dried legumes, like beans and lentils, for meat in casseroles.
*Chill soups and stews overnight so you can remove all the hardened fat from the surface.
*Be skimpy with fat. Use nonstick pans and nonstick cooking spray, or sauté in a small amount of broth or water. Don’t just pour oil into a skillet; it’s easy to add too much. Measure or use a pastry brush to coat pans with a thin layer of oil. When baking, coat pans with a spritz of nonstick cooking spray instead of oils or fats. Kitchenware shops carry oil sprayers you can fill with your favorite oil.
*Experiment with low fat or skim milk, low fat sour cream and cheese, and nonfat yogurt. They provide the same amounts of calcium and protein as the whole milk varieties, but with less fat or none at all.
*When making dips, substitute nonfat plain yogurt for sour cream.
*Use fresh herbs and zesty seasonings literally.
*Choose angel food cake instead of pound cake, especially when making cake-based desserts like trifle.
*To reduce fat and cholesterol, you can substitute 2 egg whites for 1 whole egg in recipes, but don’t substitute egg whites for all the whole eggs when baking. The dessert will have better texture and flavor if you retain a cold or two.
*Replace sour cream with buttermilk or yogurt in recipes for baked goods.
“Work With What You Got!”
© Victoria Hart Glavin Tiny New York Kitchen © 2017 All Rights Reserved
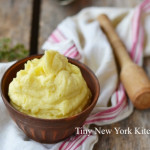
Old-School Mashed Potatoes
Mashed potatoes are as American as Thanksgiving itself. Variations range from sriracha to pumpkin spice foie gras mashed potatoes (I wouldn’t recommend that latter). At Thanksgiving, nothing beats a well-made bowl of classic mashed potatoes, however. As with many other deceptively simple dishes, there are reasons why sometimes you have good mashed potatoes, and other times you have fabulous mashed potatoes. Here are my well-kept secrets to make those fabulous ones, served piping hot, and ready for that giant ladle of gravy.
Potatoes with a high starch content (the kind used for baking) provide the traditional flavor and texture. The same starch that gives a baked potato its fluffy interior also contributes to perfect mashed potatoes. Yellow-fleshed varieties like Yukon golds or yellow Finns are excellent as well, but they turn out the same color as mashed turnips, which may be disconcerting to potato purists. If you live near a farmers’ market, take the potato farmers’ advice on local favorites as they may suggest an interesting heirloom variety that will become your favorite.
Purchase your potatoes about a week ahead of time and age them in a cool, dark place. Do not place them in the refrigerator. Mature potatoes are drier and mash up lighter. Please don’t let them sprout eyes, though.
Make mashed potatoes just before serving. Reheated mashed potatoes leave me shivering.
Make sure not to overcook the potatoes. They should just yield to a sharp knife when pierced. If the drained potatoes seem soggy, just return them to the pot and cook over a low heat for about 2 minutes, stirring constantly until they begin to stick to the bottom of the pot. Doing this forces the excess steam out of the potatoes and dries them out.
Mash the drained potatoes in the still warm cooking pot with HOT milk. A cold bowl and cold milk make for lumpy and lukewarm potatoes. The precise amount of milk is a matter of taste, so use more or less to reach your desired consistency.
You’ll need an efficient mashing utensil. Some cooks swear by a potato ricer (which does make the smoothest potatoes by the way), as long as you enlist another pair of hands to make the job go quickly. You may use an electric hand mixer. If you want to use a low-tech, old school hand potato masher, go to a restaurant supply store and get a big one, or the job will take forever. The potatoes will be cooling off by the second and we don’t want that happening. Never ever mash potatoes in a food processor or you’ll get starchy, sticky, gummy mashed potatoes that could be used for gluing kindergarten craft projects.
Season well with salt and pepper. Use your taste to determine amounts. I use kosher salt mostly, but you may use your favorite type of salt. White pepper is spicier than black pepper, but will give you pristine looking mashed potatoes. But, of course, use black if you want to.
www.tinynewyorkkitchen.com
“Work With What You Got!”
© Victoria Hart Glavin Tiny New York Kitchen © 2016 All Rights Reserved

Saffron
Highly prized as a dye, medication and culinary spice since Greek and Roman times, saffron is the stigma of a type of crocus, Crocus sativus, which was once grown all over Europe, including in England. It has a distinctive and lasting aroma, and a pleasant pungency if used sparingly. Because of its striking color, as well as its distinctive flavor, saffron is frequently added to celebration dishes; for example, pilaus from India, Spanish paella and Italian risotto Milanese. Bouillabaisse, the famous French fish and shellfish soup-stew, is flavored with saffron. The spice is also widely used in sweet recipes, including milky rice and sweet custard-like desserts. Baked goods flavored with saffron include breads and cakes.
Saffron threads can be infused (steeped) in a little warm water or milk until the color of the liquid is even. Add the liquid and the threads to the dish, usually towards the end of the cooking process. Saffron powder can be added to food without soaking, but not to hot oil.
“Work With What You Got!”
© Victoria Hart Glavin Tiny New York Kitchen © 2016 All Rights Reserved
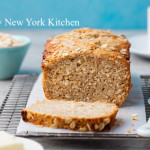
Quick Breads
For mouth-watering breads that don’t require a lot of time, turn to quick breads. By using baking powder, baking soda, steam, or air instead of yeast to leaven dough. An advantage of quick breads is their ability to be prepared quickly and reliably, without requiring time-consuming skilled labor and the climate control needed for traditional yeast breads. Quick breads include banana bread, beer bread, biscuits, cornbread, cookies, muffins, cakes, pancakes, brownies, scones, and soda bread.
Almost all quick breads have the same basic ingredients: Flour, leavening, eggs, fat (butter, margarine, shortening, or oil) and a liquid such as milk. Ingredients beyond these basics are added for variations of flavor and texture. The type of bread produced varies based predominantly on the method of mixing, the major flavoring, and the ratio of liquid in the batter. Some batters are thin enough to pour and others are thick enough to mold into lumps.
There are four main types of quick bread batter:
Pour Batters: Such as pancake batter, have a liquid to dry ration of about 1:1 and so pours in a steady stream – also called a “low-ratio” baked good.
Drop Batters: Such as cornbread and muffin batters, have a liquid to dry ratio of about 1:2.
Soft Doughs: Such as many chocolate chip cookie doughs, have a liquid to dry ratio of about 1:3. Soft doughs stick significantly to work surfaces.
Stiff Doughs: Such as pie crust and sugar cookie doughs, have a liquid to dry ratio of 1:8. Stiff doughs are easy to work in that they only minimally stick to work surfaces, including tools and hands – also called “high-ratio” baked goods.
Preparing a quick bread generally involves two mixing containers. On contains all dry ingredients (including chemical leavening agents or agent) and one contains all wet ingredients (possibly including liquid ingredients that are slightly acidic in order to initiate the leavening process). In some variations, the dry ingredients are in a bowl and the wet ingredients are heated sauces in a saucepan off-heat and cooled.
During the chemical leavening process, agents (one or more food-grade chemicals – usually a weak acid and a weak base) are added into the dough during mixing. These agents undergo a chemical reaction to produce carbon dioxide, which increases the baked good’s volume and produces a porous structure and lighter texture. Yeast breads often take hours to rise, and the resulting baked good’s texture can vary greatly based on external factors such as temperature and humidity. By contrast, breads made with chemical leavening agents are relatively uniform, reliable, and quick. Usually, the resulting baked good is softer and lighter than traditional yeast breads.
Chemical leavening agents include a weak base, such as baking soda (sodium bicarbonate) plus a weak acid, such as cream of tartar, lemon juice, or cultured buttermilk, to create an acid-base reaction that releases carbon dioxide. Quick bread leavened specifically with baking soda is often called “soda bread.” Baking powder contains both an acid and a base in dry powdered form, and simply needs a liquid medium in which to react. Other alternative leavening agents are egg whites mechanically beaten to form stiff peaks, as in the case of many waffle recipes, or steam, in the case of cream puffs.
There are three basic methods for making quick breads, which may combine the “rise” of the chemical leavener with advantageous “lift” from other ingredients.
The Stirring Method: Also known as the quick-bread method, blending method, or muffin method is used for pancakes, muffins, corn bread, dumplings, and fritters. This method calls for measurement of dry and wet ingredients separately, then quickly mixing the two. Often the wet ingredients include beaten eggs, which have trapped air that helps the product to rise. In these recipes, the fats are liquid, such as cooking oil. Using mixing is done using a tool with a wide head such as a spoon or spatula to prevent the dough from becoming over-beaten, which would break down the egg’s lift.
The Creaming Method: Frequently used for cake batters. The butter and sugar are “creamed” or beaten together until smooth and fluffy. Eggs and liquid flavorings are mixed in, and finally dry and liquid ingredients are added in. The creaming method combines rise gained from air bubbles in the creamed butter with the rise from the chemical leaveners. Gentle folding in of the final ingredients avoids destroying these air pockets.
The Shortening Method: Also known as the biscuit method, is used for biscuits and scones. This method cuts solid fat (whether lard, butter, or vegetable shortening) into flour and other dry ingredients using a food processor, pastry blender, or two hand-held forks. The layering from this process gives rise and adds flakiness as the fold of fat melts during baking. This technique is said to produce “shortened” cakes and breads, regardless of whether or not the chosen fat is vegetable shortening.
Quick bread originated in the United States at the end of the 18th century. Before the creation of quick bread, baked goods were leavened with either yeast or by mixing dough with eggs. The discovery of chemical leavening agents and their widespread military, commercial, and home utilization in the United States dates back to 1846 with the introduction of commercial baking soda in New York by Church and Dwight of “Arm & Hammer” fame. This development was extended in 1956 by the introduction of commercial baking powder in Massachusetts, although the best known form of baking powder is “Calumet”, which was first introduced in West Hammond and Hammond, Indiana (later Calumet City, Illinois) in 1889. Both forms of food-grade chemical leaveners are still being produced under their original names.
During the American Civil War (1861-1865) the demand for portable and quickly made food was high, while skilled labor for traditional bread making was scarce. This encouraged the adoption of bread, which was rapidly made and leavened with baking soda, instead of yeast. The shortage of chemical leaveners in the American South during the Civil War contributed to a food crisis.
As the Industrial Revolution accelerated, the marketing of mass-produced prepackaged foods was eased by the use of chemical leaveners, which could produce consistent products regardless of variations in source ingredients, time of year, geographical location, weather conditions, and many other factors that could cause problems with environmentally sensitive, temperamental yeast formulations. These factors were traded off against the loss of traditional yeast flavor, nutrition, and texture.
www.tinynewyorkkitchen.com
“Work With What You Got!”
© Victoria Hart Glavin Tiny New York Kitchen © 2016 All Rights Reserved
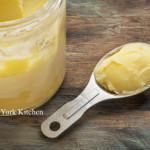
How To Clarify Butter
Some recipes call for clarified butter. To make it, just melt butter over a medium-low heat until the milk solids separate and rise to the top, 3 to 5 minutes. Let cool, then skim off the white foam and discard. Spoon remaining clarified (clear) butter into a bowl; discard the solids left at the bottom of the pan.
“Work With What You Got!”
© Victoria Hart Glavin Tiny New York Kitchen © 2016 All Rights Reserved


