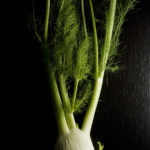
Fennel is a member of the carrot family, though it is not a root vegetable. The base of its long stalk weaves together to form a thick and crisp bulb that grows above ground. Fennel’s leaves, seeds, and stems all have a sweet, faintly anise like flavor. The stems of fennel swell and overlap at the base of the plant to form a bulb with white to pale green ribbed layers that are similar to celery in appearance and texture. Light and feathery, the pretty green leaves slightly resemble fresh dill. Use them as a bed for steaming fish or in small amounts as a garnish.
Originating in the Mediterranean, the fennel bulb appears often in Italian and Scandinavian cuisines. It can be eaten raw, grilled, baked, braised, or sautéed. While grilling, you can toss a handful of dried or fresh fennel stems onto the charcoal to infuse meat or fish with a light anise flavor.
When selecting fennel choose fresh bulbs that are smooth and tightly layered with cracks or bruises. Fat, rounded bulbs with white and pale green color will tend to be more succulent than thin or yellow ones. Avoid any with wilted leaves or dried layers. Now available year-round, fennel is at its peak from late fall through winter. Grocers sometimes incorrectly liable fennel as sweet anise.
When storing, keep fennel bulbs in a perforated plastic bag in the refrigerator for up to 5 days. If kept too long, they will lose their flavor and toughen.
When preparing, remove the green stems and leaves, saving them to flavor or garnish other dishes such as soups or fish. Discard the outer layer of the bulb if it is tough and cut away any discolored areas. Cut the bulb in half lengthwise and remove the base of the core as it is thick and solid. Gently separate the layers with your hands and rinse well to remove any grit between them. Slice or cut as your recipe directs.
©Tiny New York Kitchen © 2021 All Rights Reserved

There is no salt in pasta dough, so be sure to put enough salt in the cooking water. First, use plenty of water: about 4 quarts for 1 pound of pasta. Because salt slows the rate at which water comes to a boil, don’t add salt until after water is bubbling. Use a heaping teaspoon for every quart water. No need to measure. Instead just taste the water. You should be able to detect the salt.
Always serve pasta from a warmed serving bowl. Place the bowl in the sink, and set the colander inside the bowl. Drain the pasta, letting the water drain into the bowl. Lift up the pasta in the colander, give it a good shake to drain further, and then pour the pasta into the still warm cooking pot. Add the sauce and combine. Pour out the water from the serving bowl, and dry the bowl. Transfer the pasta to the warm bowl and serve.
“Work With What You Got!”
©Tiny New York Kitchen © 2020 All Rights Reserved

Making a classic Italian bread salad is a nice way to use up those summer tomatoes.

Make the most out of ripe summer tomatoes. Create delicious tomato, mozzarella, and basil salads for a fast and fresh summer side dish.

Use simple pizza dough to make smaller individual pies that guests can top themselves or make 2 larger ones for family pizza night.

The perfect combination of chicken Parm and hearty Italian meatballs. Each bite is packed with cheese and satiating protein. Pair with whole grain pasta or zucchini noodles.
“Work With What You Got!”
©Tiny New York Kitchen © 2019 All Rights Reserved

Cut Into Pieces (like you would broccoli)
Steam
Add 1 to 2 Tablespoons, Butter, Ghee or Clarified Butter
Add 1 Tablespoon Spice Mixture Of Your Choice
OR
Preheat Oven to 425 degrees. Line Baking Sheet With Parchment Paper
Scatter Pieces Onto Baking Sheet
Drizzle With Olive Oil
Season With Kosher Salt & Pepper
Place In Oven 15 to 20 Minutes Until Tender
“Work With What You Got!”
©Tiny New York Kitchen © 2018 All Rights Reserved

Orzo is the Italian word for barley; however, orzo is not made from barley at all, but rather from semolina, which is a course ground flour made from durum wheat. With its shape reminiscent of slivered almonds, orzo cooks up in about half the time of rice, making it a speedy standby to have on hand to add heartiness to meals.
Just bring 3 quarts of lightly salted water to a boil. Add 8 ounces ( 1 1/2 cups) dried orzo and boil about 10 minutes until it has a firm, chewy texture. Stir occasionally to prevent it from sticking together. Drain orzo in colander and serve immediately.
Rinse orzo only if it will be baked or served cold in a salad. Otherwise, do not rinse as rinsing removes a light coating of starch that helps sauces and seasonings cling to the pasta.
For the best texture and flavor serve orzo immediately after cooking. If your orzo gets done before the rest of the meal, you can keep it warm by returning the cooked drained pasta to the warm cooking pan. Stir in a little butter or olive oil to prevent it from sticking together. Cover the pasta with a lid and let it stand no more than 14 minutes.
“Work With What You Got!”
© Victoria Hart Glavin Tiny New York Kitchen © 2017 All Rights Reserved
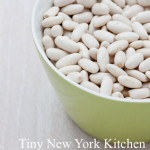
Cannellini beans, which are widely used in Italian cooking, actually originate from Argentina.
These creamy white Italian beans are slightly larger and fatter than the white haricot beans and are more like a kidney in shape. They are related to the larger French Soissons and, like them, have a fluffy texture when cooked. They are a popular addition to classic minestrone and a variety of other soups. Cannellini beans are an essential ingredient for tonno e fagioli (tuna and bean salad) and Florentine fagioli all’uccelletto, where the beans are stewed with sage, tomatoes, and garlic. They are also delicious cooked with olive oil, onion ring slices, garlic, and parsley.
I prefer to cook with dried beans rather than canned beans. I do keep a few cans of beans in my pantry, however, as they’re useful in short notice circumstances. When you purchase canned beans make sure that the ingredients do not include sugar or salt.
To cook Cannellini Beans: Sort and rinse 3/4 cup Cannellini Beans. Place in a medium-size pot with 3 cups water. Cover and bring to a boil. Reduce heat to a medium-low and cook 60 to 90 minutes until beans are soft. Add more water as needed while cooking to keep beans covered. Makes about 2 cups/4 servings.
To reduce cooking time, soak beans in water overnight in the refrigerator. Drain and throw away soaking water before proceeding.
“Work With What You Got!”
© Victoria Hart Glavin Tiny New York Kitchen © 2016 All Rights Reserved
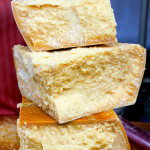
Parmesan Cheese Rinds
I tend to use a lot of good quality Parmesan cheese that I grate myself all the way down to the rind. I used to just toss the rinds until one day a chef friend told me all of the ways to use them. I think of them as the bay leaves of the cheese world. Add them when you’re cooking a dish and make sure to remove them at the end of cooking. Seriously, you’ll discover a while new world of flavor.
Throw into sauces, stews, and soups. Adding a Parmesan rind to sauces, stews, and soups will definitely add a nice rich flavor. Add to Italian dishes (both red and white pasta sauces).
Put them in a jar and pour olive oil over them. This makes Parmesan infused olive oil. You could add garlic cloves as well. This is excellent for dipping bread.
Grill them if your rinds are pure cheese with no waxy coating. They’ll become soft and chewy that is delicious on crusty bread.
Make Parmesan broth for cooking with. It’s so easy. Just add a few rinds with some herbs to a pot of water. Simmer for a couple of hours and after the broth has reduced some strain it and use to cook with.
Use them when you’re cooking vegetables.
Put a rind in the pot when you’re cooking rice or risotto.
The great news is that Parmesan rinds freeze well. You don’t need to use them right away and keep for a few months in the refrigerator. They keep for years in the freezer, however. If you don’t have any rinds on hand you may also purchase them from high-end grocers and cheese shops, where they’re super inexpensive.
www.tinynewyorkkitchen.com
“Work With What You Got!”
© Victoria Hart Glavin Tiny New York Kitchen © 2016 All Rights Reserved


