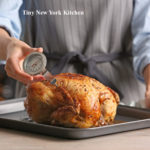
When cooking meats, it’s important to know the various temperatures.
Beef: Rare 120F to 125F (45C to 50C), Medium Rare 130F to 135F (55C t 60C), Medium 140F to 145F (60C to 65C), Medium-Well 150F to 155F (65C to 70C), Well Done 160F and above (70C and above)
Pork: Medium Rare 145F (63C), Medium 160F (70C), Well Done 170F (76C)
Poultry: Well Done 165F (75C)
Lamb: Medium Rare 145F (65C), Medium 160F (70C), Well Done 170F (76C)
Fish: Well Done 145F (65C)
To find out what temperature your meat is at, remove food from oven, turn on the digital display by pressing the on/off button. Select F/C. Insert thermometer in the thickest part of the meat, immersing the stem at least 1 inch, but not to contact with bone, fat or gristle and wait for the temperature to stabilize.
The digital display will automatically give you the cooking temperature. If additional cooking time is needed, remove the thermometer from the food and return the dish to the oven.
“Work With What You Got!”
©Tiny New York Kitchen © 2021 All Rights Reserved

This holiday season, whether you are planning your usual celebrations or making new smaller traditions it is important to balance holiday favorites and healthful options that are delicious. Sticking to wellness goals can be challenging during the holidays. Here are some tips to help you stay on track.
Pack Healthful Snacks For Travel
If you’re traveling this holiday season it can be challenging to eat healthy. Rest stops, gas stations, and airports aren’t known for healthful snack options. Pack your own for holiday trips. Try apples or bananas paired with nut butter, trail mix, or pre-cut vegetables with hummus cups. Be sure to fill up your water battle, too.
Mindful Eating
Mindfulness is the practice of being present and in the moment and can help you fully enjoy each eating experience. Turn off technology, set the table and eat slowly, using all of your senses with each bite. These habits can help you tune into your hunger cues and allow you to savor your meals without overdoing it. Plus, mindfulness can help you fully engage in the time you’re spending with loved ones.
Work In A Workout
When you’re in the thick of holiday prep, your exercise routine may fall by the wayside. Since you can’t add more hours to the day, fit in exercise when you can by parking farther away at the grocery store or taking the stairs at the mall.
Indulge Your Sweet Tooth Mindfully
There are many holiday treats to choose from. Plan to pick out your favorites and truly savor them. That will make it easier to skip the rest. If you stick to your normal healthy eating patterns most of the time, you will come out of the holiday season satisfied but not over stuffed.
©Tiny New York Kitchen © 2020 All Rights Reserved

Holiday baking time is a fun time of the year with the kitchen filled with delicious aromas and an array of treats to share with friends and family. No matter what style or flavor is your favorite, follow these steps for the best cookies you’ve ever baked, every time.
Use Room Temperature Ingredients
Get eggs and butter out of the refrigerator early, so they blend better in your cookie dough. Your cookies will have better texture and volume when all the ingredients are evenly incorporated.
Measure With The Spoon & Sweep Method
Use a spoon to add dry ingredients like flour to a dry (flat edged) measuring cup, then level off with the back of a knife. This method gives you the right amount of flour for the recipe, so your cookies aren’t too dry or dense.
Chill Dough Before Shaping Or Slicing
Refrigerate at least 1 hour or even overnight, so the dough is easier to work with and cookies hold their shape. Giving the ingredients time to meld makes your cookies taste better too.
Flour Your Cookie Cutters As You Go
Keep a small bowl of flour next to your work surface when rolling and shaping cutouts. Dip cookie cutters in flour in between stamping so they release easily and don’t stick to the dough.
Use Parchment Paper To Line Baking Sheets
Ensure that your cookies won’t stick to the baking sheet by using parchment paper liners. Parchment can be used more than once depending on the style of cookie, then can be replaced for more baking and easier cleanup.
Rotate Sheets Halfway Through Baking
All ovens have hot and cold spots. Help cookies bake evenly by switching the sheets between the top and bottom oven racks or rotating the sheets 180 degrees on the rack halfway through the baking time.
Rest On Baking Sheets For 1 To 2 Minutes Before Moving To Cooling Rack
When cookies are removed from the oven, they can still be soft and molten on the inside. Let the cookies settle and cool for a minute or two before transferring to a wire cooling rack with a thin spatula.
Cool Baking Sheets To Room Temperature Between Batches
Unbaked dough can start to melt immediately on a hot baking sheet, causing cookies to spread and overcook in the oven. Let sheets cool to the touch before using again.
Cool Cookies Completely Before Frosting Or Storing
Frosting can soften and melt on warm cookies, while sealing cookies in a container before they are cooled can cause sogginess. Let cookies rest on a rack for at least 1 hour before decorating or packaging.
Add A Small Piece Of Bread Or Orange Peel To the Cookie Tin
The cookies will slowly absorb the moisture from the bread or peel, so they won’t go stale as quickly. Replace the bread or peel every few days as it dries out.
©Tiny New York Kitchen © 2020 All Rights Reserved

Cheese Boards are a no-cook, sure-to-please option for any holiday celebration. Build a cheeseboard that’s affordable yet special. Then toast the season with festive cocktails.
A few inexpensive ingredients and simple homemade touches are all you need for a spectacular, special occasion-worthy spread. Here are some smart tips to deck your board with festivity and flavor without breaking the bank.
For a classic, colorful centerpiece, make your own cranberry and herb cheeseball. Start with a container of spreadable cheese and form into a ball. Use a sheet of plastic wrap to avoid messy hands. Roll the ball in a combination of finely chopped dried cranberries, parsley, and chives until thoroughly coated. Let sit at room temperature for 15 minutes before serving.
No need to buy expensive cheeses. Inexpensive cheddar is always a crowd pleaser. Skip the pre-cut cubes and cut the block yourself. Orange or white, mild or extra sharp. Cheddar is always a favorite.
Upgrade affordable goat cheese by rolling the log in herbs and spices, like dried thyme, dried oregano, or crushed rainbow peppercorns for a beautiful, flavorful crust. You could also keep it plain and top with jarred pepper jelly or mango chutney.
Instead of mixed nuts, opt for crunchy snack mixes, which are often less expensive and just as delicious. For the board, look for one with little or no seasoning.
Give a budget-friendly feta or mini mozzarella balls a flavor boost by marinating cubes in olive oil with herbs like parsley, oregano, or rosemary, and other seasonings like sliced chilis, crushed garlic, or lemon zest. Refrigerate overnight or up to 3 days.
Round out your cheese board with other delicious items like fresh or dried fruit (dried apricots, figs, grapes, and sliced pears), pitted olives, and plain crackers.
Pair your cheese board with a festive holiday beverage and enjoy!
©Tiny New York Kitchen © 2020 All Rights Reserved
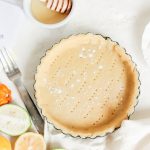
Warm Dough
Make sure not to let the dough get warm. Use cold butter and ice water. Refrigerate the dough before you roll it out. If the butter warms it will be absorbed by the flour, become sticky, and make for a tough crust.
Uneven Crust
To get an even, round crust, begin rolling from the middle of the dough round, pushing outward and stopping the pressure 1/4 inch from the edge. Then lift the round, give it a quarter turn and repeat.
Transferring Crust
To transfer your pie dough from the rolling surface to the pie plate, lift it with a bench scraper, gently drape it over a rolling pin, then place it in the pie plate.
©Tiny New York Kitchen © 2020 All Rights Reserved

Sweet potatoes are available year-round, but their true seasons are fall and winter.
When selecting choose firm, unblemished sweet potatoes without any breaks in their thin skin.
Preparing: To bake whole sweet potatoes, scrub them well first and prick their skins in a few places with a fork. Place them on a baking sheet to catch their juices, and bake in a preheated 400-degree oven until they are tender when pierced with a knife, about 45 minutes. They may then be peeled and sliced or cut into chunks for glazing, or puréed. You can also peel uncooked sweet potatoes and cook them in salted boiling water until tender before glazing or pureeing.
Sweet potatoes do not keep well. Store them in a cool, dark place, but plan to use them within a week or so.
©Tiny New York Kitchen © 2020 All Rights Reserved

A tablecloth sets the mood and the tone of whatever meal you’re serving and, as an added bonus, it helps protect the table. Shopping for tablecloths can be pretty confusing though. Often times trying to decide what size and shape to get is a difficult task. Here is a good way to calculate your perfect tablecloth no matter how small or large your table is.
Get Your Table Ready To Be Sized
If you have an extendable table with leaves make sure to extend or shrink your table to the size you will be using before you measure your table for linens. For a casual tablecloth this will probably be the table size you use most frequently. If you’re hosting a formal dinner, it will be the dimensions you plan to use for your special occasion.
Calculate Your Tabletop Dimension
Measure both table length and width. For either, this is most easily accomplished by measuring from the center of your table outward, then multiplying the measurement by two.
Factor In The “Drop” You Want
Determine the desired length of your tablecloth drop (how far over your table you want the cloth to hang. The standard is considered to be 10 inches. Anything less than 6 inches will make your table look out of proportion and your linens too small. You can also extend your drop for a more formal look, but if you do this, you should measure the difference between the table and the chairs to see what will look good when chairs are pushed under the table without gathering too much fabric or draping on your guests’ laps.
Do A Little Table Math
For a rectangular table, multiply your desired drop by two, then add on the actual measurements of the table. For example, if you are going for a 10-inch drop and your table is 68 inches long, your mathematical equation would be 10 (the desired drop, in inches) multiplied by 2 (to factor in both sides of the table) with 68 (the length of your table) added. Your desired tablecloth length would be 88 inches.
For A Round Table
For a round table, calculate the size slightly differently. You will want to multiply your desired drop by two, then measure the table through its diameter from one side to the other, adding that to the total number. For instance, if your round table has a 50-inch diameter and you want a 10-inch drop, your calculation would be (10×2) + 50, which equals 70. Your desired tablecloth size would be a 70-inch round.
If You Don’t Find The Exact Size
If you have a difficult time finding the exact size you want, then simply size up to the next available size.
Rectangular Tablecloth Size Calculator.
Table Length Tablecloth Size
62″ to 72″ 70″ x 90″
80″ to 92″ 70″ x 108″
96″ to 110″ 70″ x 126″
110″ to 126″ 70″ x 144″
Round Tablecloth Size Calculator
Table Size Tablecloth Size
42″ to 55″ Round 70″ Round
55″ to 70″ Round 90″ Round
©Tiny New York Kitchen © 2020 All Rights Reserved

With the multicolored cascades of leaves redecorating the landscape, autumn brings family gatherings and get-togethers with friends. At the center of many warm memories is time spent around the table, sharing in the delights of dishes so delicious that they are sure to be requested again and again for seasons to come.
As you ready your home for hospitality, I encourage you to select the freshest ingredients before donning your apron. I hope that you enjoy creating this autumn!
©Tiny New York Kitchen © 2020 All Rights Reserved

A Charcuterie Board makes entertaining super easy. Whether you call it a charcuterie plate or a charcuterie board, it’s easy to make when you begin with quality smoked, cured, and cooked meats. The perfect charcuterie board will contain at least 3 to 5 types of charcuterie representing different styles and textures, an assortment of cheese, plus something acidic, like pickles and olives, and something sweet like fruit chutney to complement the flavors. Nuts, fresh and dried fruits, bread, and crackers also make wonderful accompaniments.
Start with a wooden board, plate, platter, or piece of slate as the base.
Choose at least 3 to 5 charcuterie items that represent various styles and textures: smoked and meaty, dry-cured and firm, cooked and creamy. Allow two ounces per person, and slice your charcuterie into easily manageable, bite-sized pieces.
Spread the pieces out on the board, leaving space between them for accompaniments.
Add mustard, cornichons, olives, or chutney, so the acidity can balance the fat in the charcuterie.
Fresh fruits like grapes, figs, sliced pears, and apples, and any dried fruits like raisins, currants, apricots, cherries, and pears will round out the board, and add color. Use the fruits as palate cleansers between bites of charcuterie.
Place sliced bread, or various types of crackers, around the edges of the board, or tuck them between sections of charcuterie.
Cheese is a welcome addition to a charcuterie board. Choose 2 to 3 types of different textures to complement the spread.
Add truffle butter, which is especially tasty on a slice of bread with dry-cured meats like saucisson sec.
A hearty red wine makes a good accompaniment, such as Côtes-du-Rhône, Gigondas or Madiran.
Types Of Charcuterie To Consider:
Prosciutto: Probably the most recognizable pork offering on the list. Each region of Italy has its own signature recipe and flavor profile, but the most common are from Parma, Tuscany, and San Daniele. Culatello is a boneless cousin of prosciutto with a higher meat-to-fat ration. If you’d like to avoid the fat, Spanish lomo and Italian lonzaare alternatives made with pork loin.
Soppressata: We like to think of soppressata as the adult pepperoni. This salumi is generally made from dry-cured, coarse ground pork with red pepper flakes from Southern Italy, though regional variations do exist.
Finocchiona: Packed with fennel seeds, this skinny Italian salami was first created during the Renaissance. If you’re not a fan of anise, try French saucisson sec, made with garlic and pepper.
Chicken Liver Mousse: This creamy, butter spread is a nice introduction pâté for those who are new to offal.
Pork Rillette: If you love pulled pork then this is for you. This rillette is slow cooked with spices, cut up, often pounded into a paste and topped off with rendered fat.
Speck: This lightly smoked prosciutto comes from Northern Italy. Also, worth getting is guanciale, cut from the jowl, or a spice-cured fatback called lardo.
Chorizo Picante: A Spanish pork salami, chorizo picante is spiced with hot paprika, not to be confused with the fresh chorizo sausages of Latin America.
Coppa: Short for capocollo, coppa is an Italian and Corsican dry-cured pork neck and shoulder salume (capo is Italian for head, while collo means neck). A spicy version is also available.
Duck Rillette: In this rillette, duck leg confit is shredded before being mixed with spices and Armagnac. It’s then crowned with duck fat, which is more delectable and slightly lower in saturated fats than pork.
Mousse du Périgord: A signature creation of Les Trois Petits Cochons, a famed charcuterie formed in New York City’s Greenwich Village, this blend of chicken and turkey livers is infused with herbs and bits of black truffle. Expect a bite that’s silky and smooth, with a top layer of aspic, a meat jelly.
Jamón Ibérico de Bellota: This is where jamon reaches its peak. It’s a Spanish ham where the pigs are allowed to graze acorns and herbs freely, which gives the meat a very unique aroma. A more affordable version is jamón serrano. For a woodsy addition, Bauernschinken is a similar option that’s smoked with juniper.
Bresaola: An air-dried beef round from Northern Italy’s Lombardy region.
Black Truffle Salami: Creminelli offers a tartufo salami that’s delicious. It’s embedded with summer truffles whose flavors and aroma integrate beautifully with the pork.
Rabbit Rillette: Versions of this rillette can be perfumed with juniper, mace and/or thyme. Rabbits aren’t as fatty as other animals, so these are often topped with duck fat.
Pâté de Campagne: Country pâté can be tough for some people because of its visible parts of offal and fat. Trust in a high-quality pâté that showcases beautiful chunks of ham. For an impressive upgrade, try pâté en croûte, a rustic loaf of pâté wrapped in pastry.
Tips For Serving:
Charcuterie can be enjoyed as an appetizer or a meal. If you want prosciutto for breakfast, go for it. For entertaining, charcuterie is a popular option because it can be put together ahead of time and covered with plastic wrap.
Remove all inedible material like twine, cloth, and tough salami casing before slicing.
Cubes are fine for cheese and cold cuts, but chunky charcuterie might be hard to bite or deliver too much salt per portion. Salted cured meats are best sliced thin and served immediately.
When you place charcuterie, drape each slice like you just shaved it yourself. Not only does it look attractive, it keeps each piece separated so that guests won’t struggle to peel them apart.
Choose a flat board or platter so everything can get picked up with tongs or a fork. It’s especially important if anything needs to be sliced, like a loaf of pâté.
Lipped, round serving trays are great if there are jars, small bowls, or ramekins that may be prone to slipping. To prevent small containers from sliding, wet a small cocktail napkin and fold it so it is hidden beneath the container.
Eat sliced meats with your hands, forks, or toothpicks. Don’t forget a knife for the pâté and rillettes.
Have fun with thin sliced meats by wrapping them around melon, asparagus, batons of cheese or grissini.
Since charcuterie tends to be in the red-brown range of the color spectrum, lay down a bed of sturdy greens like arugula as a base. In addition to being visually impressive, it makes cleaning much easier.
Invite cultured butter and cheese to the party. Let butter soften to room temperature so it’s easy to spread. Cheese from the same regions as your meats will complement each other nicely.
“Work With What You Got!”
©Tiny New York Kitchen © 2019 All Rights Reserved

Some people are natural bakers and some people learn as they go. I’m guessing that most people are the “learn as you go” types. Here are some little things that, are not giant revelations, but are useful tips to help you through your holiday baking.
Unwrap Butter Before Bringing To Room Temperature
Many recipes call for softened butter and if you’re using it, here’s a trick. Instructions for softening butter usually directs one to leave the butter on the counter until it reaches room temperature. It’s much better to unwrap the butter straight from the refrigerator and let it soften in the mixing bowl. When butter is cold, it lifts cleanly off the wrapper as opposed to much of it sticking to the paper and the mess it makes.
Use Butter Paper To Grease Pans
If you don’t unwrap your butter when cold and you have butter-globbed butter wrappers, use them to grease pans.
Use A Large Slotted Spoon To Separate Eggs
For separating eggs, break the whole egg into a small-size bowl. Grab the yolk with a metal slotted spoon. Use the wall of the bowl to help and let the white slink off the edge of the spoon, jiggling if the white is stubborn. The white doesn’t actually go through the wholes of the spoon, but the holes somehow seem to facilitate their departure. Do one at a time and transfer each one after so as not to taint the batch should a yolk break. If you are using just the whites and don’t need the yolks right away, stick them in the freezer for later use.
Use The Right Kind Of Measuring Cup
Use spouted cups for the measuring of wet ingredients. Use the scoop/cup type for dry ingredients. It’s hard to get an accurate amount of flour or sugar in a big glass measuring cup, and it’s hard not to spill oil or water when it’s filled to the brim in a scoop measuring cup. For wet ingredients, get to the eye level with the quantity marks and make sure they are even. For dry ingredients, spoon ingredients into the cup and then level it off with a knife.
Better Yet, Use A Scale
Unlike the rest of the world, American recipes use cups for measuring. Baking can be an exact science and as long as the recipe includes weights the scale is the most accurate way to measure.
Don’t Measure Over The Bowl
If you measure your ingredients over the bowl you just may get more in the bowl than you intended. Measure to the side of the bowl, even if it means having to wipe up a few grains of salt from the counter.
Know Your Oven’s Moods
Each oven heats differently. Ovens have hot and cool spots, which might explain uneven baking. Get into the habit of moving shelves around (middle rack is a good bet) and setting a timer to rotate pans halfway through baking. Test your oven by turning your oven to 350 F degrees, line the racks with slices of white bread and cook until they start to toast; remove them and analyze the results for a pattern. Are they even? Are the ones from the back darker than the rest?
Use An Oven Thermometer
Your oven dial may not be giving you an accurate read. The best way to avoid this is by purchasing an oven thermometer that sits inside the oven. Many bakers do this and having the ability to monitor the temperature in real-time allows you to adjust as needed.
Candy Thermometers
All candy thermometers are not created equally. Here’s how to calibrate your candy thermometer: Put the candy thermometer in a pot of water and bring it to a rolling boil, with constant and vigorous bubbles. The boiling point for water is 212 F (100 C), which is what your thermometer should read (if you are at sea level). You can leave it in there for a few minutes to make sure the reading is accurate.
Dark And Light Pans Are Not Perfectly Interchangeable
Are your cookies always overdone on the bottom? Are your roasted vegetables not getting browned enough? This one makes perfect sense. Dark pans absorb heat, light pans reflect it. Use light pans for cookies and cakes that don’t want a brown crust. Use dark pans for roasting vegetables, making pizza, or baking anything in which you want more of a crust.
Swapping Pan Sizes And Shapes
You might now want to use the pan that the recipe calls for. Pick up a copy of, Joy of Baking, and use the Baking Pan Sizes page. It has a list of every pan and its capacity, so that you can switch things around and swap pans with compatible capacities or adjust if needed.
Wear An Apron
Your apron will take a beating, but it will save your clothes!
“Work With What You Got!”
©Tiny New York Kitchen © 2019 All Rights Reserved


