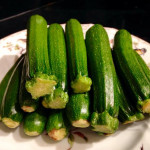
Baby Zucchini
Baby zucchini are very tender, tasty simple vegetables that have more flavor than the larger Italian zucchini as well as being very easy to prepare and enjoy. Archeologists think that they are indigenous to Central America. They are very nutritious and are a good source of Vitamin A, C B6, thiamin, niacin, and Pantothenic acid. Baby zucchini are also a very good source of fiber, protein, folate, iron, magnesium, phosphorus, zinc, and copper.
Quick Roast: Cut lengthwise and roast with sliced onions for 25 minutes at 350 degrees.
Blanching: Drop zucchini into boiling water for 1 to 2 minutes. Then remove to an ice bath. Zucchini are now ready to cut lengthwise and add to salads, sauté with mushrooms, onions, and garlic.
Grilling: Brush zucchini with olive oil, sprinkle with fresh herbs or spices, and either grill on BBQ or grill in a grill pan for about 2 to 3 minutes on each side.
Microwave: Place zucchini in ziplock bag. Cut corner of bag and microwave on high for 3 to 4 minutes.
For Salads: Baby zucchini makes a great salad addition. Shred or grate raw and add to salads, or cut lengthwise and add to vegetable platters.
Raw: To eat raw make sure to wash before eating.
“Work With What You Got!”
© Victoria Hart Glavin Tiny New York Kitchen
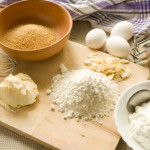
Gluten-Free Baking
Baking can be tricky when you throw gluten-free into the mix, even the most skilled cooks can be challenged. Here are some tips that can make Gluten-Free Baking less challenging.
Gluten-Free flour mixes can generally replace wheat flour cup for cup. Nut and bean flours may need extra experimentation to find the exact amounts to use.
Consider using smaller pans when baking gluten-free. It’s easier to get the center cooked without the edges burning as can happen with larger pans.
Keep a close watch on baking times. Some gluten-free recipes may take longer to bake than their wheat-containing counterparts.
To help gluten-free recipes taste their best, consider boosting flavor with extra nuts, herbs, spices, and flavor extracts such as vanilla and almond.
If converting a recipe to gluten-free, increase the egg amount by one extra egg to help ingredients bind together.
Gluten-free flours can be dry. You may need to increase a recipe’s liquids.
Xanthan gum keeps gluten-free baked goods moister and less prone to crumbling. Add 1/4 to 1/2 teaspoon xanthan gum for each cup of gluten-free flour.
"Work With What You Got!"
© Victoria Hart Glavin Tiny New York Kitchen


Constitution Week – Foods of Our Forefathers Part V
In her food preparation and preservation, the early American housewife was tied tightly to the calendar and the clock – much more tightly than today’s homemaker is. Local availability of foodstuffs and the limitations of existing food preservation techniques meant that nature largely called the shots on timing. Fruits and vegetables had to be picked at the right moment and processed quickly. Animals had to be slaughtered at their peak to keep best, and the peak varied from animal to animal. Even cheese and butter had a better likelihood of successful preservation depending on the season of the year in which they were processed.
Weather conditions played a major role: herbs had to be picked on a dry day to retain color and flavor; slaughter had to be done in cold weather to allow the carcass to cool rapidly; milk winters produced little ice for the following summer.
Also, once begun, preservation techniques sometimes had to be carried uninterruptedly through a long and tedious series of steps. There was no turning back – or time for vacations. Hams being cured had to be turned regularly, fish being dried had to be restacked four times a day, pickles had to have their brine skimmed and changed – or the product would be lost.
The labor involved in such food preservation was frequently heavy, but the routine of the rest of the house went on as usual. Organizational ability and endurance were essential, and woe betide the housewife who didn’t “keep up appearances” with her neighbors.
Just as the make-up of the early American’s diet varied with his geographic location, so did his needs – and abilities – in food preservation.
For example, the southern areas had access to a more varied food supply over the course of the year and consequently had less need to provide stores for the hard winter. At the same time, it was more difficult and expensive to get ice for short-term protection against the warmer climate. Ice was actually shipped from Massachusetts to the Southern states and to Cuba and Jamaica in the early 19th century, but it was obviously only available to the wealthier residents. The ice-box itself didn’t become popular until the mid 1800’s.
The shorter growing season in the North reduced the variety of produce available, but it also made cold storage in root cellars practical in small towns and rural areas. Above-ground ice houses and ice-saws, invented in the mid-nineteenth century, drastically reduced the cost of storing ice into the summer, and simplified storage of dairy products, fish and meat.
In many respects, the northern colonies had the greatest difficulty in providing a nutritious, varied diet throughout the year. Although fruits, berries, and summer vegetables were plentiful from the midsummer to early fall, proving vitamin-rich foodstuffs, during the winter and spring took special care. Many food items, of course, could be stored in relatively simple root cellars – where winter temperatures hovered between 30 and 40 degrees. In especially cold weather, a large tub of water was placed on the floor. This water gave off heat as it froze, which kept the vegetables safe. Turnips, beets and squash were kept in the driest areas. Carrots would keep anywhere. Cabbages and celery were buried in sand, cauliflower was set in holes and covered with straw, while cranberries were floated in water in a tub. Other crops were arranged loosely on slatted shelves for free air circulation, sometimes lying on straw.
Some vegetables, such as summer squash and potatoes, kept better at somewhat higher temperatures, and these were usually stored in the dark basement of the home. Temperatures between 50 and 60 degrees were ideal.
Eggs could also be stored in the root cellar, or in the basement of the house. Two methods were common. In one, the eggs (which the housewife was instructed to collect “in fine weather”) were dipped in boiling water for 20 seconds, then coated all over with butter or “sweet oil” (glycerin) and packed in sawdust. They would keep this way for some two to three weeks. Other housewives kept their eggs in crocks, submerged in “water glass” (sodium silicate). In this technique, it was important not to wash the eggs first, since their shells possess a natural coating which prevented the water glass from penetrating through the shell and ruining the egg. Even stored at room temperature, such eggs would keep for several months, while the hens sulked through the dark winter days.
If a family didn’t have room for a root cellar, it could accomplish somewhat the same effect with a pit, with the vegetables in layers separated by straw, and the whole covered with earth. Obviously, retrieving vegetables thus buried was a messy chore, and needed careful planning.
Under either type of storage, frequent examination was necessary, in order to detect spoilage and eliminate those items of fruit or vegetables which had gone rotten. The proverb about “one rotten apple spoiling the barrel” was not taken lightly! In fact, many housewives wouldn’t put apples in barrels, but spread them out, in order to “pick them over” more easily as the winter progressed. Spoiling apples were cut up, and the good parts made into applesauce as the winter progressed. Early cookbooks instructed the housewife to add a teaspoon of tartaric acid to the apples when making sauce late in the winter, as the apples lost their flavor. New Englanders even had a name for the period after the vegetables had spoiled or been used up, but before the dandelion greens appeared. They called it “the six weeks want.”
In the South, storage of this sort was less necessary, and the typical New England vegetables such as Hubbard squash and turnips were rarely seen on Southern menus.
To Be Continued…

 Easter Menu Ideas
The greatest feast of the Christian Church takes its name from that of Eastre, the Anglo-Saxon goddess of the dawn. The feast, however, has another name, the Pasch, the Greek word coming from the Hebrew pesakh, the Passover. This is the term for the feast which is used in nearly every language except English and German, but even these two languages use the words Paschal candle and Paschaltide. In the churches of the Eastern Orthodox the feast of Easter comes somewhat later than in the Western calendar, but the observance is as great, if not greater. Here are some Easter feast ideas that may be useful in your home this Sunday.
Easter Breakfast Or Brunch
Mini Frittatas: Cheddar, Asparagus, Sun-Dried Tomato, Swiss, Bacon or Mushroom
Spring Onion Quiches With Gruyere Cheese: Cooked Leeks & Onions With Cheese & A Savory Egg Custard Baked In A Tart Shell
Asparagus, Arugula & Goat Cheese Quiche: Asparagus, Baby Arugula & Goat Cheese Mixed With Egg Custard Baked In a Flaky Crust
Fresh Fruit Platter: Sliced Cantaloupe, Honeydew, Watermelon , Pineapple, Grapes & Berries
Easter Appetizers
Asparagus Rolled In Pancetta
Mini Spinach & Ricotta Calzone
Bruschetta
Crudites Platter: Celery, Broccoli, Cauliflower, Green & Yellow Squash, Sliced Cucumbers, Red/Yellow/Green Bell Peppers, Grape Tomatoes And Baby Carrots
Cheese Platter: Classic American & European Cheeses Cubes & Wedges For Snacking. Serve With Almonds & Crostini
Shrimp Cocktail: Cook, Devein & De-shell Large Shrimp Serve with Lemons & Cocktail Sauce
Smoked Salmon Platter: Sliced Salmon With Chopped Red Onions, Capers, Cornichons, Mustard Sauce & Horseradish Sauce
Whole Boneless Poached Salmon: Poached In White Wine With A Light & Creamy Dill Sauce
Soups
Spring Pea & Onion Soup: Pureed Spring Pea & Onion Soup Made With Celery, Leeks, Garlic & Thyme
Carrot & Fennel Soup: Carrots, Fennel & Tomatoes Cooked In Vegetable Broth. Pureed Smooth
Salads & Side Dishes
Shrimp, Spring Pea & Morel Salad: Shrimp With Crispy Spring Peas, Morel Mushrooms & Tomatoes Lightly Tossed In A Lemon Vinaigrette
Golden Beet, Radish & Frisee Salad: Golden Beets, Radishes, Frisee Served With Goat Cheese, Pecans & Champagne Vinaigrette.
Grilled Asparagus: Marinate In Olive Oil & Kosher Salt. Grill
Gnocchi, Peas & Pancetta: Gnocchi, Peas, Panchetta, Ricotta Salata, Baby Arugula & Lemon Zest
Entrees
Honey Spiced Turkey Breast: Brine, Slow Roast Finished With Spices & Honey Glaze
Apricot Bourbon Glazed Ham: Apricot Jam, Honey, Dijon Mustard & Bourbon Combined & Poured On Top Of Ham Then Baked
Victoria’s Apricot Pork Tenderloin
Rosemary Rubbed Leg Of Lamb: Boneless Leg Of Lamb Marinated In Olive Oil & Herbs Then Roasted To Medium Rare
Grilled Salmon With Crispy Potato & Leek Fondue: Grilled Salmon Topped With Melted Spring Leeks With A Touch Of Cream & Crispy Fingerling Potatoes
Rack Of Lamb: Roasted With A Variety Of Spices
Desserts
Carrot Cake With Cream Cheese Frosting
Chocolate Cake
Yellow Cake With White Chocolate Ganache
Victoria’s Caramel & Chocolate Pecan Bars
Fruit Tarts
Hot Cross Buns
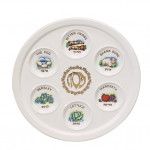
 Preparing The Seder Plate
Passover is almost here and if you are Jewish then it’s time to think about preparing the Seder plate. The foods are symbolic and are arranged on a specific Seder plate which is called k’arah in Hebrew. Some of these symbolic foods are eaten and some are not. Throughout the years these plates have been made from silver, pewter, brass, painted porcelain and glass with specific indented compartments for the ceremonial foods. If you don’t have a Seder plate then you can display the foods on a pretty tray or platter with decorations of fresh spring blossoms or herbs. If you are having quite a few quests then you may want to have a second Seder plate for the other end of the table.
The traditional Seder plate items include:
Karpas: A vegetable to celebrate spring and rebirth. This vegetable usually is a green vegetable such as celery, sweet lettuce or a spring herb such as parsley or chervil which symbolizes the beginning of new life. Some use a boiled potato as a reminder of a harsh early spring.
Maror: This symbolizes the misery of the Israelites’ slavery and oppression. This is a bitter herb that varies from community to community or even from one family to another. Ashekenazim like to use either ground or sliced fresh horseradish root or romaine lettuce. Sephardim like to use bitter greens such as endive, escarole, chicory, sorrel, arugula, dandelion, purslane, celery leaves or watercress. Maror is eaten by all at the table so you may want to put extra in a separate bowl.
Haroset: Haroset is the fruit and nut dip that is symbolic of clay or mortar that the Israelites used to construct the pyramids. Kids like to sculpt it into pyramid shapes if the haroset is stiff enough. Some people like to serve two or three different types of harosets symbolizing the diverse Jewish communities. Haroset usually consists of quartered, grated or chopped apples, walnuts or almonds, ground cinnamon and kosher grape wine or grape juice. The consistency tends to be more like a paste.
Hazeret: Many Seder plates have a second place for another bitter herb in addition to the maror. This additional bitter herb is to be used in the traditional Hillel sandwich which is a matzoh with a filling of haroset and bitter herbs.
Zeroa (Forearm): This is a roasted lamb shankbone that symbolizes the ancient Paschal lamb sacrifice in the Temple. It also symbolizes the protective arm of God. The Israelites marked their doorposts with blood from the lamb that was slaughtered on the eve of the Exodus. Seeing this sign, the Angel of Death “passed over” their homes, keeping them from God’s tenth and final plague (the slaying of the firstborn males). Some use a poultry wing or neck. Vegetarians may use a beet. A friend of mine, who is not a meat eater, told me that last year she cut out a picture of a shankbone and placed it in the proper place on the Seder plate. Zeroa is typically not eaten at the Sedar. The shankbone is roasted and scorched to symbolize the burnt sacrificial offering.
Beitzah: This is a roasted egg which is the symbol of the festival sacrifice of each Jew brought to the ancient Temple. It is also a symbol of spring, mourning and rebirth. The egg is also not eaten during the Seder service. Hard boil an egg and then wrap it, still in the shell, in a foil. Place it in a hot oven until it is lightly charred. Make sure to hard boil the egg first or you will have quite a mess on your hands.
Another symbolic item on the Seder table, not on the Seder plate, is a plate of three whole matzot, which are stacked and separated from one another by cloths or napkins. The middle matzah is broken and half of it put aside for the afikoman (after the meal or dessert). The top and other half of the middle matzot is used for hamotzi (blessing over the bread). The bottom matzah is used for the Hillel sandwich.
A bowl of salt water is used for the first “dipping” of the Seder. It is not traditionally part of the Seder plate, but it is placed next to it. Sometimes the bowl of salt water is used as one of the six items, omitting haroset.
Potato Peels: Survivors of the Holocaust and their children began including potato peels as a symbol of the Holocaust and today’s hunger and famines. It was a blessing to have a potato peel as it could mean the difference between life and death in the concentration camps. For many Jews who fled the famines of Ethiopia it was the potato that was the first food tasted when they immigrated to Israel.
Orange: Some new Seder plates have an additional place for an orange. Theologian Susannah Heschel, “Orange on the Seder Plate,” talks about the ritual that she created based on a story that she had read in a feminist Haggadah. She asked everyone to take a tangerine segment, say the blessing over it and eat it to symbolize solidarity with Jewish lesbians and gay men as well as others who are marginalized within the Jewish community.
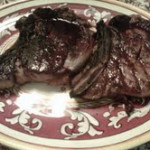
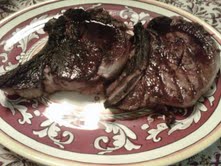 A Note About Grilled Steaks
Steak is perfect for the grill. A well marbled, cut thin and flat steak is made for searing over a bed of hot coals. A grilled steak is mouthwatering if it is brown and crisp on the outside and pink & juicy on the inside. There really isn’t an easier and less complicated dinner than a grilled steak with a green salad on the side. Plus, the cleanup is practically effortless. Most any cut of steak is great for grilling. The classics are rib eye, New York, filet, tenderloin and porterhouse. The lesser cuts are cheaper and usually every bit as tasty if they are marinated. A flatiron, chuck, skirt steak, hangar steak, top sirloin or tri-tip are lesser cuts of steak that I tend to marinate overnight. Steaks can be grilled as a single portion or larger steaks can be grilled whole and sliced for more than one. A steak is best cut 1 to 2 inches thick. If a steak is thinner, then the inside will be overdone before the outside is properly seared. If a steak is thicker then the outside, it will start to char before the inside is ready. Trim off all but a fourth of an inch layer of fat. The less dripping fat means fewer flare-ups.
Seasoning a steak is simple. All you really need is kosher salt and freshly ground black pepper. Some people like an herb crust. Chopping fresh herbs together in any combination is great. You can combine thyme, rosemary, oregano and/or oregano; however, you should always use rosemary. Mix the fresh herbs with kosher salt and freshly ground pepper. Rub onto the steak with some olive oil an hour or so before grilling. You should take the steaks out of the refrigerator about 1 hour before grilling to allow the steaks to come to room temperature.
Clean your grill with a wire brush and then prepare a hot fire. Oil the grill and put on the steaks. Your grill should be so hot that you shouldn’t be able to tolerate the heat for more than a couple seconds. Cook for 5 to 6 minutes. Turn the steaks over and cook for another 5 to 6 minutes. If your steak has a border of fat then turn this onto the grill by holding the steak up with your tongs. Sear the fat for 1 to 2 minutes. After you flip your steaks you should start checking for doneness after about 2 minutes. Press the back of your tongs into the steak. If it is rare it will be soft. If it springs a bit then it is medium rare. If it is resilient then it is well done. Keep testing by using the “back of the tong” method. You can check by cutting into the steaks, but I really think that it is better not to cut into the steaks. Keep working on the “back of the tong” method and you will become a good judge pretty quickly. I think that it is a good idea to take the steaks off of the grill when they are a little less done than you want them to be. They will continue to cook while they rest. A 1 inch steak will be grilled rare in about 8 minutes and for medium it should take about 12 minutes. Check your fire while the steaks are cooking. Move the coals as needed to make the fire hotter or cooler. If your fire flares up then move the steaks out of the flames right away or the fire will burn up your steak. This will form a black and acrid crust. When you remove your steaks from the grill let them take a little rest for a few minutes before serving. Resting stabilizes the internal juices so that they don’t run out excessively when you cut into the steaks. If you are not going to serve right away, make sure to cover loosely with aluminum foil to help keep warm. Don’t seal tightly or they will continue to cook.
Happy Grilling!


