
Feta From The Block
Feta sliced from a block is a bit creamier and less salty than feta crumbles, though you can use either. For a quick appetizer, cut into cubes and toss with herbs, olives, and lots of olive oil.
“Work With What You Got!”
©Tiny New York Kitchen © 2020 All Rights Reserved
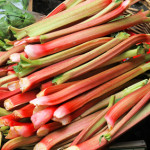
Rhubarb is a fabulous spring crop. The sour sweetness of rhubarb is absolutely nice in cakes, breads, pies, cobblers and jams, as well as sweet and savory compotes, chutneys, and sauces. Savory rhubarb chutney, cooked with onions and hot pepper is an exciting accompaniment to grilled pork, chicken, or shrimp. Sweeter versions employing brown sugar and lemon peel are superb served with pancakes, French toast, waffles or pound cake. Ladled atop frozen yogurt or ice cream, sweet rhubarb sauce is perfect for a spring sundae when the sun burns bright. This same sauce can be strained to yield a perfectly pink syrup. Combine with cold sparkling water or seltzer for a refreshing mocktail, or add to prosecco for a beautiful brunch beverage.
Rich in fiber, protein, vitamin C, potassium and calcium, rhubarb provides many valuable nutrients. A natural laxative, rhubarb may help east constipation. In fact, it is written that rhubarb was utilized in ancient Chinese medicine for treating stomach ailments. The vitamin K found in rhubarb may help strengthen bones, as well as possibly inhibiting inflammation in the brain. Rhubarb also supplies the body with vitamin A, which may help diminish signs of aging, particularly skin damage.
When choosing rhubarb at the supermarket or farm markets, look for glossy, firm stalks. Trim the leaves off when you bring your rhubarb home, as they are toxic. Store the stalks wrapped in a paper towel in your vegetable drawer. Wash before using. Rhubarb freezes beautifully, place chopped stalks on a parchment paper lined baking sheet and place in the freezer. When the chunks are frozen, store them in freezer bags and use within one year.
“Work With What You Got!”
©Tiny New York Kitchen © 2020 All Rights Reserved

Tabouli (.تبولة also tabbouleh, tabouleh, tabbouli, taboulah) is a Levantine vegetarian dish made mostly of finely chopped parsley with tomatoes, mint, onions, bulgur (that is soaked not cooked), and seasoned with olive oil, lemon juice, salt, and sweet pepper. Some variations add cucumbers, lettuce, or use semolina instead of bulgur. Tabouli is traditionally served as part of a mezze (small dishes served as appetizers) in the Arab world, but its popularity has grown tremendously in Western cultures.
Originally from the mountains of Lebanon and Syria, tabouli has become one of the most popular salads in the Middle East. The wheat variety salamouni was cultivated in the Beqaa Valley region in Lebanon and was considered, in the mid-19th century) as well-suited for making bulgur, a basic ingredient of tabouli.
In the Middle East, particularly Syria, Lebanon, Palestine, Jordan, Egypt, and Iraq, it is usually served as part of a meze. The Syrian and the Lebanese use more parsley than bulgur wheat in their dish. A Turkish variation of the dish known as kisir and a similar Armenian dish known as eetch use far more bulgur than parsley. Another ancient variant is called terchots. In Cyprus, where the dish was introduced by the Lebanese, it is known as tambouli. In the Dominican Republic, a local version introduced by Syrian and Lebanese immigrants is called Tipile.
“Work With What You Got!”
©Tiny New York Kitchen © 2020 All Rights Reserved

Have you ever found yourself making a recipe and realize that you don’t have an ingredient that it’s calling for? Here are a few ingredient alternatives that you might have on hand instead.
Mayonnaise
For 1 cup of mayonnaise use 1 cup sour cream or 1 cup plain yogurt with a pinch of salt.
Honey
For 1/4 cup of honey use 1/4 cup maple syrup or light corn syrup.
Buttermilk
For 1 cup of buttermilk use 1 tablespoon vinegar or lemon juice mixed with enough milk or plant-based milk to reach 1 cup.
Butter
If butter is used for baking or in a solid form, solid coconut oil is a good 1 to 1 substitution. If it’s melted or for cooking use olive oil.
Oil
When it comes to oil for baking, applesauce is a great substitute. For 1 cup of oil, use 3/4 cup applesauce mixed with 1/4 cup melted butter. In cooking, any neutral refined oils like canola, olive, vegetable, corn, and peanut oils are interchangeable.
Breadcrumbs
For 1 cup of breadcrumbs use 1 cup of cracker crumbs, finely crushed potato chips, tortilla chips, or pretzels pulsed in your food processor.
Brown Sugar
For 1 cup of light brown sugar, use 1 cup white sugar plus 1 tablespoon molasses. For 1 cup of dark brown sugar, use 2 tablespoons molasses. The sugar and molasses should be mixed together thoroughly.
Baking Powder
For 1 teaspoon baking powder, stir or sift together 1/4 teaspoon baking soda plus 5/8 teaspoon cream of tartar.
“Work With What You Got!”
©Tiny New York Kitchen © 2020 All Rights Reserved
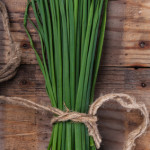
As gardens begin to grow, one of the first perennial herbs to appear are chives. Chives are quite resilient and are particularly easy to grow both in garden beds or in pots. They can stand a bit of shade, tolerate drought, and grow well in any type of garden soil. For first time gardeners, this is an excellent plant that will yield a reliable source of flavorful nutrition.
Chives belong to the lily family and are part of a large genus of over 500 species of perennials that contain bulbs or underground stems. Known for their strong scent and distinct flavor, chives, along with garlic, onions, scallions and leeks are known as allium herbs. Allium species have been cultivated around the world for centuries and are valued both medicinally ad for their fabulous flavor.
If you grow your own chives, you can continually cut them back so the crop will continue into early fall. If you let happen to let them go you will get lovely purple-pink globe shaped chive flowers that make a beautiful garnish as well as a bright addition to spring or summer salads.
Chives are best when used fresh. Rinse and dry them well, then snip with scissors or cut with a very sharp knife. Snipped chives can be placed in freezer bags and frozen for later use, but will not maintain the texture of fresh shoots.
This is an herb that will elevate so many dishes, including soups, stews, salads, sauces, marinades, dressings, and dips. Adding a few tablespoons of chopped chives to cottage cheese will add a pleasing punch to a super simple snack. Make an easy supper of baked potatoes or sweet potatoes topped with Greek yogurt and chives. Mixing chives into cream cheese, along with lemon zest, and a grinding of black pepper will make an excellent spread for sandwiches or crackers. Omelets prepared with chives, parsley, and dill are a nice choice for any meal.
Chives contain valuable vitamin and mineral content. Vitamins K, A, and C are found in chives, as well as calcium, an important mineral. Chives also contain small amounts of magnesium, phosphorus, potassium, and sodium. Purported to be anti-inflammatory, antibacterial and antiviral, eating more chives may boost your immune system and assist in maintaining superior levels of health.
If you buy your own chives at the grocery store, look for a bright green color with no sign of yellowing or wilting. Chives will keep in the crisper drawer of the refrigerator for several days. Before using, rinse and dry well and trim the ends before using.
Enjoy this light and bright spring herb.
“Work With What You Got!”
©Tiny New York Kitchen © 2020 All Rights Reserved
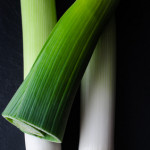
Because leeks grow deep in the soil the fine layers inside can be difficult to clean. When using leeks in a recipe, trim and slice the leeks first, then add to a bowl of water and stir. The dirt will sink to the bottom of the bowl.
“Work With What You Got!”
©Tiny New York Kitchen © 2020 All Rights Reserved

As many people are staying put inside of their homes avoiding exposure to COVID-19, many have turned to baking. Baking is a form of self-care and mindfulness. There is something meditative about creating a dessert or bread that you pay attention to in the moment. Desserts might be trivial, but sometimes triviality should be embraced. We are living in unusual times, but after all, for the sake of mental and physical health, everyone deserves a coping mechanism that lends some sense of structure in a chaotic world. Consider your baking a gift to yourself.
“Work With What You Got!”
©Tiny New York Kitchen © 2020 All Rights Reserved
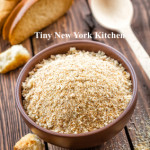
Fresh, or soft, bread crumbs and dried bread crumbs begin at the same place. Both are easily made by processing sliced bread in a food processor or blender. Use white bread with a firm crumb, such as a good quality sandwich loaf. Avoid bread with an open, airy crumb or one with a dark crust. Sourdough bread will lend its own tart flavor, so it isn’t the best choice for bread crumbs, which should be neutral. Whether you keep the crust on or off it up to you.
For fresh bread crumbs, tear the fresh bread into pieces about 2 inches square, and process in a food processor or blender until pulverized. Store them in a resealable bag in the freezer for up to 2 months, they do not have to be thawed before using.
For dried bread crumbs, don’t use old, desiccated bread, or you could get off flavors. Instead, toast the sliced fresh bread until it is firm around the edges but not browned. As the bread cools, it will crisp. Process the lightly toasted bread in a food processor or blender until pulverized. Prepare just the amount of bread you need. Dried bread crumbs don’t store well.
You can make bread crumbs out of more than sandwich bread. Croissants, bagels, and rolls can all be turned into crumbs.
Panko are crisp, fluffy Japanese-style bread crumbs and are usually reserved for dishes where an especially crunchy coating is desired. They can be used in any recipe that calls for dried bread crumbs, either as a binder or filler for moist mixtures like meat loaf, or as breading for dishes like crab cakes.
To ensure a crisp crust on foods coated with bread crumbs and baked, spritz the coatings with cooking oil spray (olive or vegetable oil) before they go in the oven, and once again halfway through baking.
“Work With What You Got!”
©Tiny New York Kitchen © 2020 All Rights Reserved

There is no salt in pasta dough, so be sure to put enough salt in the cooking water. First, use plenty of water: about 4 quarts for 1 pound of pasta. Because salt slows the rate at which water comes to a boil, don’t add salt until after water is bubbling. Use a heaping teaspoon for every quart water. No need to measure. Instead just taste the water. You should be able to detect the salt.
Always serve pasta from a warmed serving bowl. Place the bowl in the sink, and set the colander inside the bowl. Drain the pasta, letting the water drain into the bowl. Lift up the pasta in the colander, give it a good shake to drain further, and then pour the pasta into the still warm cooking pot. Add the sauce and combine. Pour out the water from the serving bowl, and dry the bowl. Transfer the pasta to the warm bowl and serve.
“Work With What You Got!”
©Tiny New York Kitchen © 2020 All Rights Reserved
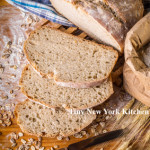
Many people are making bread these days and there’s nothing quite like the smell of bread baking in the house. Here are some answers to frequently asked bread making questions.
Never allow salt to come into direct contact with yeast because it removes the water that yeast needs to live. Instead, add salt to the flour used to make the dough, so the flour can act as a buffer.
A heavy-duty stand mixer is a great appliance for making bread dough. You can use the dough hook for mixing and kneading. If the dough isn’t coming together with the dough hook, switch over to the paddle attachment and mix just until the ingredients are combined, then switch back to the dough hook.
After the dough is mixed, let it rest. Professional bakers call this period, autolyze. It lets the flour fully hydrate and strengthens the gluten in the flour before kneading. Cover the work bowl with plastic and let the dough stand for 20 minutes and then knead on medium speed until the dough is smooth and elastic.
Dough made with a high proportion of whole-grain flour should feel tacky when you are kneading it. In general, moist or even sticky dough makes the best bread. Don’t add too much flour to the dough or the bread will bake up dry and tough.
How can you tell when the dough has been kneaded long enough? Use the windowpane test. Pull off a golf ball knob of dough and pat it into a rectangle. Pulling slowly and consistently from all four corners, stretch the dough into a thin, translucent membrane. If the dough tears easily, knead it longer. This technique won’t work with dough that includes seeds, nuts, or raisins, as they will tear the dough even if it has been kneaded sufficiently. If such ingredients have been used, check for stretchy and resilient dough.
Many bakers use a bowl to hold bread dough, but a straight-sided clear plastic tub is ideal for keeping track of dough as it rises. Mark the beginning level of the dough on the outside with a pen or a piece of tape, and then you can easily see when the dough has doubled. You can also use a glass bowl, but the doubling is a bit harder to define in a slope-sided container. Gently poke a finger into the dough. If the hole doesn’t refill, the dough has probably finished rising.
Many crusty artisanal are baked with steam to help keep the crust soft and pliable, allowing the bread to expand fully. Professional ovens have built-in steam injectors, but home bakers have to be more creative. One recommended method: When you turn on the oven to preheat it, place an empty heavy-duty rimmed baking sheet or pan on a rack near the top of the oven, When the bread dough is added to the oven, toss a handful of ice cubes into the pan and close the door. The ice will melt quickly and create a burst of steam. While the oven door is open, cover the glass on the door with a towel to catch any drips (the cold water could crack the glass) and remove the towel before closing the door.
A common way to test bread for doneness is to rap on the bottom of the loaf and listen for a dull thump. Using a thermometer is more reliable. Insert an instant-read thermometer in the bottom of the loaf, being sure to the tip reaches the center of the loaf. Butter and egg laden breads are finished when their internal temperature reaches 185 to 190 degrees F. Leaner and crispier breads are ready at 200 to 205 degrees F. For breads baked in loaf pans, insert the thermometer just above the rim of the pan, angling the tip down to the center of the loaf.
“Work With What You Got!”
©Tiny New York Kitchen © 2020 All Rights Reserve


