
I love to bake all year long, but during the holidays I’m on “baking overdrive.” To make better cakes here are some simple tips to help you with the best outcome possible.
Don’t use cold eggs. The eggs really should be at room temperature, otherwise the mixture won’t emulsify properly. If you’re short on time place eggs in a bowl of warm water for 15 minutes.
Make sure to measure all ingredients precisely. Baking is an art form, but also a science.
Position pans as close to the center of the oven as possible. If you’re placing more than one pan in the oven, they should not touch each other or the oven walls. If your oven isn’t wide enough to put pans side by side, place them on different racks.
If a recipe calls for 1 cup of sifted flour, then first sift the flour and then measure it. If it calls for 1 cup flour sifted, measure the flour, then sift it. It may seem subtle, but it can make the difference between a light, fluffy cake and a heavy one.
Allow at least 20 minutes for your oven to preheat. It’s best to turn the oven on before you start working on your recipe.
Avoid opening the oven door. Opening the oven door too often can make a cake fall, so use the window in your oven door to check the cake’s process when possible.
Remember that each oven heats differently. Check for doneness 10 minutes before the recipe suggests. For most recipes, a cake is ready when it starts pulling away from the sides of the pan and a toothpick inserted in the center comes out clean.
Invest in wire cooling racks. Cakes cool faster and don’t get soggy when set out on a rack. Leave them in the pans for 10 to 15 minutes before unmolding, and then place on a rack to cool completely before frosting. Angel, chiffon and sponge cakes should be left in the pan to cool to prevent collapsing.
Unfrosted cakes can be stored, well wrapped in plastic, at room temperature for 24 hours. If storing unfrosted cakes for more than 24 hours, it is best to freeze them rather than refrigerate them. Wrap the layers in plastic wrap and then heavy-duty foil to freeze, let cake thaw in the refrigerator before frosting.
To store frosted cakes, keep at room temperature under a cake dome or large bowl unless the recipe specifies refrigeration.
For smooth and easy cake removal, prep your pans properly. When a recipe calls for greasing and flouring, place a piece of parchment or waxed paper on the bottom of a pan (trace and cut it to fit). Coat the sides and bottom with softened butter, and then dust with flour, turning the pan on its side to get full coverage and tapping out the excess. For chocolate cakes, swap in cocoa powder for flour.
Angel, chiffon, and sponge cakes should go into clean, untreated pans since they need to adhere to the sides in order to rise properly.
Happy Baking!
“Work With What You Got!”
© Victoria Hart Glavin Tiny New York Kitchen © 2016 All Rights Reserve
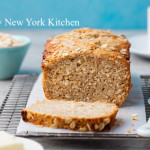
Quick Breads
For mouth-watering breads that don’t require a lot of time, turn to quick breads. By using baking powder, baking soda, steam, or air instead of yeast to leaven dough. An advantage of quick breads is their ability to be prepared quickly and reliably, without requiring time-consuming skilled labor and the climate control needed for traditional yeast breads. Quick breads include banana bread, beer bread, biscuits, cornbread, cookies, muffins, cakes, pancakes, brownies, scones, and soda bread.
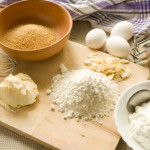
Almost all quick breads have the same basic ingredients: Flour, leavening, eggs, fat (butter, margarine, shortening, or oil) and a liquid such as milk. Ingredients beyond these basics are added for variations of flavor and texture. The type of bread produced varies based predominantly on the method of mixing, the major flavoring, and the ratio of liquid in the batter. Some batters are thin enough to pour and others are thick enough to mold into lumps.
There are four main types of quick bread batter:
Pour Batters: Such as pancake batter, have a liquid to dry ration of about 1:1 and so pours in a steady stream – also called a “low-ratio” baked good.
Drop Batters: Such as cornbread and muffin batters, have a liquid to dry ratio of about 1:2.
Soft Doughs: Such as many chocolate chip cookie doughs, have a liquid to dry ratio of about 1:3. Soft doughs stick significantly to work surfaces.
Stiff Doughs: Such as pie crust and sugar cookie doughs, have a liquid to dry ratio of 1:8. Stiff doughs are easy to work in that they only minimally stick to work surfaces, including tools and hands – also called “high-ratio” baked goods.
Preparing a quick bread generally involves two mixing containers. On contains all dry ingredients (including chemical leavening agents or agent) and one contains all wet ingredients (possibly including liquid ingredients that are slightly acidic in order to initiate the leavening process). In some variations, the dry ingredients are in a bowl and the wet ingredients are heated sauces in a saucepan off-heat and cooled.
During the chemical leavening process, agents (one or more food-grade chemicals – usually a weak acid and a weak base) are added into the dough during mixing. These agents undergo a chemical reaction to produce carbon dioxide, which increases the baked good’s volume and produces a porous structure and lighter texture. Yeast breads often take hours to rise, and the resulting baked good’s texture can vary greatly based on external factors such as temperature and humidity. By contrast, breads made with chemical leavening agents are relatively uniform, reliable, and quick. Usually, the resulting baked good is softer and lighter than traditional yeast breads.
Chemical leavening agents include a weak base, such as baking soda (sodium bicarbonate) plus a weak acid, such as cream of tartar, lemon juice, or cultured buttermilk, to create an acid-base reaction that releases carbon dioxide. Quick bread leavened specifically with baking soda is often called “soda bread.” Baking powder contains both an acid and a base in dry powdered form, and simply needs a liquid medium in which to react. Other alternative leavening agents are egg whites mechanically beaten to form stiff peaks, as in the case of many waffle recipes, or steam, in the case of cream puffs.
There are three basic methods for making quick breads, which may combine the “rise” of the chemical leavener with advantageous “lift” from other ingredients.
The Stirring Method: Also known as the quick-bread method, blending method, or muffin method is used for pancakes, muffins, corn bread, dumplings, and fritters. This method calls for measurement of dry and wet ingredients separately, then quickly mixing the two. Often the wet ingredients include beaten eggs, which have trapped air that helps the product to rise. In these recipes, the fats are liquid, such as cooking oil. Using mixing is done using a tool with a wide head such as a spoon or spatula to prevent the dough from becoming over-beaten, which would break down the egg’s lift.
The Creaming Method: Frequently used for cake batters. The butter and sugar are “creamed” or beaten together until smooth and fluffy. Eggs and liquid flavorings are mixed in, and finally dry and liquid ingredients are added in. The creaming method combines rise gained from air bubbles in the creamed butter with the rise from the chemical leaveners. Gentle folding in of the final ingredients avoids destroying these air pockets.
The Shortening Method: Also known as the biscuit method, is used for biscuits and scones. This method cuts solid fat (whether lard, butter, or vegetable shortening) into flour and other dry ingredients using a food processor, pastry blender, or two hand-held forks. The layering from this process gives rise and adds flakiness as the fold of fat melts during baking. This technique is said to produce “shortened” cakes and breads, regardless of whether or not the chosen fat is vegetable shortening.
Quick bread originated in the United States at the end of the 18th century. Before the creation of quick bread, baked goods were leavened with either yeast or by mixing dough with eggs. The discovery of chemical leavening agents and their widespread military, commercial, and home utilization in the United States dates back to 1846 with the introduction of commercial baking soda in New York by Church and Dwight of “Arm & Hammer” fame. This development was extended in 1956 by the introduction of commercial baking powder in Massachusetts, although the best known form of baking powder is “Calumet”, which was first introduced in West Hammond and Hammond, Indiana (later Calumet City, Illinois) in 1889. Both forms of food-grade chemical leaveners are still being produced under their original names.
During the American Civil War (1861-1865) the demand for portable and quickly made food was high, while skilled labor for traditional bread making was scarce. This encouraged the adoption of bread, which was rapidly made and leavened with baking soda, instead of yeast. The shortage of chemical leaveners in the American South during the Civil War contributed to a food crisis.
As the Industrial Revolution accelerated, the marketing of mass-produced prepackaged foods was eased by the use of chemical leaveners, which could produce consistent products regardless of variations in source ingredients, time of year, geographical location, weather conditions, and many other factors that could cause problems with environmentally sensitive, temperamental yeast formulations. These factors were traded off against the loss of traditional yeast flavor, nutrition, and texture.
www.tinynewyorkkitchen.com
“Work With What You Got!”
© Victoria Hart Glavin Tiny New York Kitchen © 2016 All Rights Reserved
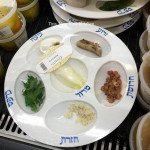
This afternoon I was down in the west village and stopped into Citarella Gourmet Market on 6th Avenue. The place was packed to the gefilte fish with midday shoppers who seemed to be mostly shopping for tomorrow evening’s Passover dinner. I was surprised to see that they were selling prepared Seder Plates complete with hard-boiled egg, lamb shank bone, haroseth, horseradish, parsley, and watercress. Just goes to show that I learn a lot when I leave my apartment and go on little adventures in the city.
Everything From Apple Sauce To Tzimmes!
For a Sensational Seder you’ll want to have these traditional Passover dishes on hand.
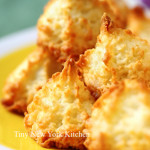
Coconut Macaroons (You’ll Go Coco-Loco For Coconut Macaroons!)
Haroseth (For A Sweet Seder)
Matzo Ball Soup (Keep Your Eye On the Matzo Ball)
Potato Kugel (When Life Gives You Potatoes, Have Kugel)
Apple Sauce (Passover’s Special Sauce For Latkes & More)
Chopped Chicken Liver (What Am I? A Great Topper For Matzo!)
Kosher Passover Soups (A.K.A. Jewish Penicillin)
Karpas (That’s Parsley, For The Gentiles)
Matzo (You Gotsa Have Lotsa Matzo On Passover)
Root Vegetable Tzimmes (Get In Touch With Your Roots!)
Honey Glazed Carrots (Yummy)
Gefilte Fish (Just Like Your Grandmother Used To Make)
Kedem Concord Grape Juice (Tasty Enough For All Four Cups)
Raspberry Jelly Ring (If It’s Kosher, You Shoulda Put A Jelly Ring On It!)
Honey (Make A Nod To The Land Of Milk & Honey)
Beitzah (Don’t Forget The Eggs!)
Whole Kosher Brisket (Braise With Onions & Make Your Bubbe Proud)
Leg Of Lamb (Get A Leg Up On Seder Dinner)
Flourless Cake With Chocolate Glaze (Because 8 Days Without Cake Is A Long Time)
“Work With What You Got!”
© Victoria Hart Glavin Tiny New York Kitchen © 2016 All Rights Reserved
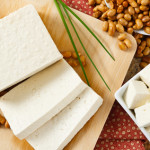
How To Eat More Protein On A Meat-Free Diet
If you’re new to a meat-free diet or you struggle with ways to get the protein you need here are some important tips that may help you. It really isn’t as hard as you might think.
Snack on protein rich munchies and skip the carbs. Eat roasted chickpeas, edamame, roasted peanuts, or raw nuts. Keep away from heavily salted nuts.
If you’re looking for a frozen treat then purée coconut milk, almond butter, cashew butter, honey, and cocoa powder. Freeze in an ice cream maker for a protein rich frozen treat.
Make an easy cream sauce by whisking cashew butter with vegetable stock, garlic, and minced parsley. Toss with cooked pasta.
Crumble tempeh (fermented soybean protein) into pasta sauce or soups, or wherever you might use hamburger meat.
Purée cooked black beans and add to brownies. For blondies or light colored muffins or cakes, use cooked, puréed chickpeas.
Sprout sunflower seeds and add them to salads. Just soak raw seeds overnight in water to cover. Drain and let sprout for 24 to 48 hours.
Add ground flaxseeds to muffins, waffles, breads, or cookies for a protein boast and added omega 3 fats.
Make a protein packed pudding. Purée silken tofu with cocoa powder, honey, and vanilla extract.
Use hemp or rice protein powder instead of flour to make waffles, pancakes, and baked goods. Instead of eggs, use flax as a binder.
Lentils are awesome! Eat lentils more often. They are fast cooking and easy to use. Add to soups, toss in salads, and stir in cooked rice.
Spread sandwiches and wraps with hummus instead of mayonnaise. I do this all the time. Purée hummus with roasted red peppers or chipotle peppers for an added zing.
If you can tolerate gluten, seitan (wheat protein) is a great substitute for sliced deli meat. Use it in wraps or sandwiches for an easy lunch.
“Work With What You Got!”
© Victoria Hart Glavin Tiny New York Kitchen
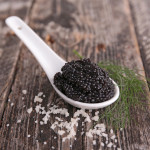
New Year’s Eve is about celebration, which most definitely calls for caviar and champagne. If you’re having a party or small get-together here are a few important tips about caviar.
Keep it simple! When serving caviar, keep it simple. You certainly don’t want to spring for something so speak jut to cover up the flavor with a lot of overkill. Caviar is intensely flavorful, and it goes well with crème fraiche or sour cream and blini. Try it with small boiled potatoes, seafood, soft or hard boiled eggs, or buttered pasta. Caviar can be used almost like a precious garnish, which can also be a great way to stretch out a small amount of it.
Keep it cool! When you bring caviar home, place in the refrigerator immediately in its tin. Place in the coldest part of your fridge, which is usually in the back of the deli drawer. If you’re making hors d’oeuvres, make sure to work quickly and serve immediately or place the completed snacks back in the fridge so that the eggs are sitting out on the table or counter. If you plan on serving the caviar straight up, place the tin or place in another bowl over crushed ice. The caviar doesn’t need to be freezing cold, but should be kept cool so the eggs hold their shape and freshness.
No metal please! Probably the most important rule with caviar is making sure it doesn’t come into contact with reactive metal. You certainly don’t want your precious caviar tasking like metal. This also goes for that beautiful tiny metal spoon you’ve been dying to use. Traditionally, a mother-of-pearl spoon is used to serve caviar. If you don’t have a mother-of-pearl spoon then don’t fret. Wood, ceramic, and glass utensils all work. Just make sure whatever non-metal spoon you use is a dainty little thing.
Leftovers you say? Holy moly, if you’re lucky enough to have leftover caviar please don’t throw it out or freeze it. Eat some more the next day and go out and buy yourself a lottery ticket. Leftover caviar is like seeing a unicorn. There are a number of ways to enjoy it by tossing it with buttered pasta or top your scrambled eggs with it. The good news is that your leftover caviar should last in your refrigerator for about a week.
Happy New Year’s Eve!
"Work With What You Got!"
© Victoria Hart Glavin Tiny New York Kitchen
Gluten-Free Baking
Baking can be tricky when you throw gluten-free into the mix, even the most skilled cooks can be challenged. Here are some tips that can make Gluten-Free Baking less challenging.
Gluten-Free flour mixes can generally replace wheat flour cup for cup. Nut and bean flours may need extra experimentation to find the exact amounts to use.
Consider using smaller pans when baking gluten-free. It’s easier to get the center cooked without the edges burning as can happen with larger pans.
Keep a close watch on baking times. Some gluten-free recipes may take longer to bake than their wheat-containing counterparts.
To help gluten-free recipes taste their best, consider boosting flavor with extra nuts, herbs, spices, and flavor extracts such as vanilla and almond.
If converting a recipe to gluten-free, increase the egg amount by one extra egg to help ingredients bind together.
Gluten-free flours can be dry. You may need to increase a recipe’s liquids.
Xanthan gum keeps gluten-free baked goods moister and less prone to crumbling. Add 1/4 to 1/2 teaspoon xanthan gum for each cup of gluten-free flour.
"Work With What You Got!"
© Victoria Hart Glavin Tiny New York Kitchen

Substitution Guide
|
Ingredient |
Substitution |
|
Allspice (1 tsp.) |
1/2 tsp. cinnamon + 1/4 tsp. nutmeg + 1/4 tsp. ground clove |
|
Baking Powder (1 tsp.) |
1/4 tsp. baking soda + 1/2 tsp. cream of tartar |
|
Baking Soda (1 tsp.) |
2 tsp double-acting baking powder + replace acidic liquid ingredient in recipe with non-acidic liquid |
|
Balsamic Vinegar |
Equal amount of sherry or cidar vinegar |
|
Bread Crumbs (1 cup) |
3/4 cup cracker crumbs |
|
Brown Sugar (1 cup) |
1 Tbsp. light molasses + enough sugar to fill 1 dry measure cup or 1 cup raw sugar |
|
Butter, salted (1 cup or 2 sticks) |
1 cup or 2 sticks unsalted butter + 1/4 tsp. salt or 1 cup margarine or 7/8 cup lard or vegetable shortening |
|
Buttermilk (1 cup) |
Place 1 Tbsp. white vinegar or lemon juice in a liquid measure. Fill to 1 cup with room temp whole or 2% milk and let stand for 5 minutes or 1 cup milk + 3/4 tsp. cream of tartar or 1 cup plain yogurt |
|
Canola, Sunflower and Vegetable Oils |
Substitute one for one |
|
Chocolate, Bittersweet or Semi-Sweet (1 oz.) |
1/2 oz. Unsweetened chocolate + 1 Tbsp. granulated sugar |
|
Cocoa Powder (3 Tbsp. Dutch-processed) |
1 oz. Unsweetened chocolate + 1/8 tsp. baking soda + reduce fat in recipe by 1 Tbsp. or 3 Tbsp. natural cocoa powder + 1/8 tsp. baking soda |
|
Corn Starch (as a thickener) |
Equal amounts of Minute Tapioca for cornstarch, use slightly less for flour |
|
Cream of Tartar (1/2 tsp.) |
1/2 tsp. white vinegar or lemon juice |
|
Egg (1 whole large egg) |
3-1/2 Tbsp. thawed frozen egg or egg substitute or 2 egg whites |
|
Garlic (1 fresh clove) |
1 tsp. Garlic Salt or 1/8 tsp. Garlic Powder or 1/4 tsp. dried minced garlic |
|
Gingerroot (1 Tbsp. minced) |
1/8 tsp. ground ginger powder or 1 Tbsp. rinsed and chopped candied ginger |
|
Half & Half (1 cup) for cooking or baking |
1-1/2 Tbsp. butter or margarine + enough milk to equal 1 cup |
|
Heavy Cream (1 cup) for cooking or baking |
3/4 cup milk + 1/3 cup butter or margarine |
|
Herbs, Fresh (1 Tbsp.) |
1 tsp. dried herbs |
|
Honey (1 cup) for cooking or baking |
1 1/4 cups granulated sugar + 1/4 cup of liquid appropriate for recipe |
|
Italian Seasoning (1 tsp.) |
1/2 tsp. dried basil + 1/4 tsp. dried oregano + 1/4 tsp. dried thyme |
|
Molasses (1 cup) |
1 cup honey or 1 cup dark corn syrup or 3/4 cup light or dark brown sugar dissolved in 1/4 cup liquid |
|
Mushrooms, fresh (1 cup sliced and cooked) |
1 can (4 oz.) mushrooms, drained |
|
Mustard, Prepared (1 Tbsp.) |
1/2 tsp. dry mustard powder + 2 tsp. white vinegar |
|
Onion (1 small minced) |
1/2 tsp. onion powder |
|
Poultry Seasoning (1 tsp.) |
1/4 tsp. ground thyme + 3/4 tsp. ground sage |
|
Pumpkin Pie Spice (1 tsp.) |
1/2 tsp. ground cinnamon + 1/4 tsp. ground ginger + 1/8 tsp. allspice + 1/8 tsp. nutmeg |
|
Sour Cream (1 cup) |
1 cup plain yogurt or 1 Tbsp. lemon juice and enough evaporated milk to equal 1 cup |
|
Tomato Juice (1 cup) for cooking |
1/2 cup tomato sauce + 1/2 cup water |
|
Tomato Sauce (1 cup) for cooking |
1/2 cup tomato paste + 1/2 cup water |
|
Wine, Red (1 cup) |
1 cup nonalcoholic wine, apple cider, beef broth or water |
|
Wine, White (1 cup) |
1 cup nonalcoholic wine, white grape juice, apple juice, chicken broth or water |
|
Yogurt (1 cup) |
1 cup buttermilk or 1 Tbsp. lemon juice and enough milk to equal 1 cup or 1 cup sour cream |
"Work With What You Got!"
© Victoria Hart Glavin Tiny New York Kitchen

Food is the fuel for your day's activities, so it makes no sense at all to eat your biggest meal at night when it's all behind you. – Laurel's Kitchen


Constitution Week – Foods of Our Forefathers Part V
In her food preparation and preservation, the early American housewife was tied tightly to the calendar and the clock – much more tightly than today’s homemaker is. Local availability of foodstuffs and the limitations of existing food preservation techniques meant that nature largely called the shots on timing. Fruits and vegetables had to be picked at the right moment and processed quickly. Animals had to be slaughtered at their peak to keep best, and the peak varied from animal to animal. Even cheese and butter had a better likelihood of successful preservation depending on the season of the year in which they were processed.
Weather conditions played a major role: herbs had to be picked on a dry day to retain color and flavor; slaughter had to be done in cold weather to allow the carcass to cool rapidly; milk winters produced little ice for the following summer.
Also, once begun, preservation techniques sometimes had to be carried uninterruptedly through a long and tedious series of steps. There was no turning back – or time for vacations. Hams being cured had to be turned regularly, fish being dried had to be restacked four times a day, pickles had to have their brine skimmed and changed – or the product would be lost.
The labor involved in such food preservation was frequently heavy, but the routine of the rest of the house went on as usual. Organizational ability and endurance were essential, and woe betide the housewife who didn’t “keep up appearances” with her neighbors.
Just as the make-up of the early American’s diet varied with his geographic location, so did his needs – and abilities – in food preservation.
For example, the southern areas had access to a more varied food supply over the course of the year and consequently had less need to provide stores for the hard winter. At the same time, it was more difficult and expensive to get ice for short-term protection against the warmer climate. Ice was actually shipped from Massachusetts to the Southern states and to Cuba and Jamaica in the early 19th century, but it was obviously only available to the wealthier residents. The ice-box itself didn’t become popular until the mid 1800’s.
The shorter growing season in the North reduced the variety of produce available, but it also made cold storage in root cellars practical in small towns and rural areas. Above-ground ice houses and ice-saws, invented in the mid-nineteenth century, drastically reduced the cost of storing ice into the summer, and simplified storage of dairy products, fish and meat.
In many respects, the northern colonies had the greatest difficulty in providing a nutritious, varied diet throughout the year. Although fruits, berries, and summer vegetables were plentiful from the midsummer to early fall, proving vitamin-rich foodstuffs, during the winter and spring took special care. Many food items, of course, could be stored in relatively simple root cellars – where winter temperatures hovered between 30 and 40 degrees. In especially cold weather, a large tub of water was placed on the floor. This water gave off heat as it froze, which kept the vegetables safe. Turnips, beets and squash were kept in the driest areas. Carrots would keep anywhere. Cabbages and celery were buried in sand, cauliflower was set in holes and covered with straw, while cranberries were floated in water in a tub. Other crops were arranged loosely on slatted shelves for free air circulation, sometimes lying on straw.
Some vegetables, such as summer squash and potatoes, kept better at somewhat higher temperatures, and these were usually stored in the dark basement of the home. Temperatures between 50 and 60 degrees were ideal.
Eggs could also be stored in the root cellar, or in the basement of the house. Two methods were common. In one, the eggs (which the housewife was instructed to collect “in fine weather”) were dipped in boiling water for 20 seconds, then coated all over with butter or “sweet oil” (glycerin) and packed in sawdust. They would keep this way for some two to three weeks. Other housewives kept their eggs in crocks, submerged in “water glass” (sodium silicate). In this technique, it was important not to wash the eggs first, since their shells possess a natural coating which prevented the water glass from penetrating through the shell and ruining the egg. Even stored at room temperature, such eggs would keep for several months, while the hens sulked through the dark winter days.
If a family didn’t have room for a root cellar, it could accomplish somewhat the same effect with a pit, with the vegetables in layers separated by straw, and the whole covered with earth. Obviously, retrieving vegetables thus buried was a messy chore, and needed careful planning.
Under either type of storage, frequent examination was necessary, in order to detect spoilage and eliminate those items of fruit or vegetables which had gone rotten. The proverb about “one rotten apple spoiling the barrel” was not taken lightly! In fact, many housewives wouldn’t put apples in barrels, but spread them out, in order to “pick them over” more easily as the winter progressed. Spoiling apples were cut up, and the good parts made into applesauce as the winter progressed. Early cookbooks instructed the housewife to add a teaspoon of tartaric acid to the apples when making sauce late in the winter, as the apples lost their flavor. New Englanders even had a name for the period after the vegetables had spoiled or been used up, but before the dandelion greens appeared. They called it “the six weeks want.”
In the South, storage of this sort was less necessary, and the typical New England vegetables such as Hubbard squash and turnips were rarely seen on Southern menus.
To Be Continued…


