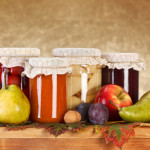
Many of us are preserving summer’s bounty to enjoy during colder months.
Here are tips on how to preserve using the hot water bath method. It’s really not difficult if you follow these easy steps.
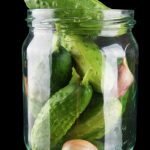
High acid foods like tomatoes, pickles, salsa, jelly, pie filling, jam, fruit, and chutney are great for canning using the hot water bath method.
Preheat Jars
Fill water bath canner (or large pot) to cover empty jars by at least 1 inch of water. Heat jars to simmer (180 degrees F) to prevent jar breakage.
Fill Jars
Following a canning recipe, fill a hot jar with prepared food leaving enough space between the food and the rim (headspace) as indicated in the recipe.
Tighten Lids And Bands
Wipe any food from the rim of the jar. Center new lid on the jar, then twist on band just until fingertip tight.
Process Jars
Place filled jars onto rack in simmering water. If you don’t have a rack designed for home preserving, use a cake cooking rack. Filled jars should be covered by 1 inch of water. Place lid on canner and heat to a steady boil. Boil jars for the time specified in recipe. Adjust for high altitudes.
Altitude Adjustment
1,001 to 3,000 ft increase processing time 5 minutes; 3,001 to 6,000 ft increase 10 minutes; 6,001 to 8,000 ft increase 15 minutes; 8,001 to 10,000 ft increase 20 minutes.
Cool Down
Turn off heat and remove canner lid. Let jars stand in water for 5 minutes. Remove from water and cool jars upright on cutting board, wire rack or towels on countertop for 12 to 24 hours.
Check The Seal
After cool down, press on center of lid. If jar is fully sealed, the lid will NOT flex up or down. Remove the bands and gently attempt to lift lids off with your fingertips. Properly sealed lids will remain attached. Wipe canning jars, lids, and bands clean. Store sealed jars in pantry for up to 18 months. Jars may be stored with or without bands. If a lid fails to seal within 24 hours, immediately refrigerate the food product.
©Tiny New York Kitchen © 2020 All Rights Reserved
Most recipes have been perfected for use at seal level. At higher altitudes, adjustments in the cooking time, temperature, and ingredients could be necessary.
At sea level, water boils at 212 degrees. With each additional 500 feet of altitude, the boiling point drops 1 degree. Even though the boiling point is lower, it takes longer to generate the heat required to cook food. Therefore, at high altitudes, foods boiled in water (such as pasta and beans) will take longer to come to a boil and will require longer cooking times than recipes suggest. The processing times for canning foods and the blanching times for freezing vegetables will vary, too.
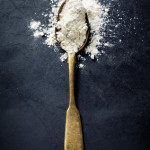
At high altitudes, cake recipes may need slight adjustments in the proportions of flour, leavening, liquid, eggs, etc. These adjustments will vary from recipe to recipe, and not set guidelines can be given. Many cake mixes now carry special directions on the label for high-altitude preparation.
High altitudes can also affect the rising of doughs and batters, deep-frying, candy making, and other aspects of food preparation. For complete information and special recipes for your area, call or write to the home agent at your county cooperative extension office or to the home economics department of your local utility company or state university.
“Work With What You Got!”
© Victoria Hart Glavin Tiny New York Kitchen © 2017 All Rights Reserved
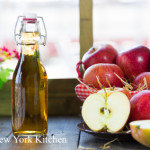
Know Your Vinegar
Pickling season is here and it’s important to know about the various vinegars. Vinegar is usually made by oxidation of the alcohol in wine, cider, or malt. Vinegar provides the tart pucker flavor in pickles, but it also acts as a preservative. If a recipe calls for vinegar, it will most likely call for a particular type. If a recipe does not specify the type, use a vinegar that fits the recipe. White vinegar has a sharp flavor and is used for pickling and in recipes where a clean, strong taste is desired. Cider vinegar, made from apples, has a faint fruity flavor and is used in recipes where a slightly milder taste is preferred. You can replace white vinegar with cider vinegar in pickling recipes, as long as the cider vinegar has a 5% acidity level.
Since vinegar is very acidic, bacteria grow very poorly in it, or not at all. However, vinegar will still deteriorate if exposed to air and/or heat. Keep your vinegar capped and store it in a cool, dark, dry place. Vinegars can be flavored by adding slightly bruised herbs or fruit, heating the vinegar almost to body temperature, and sealing the bottle.
www.tinynewyorkkitchen.com
“Work With What You Got!”
© Victoria Hart Glavin Tiny New York Kitchen © 2016 All Rights Reserved
 Canning Basics
It’s that time again! Time to can jams, jellies, fruits, tomato sauces, pickles, vegetables and whatever else you can think up. The good news is that canning is making a comeback as new generations discover the joys of serving and sharing home preserved foods. Here are some basic guidelines to follow for safe and delicious results.
Equipment
Boiling Water Canner
I like to use a Boiling Water Canner and not a pressure canner. A boiling water canner (or water bath) is used for fruits, jams, jellies, pickled vegetables, pickles, relishes and tomatoes. It is a large pot that has a lid and a rack designed to hold canning jars. Any large cooking pot can be used if it has a rack, a tight fitting lid and enough depth for briskly boiling water to cover the jars by 1 inch. A pressure canner must be used for vegetables and other low acid foods. It is a large heavy pot that has a rack and a tight fitting lid with a vent, a dial or weighted pressure gauge and a safety fuse. It sometimes has a gasket. Pressure canners allow foods to be heated to 240° F and held at the temperature as long as necessary. When using a pressure canner, always refer to the manufacturer’s instructions before beginning.
Jars
Canning jars come in many sizes, from 4 ounces to 1 quart; those with wide mouths are perfect for pickles. Use the size and style called for in each recipe.
Use only standard canning jars. These are tempered to withstand the heat inside a canner, and their mouths are specially threaded to seal with canning lids. Inspect all jars before using them, discard any that are cracked or have chipped rims.
Lids
Use screw bands and flat metal lids that have a built-in sealing compound. Prepare them according to the manufacturer’s directions. The flat lids are designed for one-time use only. Screw bands can be reused if they are not bent or rusty.
Other Essentials
Special kits can be purchased that include all the canning essentials in one box. Kits typically contain the following: A jar lifter for removing hot jars from the boiling water; a magnetic lid want for retrieving sterilized lids from the hot water; a nonmetallic spatula which often has measuring increments for judging headspace (You certainly could use a ruler instead); and a funnel for directing hot liquids into jars. You may also want to have a food scale, food mill or sieve and a colander. Make sure to wash any utensils that will directly touch the food with soap and warm water before beginning.
General Canning Steps
For a boiling water canner, pack food into the canning jars by the raw pack (cold pack) or hot pack method. In raw packing, uncooked food is packed into the canning jar and covered with boiling water, juice or syrup. In hot packing, food is partially cooked, packed into jars and covered with cooking liquid. The following applies to both methods.
*Wash empty canning jars in hot, soapy water. Make sure to rinse thoroughly. Place the jars in the boiling water canner. Cover the jars with hot water and then bring to a simmer over a medium heat. For food processed under 10 minutes, boil the jars 10 minutes and keep warm in simmering water until needed. Set screw bands aside; place the lids in a separate saucepan. Cover with water; bring to a simmer over medium heat (do not boil).
*If you are using a separate pot for sterilizing the jars, fill the boiling water canner half full; bring to boiling. Heat additional water in another large pot (to top off water in the canner); keep it hot but not boiling.
*Prepare only as much food as needed to fill the maximum number of jars your canner will hold at one time. Keep your work area clean.
*Remove sterilized jars from the hot water; place the hot jars on cloth towels to prevent them from slipping during packing.
*Pack food into jars using a wide mouth funnel, allowing for adequate headspace. Ladle boiling liquid over the food, leaving adequate headspace.
*Check the headspace. The space between the top of the food and the container rim is the headspace, leaving the correct amount is essential. Headspace allows a vacuum to form and the jar to seal. Use a ruler to make sure that you have the amount specified in each recipe.
*Release trapped air bubbles by gently working a sterilized nonmetal utensil (such as one provided in a canning kit) down the jar’s sides. Add liquid, if needed, to maintain necessary headspace.
*Wipe jar rims with a clean, damp cloth, food on the rims prevents a perfect seal. Place the prepared lids on the jars, add the screw bands, and tighten according to the manufacturer’s directions.
*Set each jar into the rack in the canner as it is filled and sealed. Jars should not touch each other. Replace the canner cover each time you add a jar.
*When all jars have been added, ladle hot water from the extra pot into the canner to cover the jars by 1 inch.
*Cover, heat to a full rolling boil. Begin processing time, following recipe procedures and times exactly. If necessary adjust for altitude. Keep the water boiling gently during the processing, adding additional boiling water if the water level drops. If the water stops boiling when you add more, stop timing, turn up the heat, and wait for a full boil before resuming counting.
*At the end of processing, remove the jars; place them on a rack or on towels in a draft-free area to cool. Leave at least 1 inch of space between jars to allow air to circulate.
*After the jars are completely cooled (12 to 24 hours), press the center of each lid to check the seal. If the dip in the lid holds, the jar is sealed. If the lid bounces up and down, the jar isn’t sealed. Check unsealed jars for flaws. Contents can be refrigerated and used within 2 to 3 days, frozen, or reprocessed within 24 hours. To reprocess, use a clean, sterilized jar and a new lid; process for full length of time specified. Mark the label so you can use any recanned jars first. If the jars have lost liquid but are still sealed, the contents are safe. However, any food not covered by liquid will discolor, so use these jars first.
*Wipe jars and lids. Remove, wash, and dry screw bands; store for future use. Label jars with contents and date; include batch number if you can more than a load a day. If a jar spoils, you can identify others from the same batch. Store jars in a cool (50° to 70° F), dry, dark place. Use within 1 year.


