
Grilling season is officially here, although I grill all year round, and many are dusting off their grills. I grill everything from meats to fruits and vegetables, but I’m partial to grilling sausages.
The great thing about sausages is that the work is already done. It’s the quick cooking, preseasoned protein your dinner has been waiting for. Here are ways to use that beautiful & delicious sausage.
Potato Salad: Add lightly charred andouille to potato salad.
Burgers: Form loose spicy turkey sausage into patties, then cook. You’ll have instant burgers.
Kebabs: Skewer sliced smoked kielbasa for easy kebabs.
Tacos: Wrap grilled fresh chorizo in a tortilla with avocado and pico de gallo for instant tacos.
Sandwiches: Grill bratwurst with onions and peppers and throw it inside a roll.
Main Dish: Serve grilled merguez (North African sausage) with cucumbers and mint with a dollop of yogurt.
www.tinynewyorkkitchen.com
“Work With What You Got!”
© Victoria Hart Glavin Tiny New York Kitchen © 2017 All Rights Reserved

The Secret Ingredient For Ridiculously Crispy Chicken
For years I experimented with ways to make chicken extra crispy until one day a chef friend and I were discussing this issue. He told me that the trick is to use baking powder on “skin-on” poultry. I was a bit surprised and put it to the test myself. Holy smokes it does work!
Apparently, baking powder raises the skin’s pH levels, which will allow proteins to break down, giving you a crispier and more evenly browned outcome. Combining with poultry’s natural juices, it forms carbon dioxide gas that creates a layer of small bubbles. These bubbles will increase the skin’s surface area, which allows it to develop a crunchy texture once cooked.
It’s so simple. All you need to do is mix together 1 part baking powder to 3 parts kosher salt (for example 1 tablespoon baking powder & 3 tablespoons kosher salt – of course it all depends on what size poultry you’re cooking). Evenly sprinkle over the skin’s surface and then place in the refrigerator, uncovered, between 12 to 24 hours. Without rinsing cook it any way you want to (roast, grill, fry). It’s really that easy. You just need a bit of planning, but it’s worth it.
You can use it on chicken, turkey, duck, game hens, or goose. Thanksgiving is coming up so you may want to give it a try on your Thanksgiving turkey.
“Work With What You Got!”
© Victoria Hart Glavin Tiny New York Kitchen © 2016 All Rights Reserved
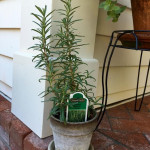
Growing herbs make cooking so much better. When the weather turns cold I bring them inside to my kitchen so they don’t freeze. Tonight I’m making grilled rosemary bone-in pork chops.
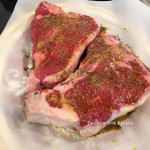
Now That I Have These Beautiful Butcher Shop Steaks I Am About To Put Them On The Grill. Before I Grill Them, However, I Let Them Sit Out For 1 Hour On A Platter So That They Come To Room Temperature. I Drizzle Them With Olive Oil And Sprinkle With A Favorite All-Purpose Spice Mixture That I Created. These Are Thick Steaks So They’ll Cook On The Grill 7 To 10 Minutes Per Side.
“Work With What You Got!”
© Victoria Hart Glavin Tiny New York Kitchen © 2016 All Rights Reserved

I’ve gotten spoiled and typically don’t care for the grocery store meats. They tend to be bland and tough so most Saturdays I take a trip to the butcher shop. I’ve been reading Bill Buford’s book, Heat, and when the butcher asked me what meats I wanted I thought to myself, “Hmmmm…I think I’ll eat like a Tuscan,” and then blurted out, “I’ll have those two large delicious looking T-Bones!” Life is so much better with a good butcher nearby.
“Work With What You Got!”
© Victoria Hart Glavin Tiny New York Kitchen © 2016 All Rights Reserved

Seafood
Keep your seafood fresh with safe handling and cooking tips.
Selecting Seafood
The first step in putting the best seafood on your plate is making sure that you put the best seafood in your shopping cart. Make the best choices at the store and you’ll enjoy great taste at the table every time.
When you’re shopping, make seafood the very last thing you pick up before you check out. Make sure to place it in an insulated bag for your trip home.
When purchasing clams and oysters in their shells, make sure they are alive. Shells of live clams and oysters may open naturally, but will close tightly when tapped, indicating that they are alive. Throw away any dead ones.
Fresh whole fish should have a shiny surface with tightly adhering scales, gills that are deep red or pink, free of slime, mucus and off-odor, and milk, briny aroma, similar to the ocean.
Fresh steaks, fillets, and loins should have a translucent look, fresh that is firm and not separating and a mild briny odor, similar to the ocean.
Handling Seafood
Shore to store is only one leg of the journey. It’s important to continue following safe handling recommendations once you take your seafood purchase home.
If your seafood is frozen make sure to thaw seafood in the refrigerator. Never thaw at room temperature.
Wash your hands with hot soapy water before and after handling raw seafood.
Thoroughly wash containers that held raw seafood before using them again.
Cooking Seafood
Now that your seafood is home safely, it’s time to get cooking.
Make sure that you cook fresh fillets and shellfish 1 to 2 days after purchasing.
Keep seafood refrigerated until it’s time to cook.
A general rule for baking and broiling fish is 10 minutes per inch of thickness at 400 to 450 degrees.
Fish is done when the flesh becomes opaque and flakes easily at the thickest part.
Scallops, clams, oysters, and shrimp become opaque and firm when fully cooked. Don’t overcook as this will result in loss of moisture, which affects texture and taste.
To boil, place shrimp and scallops in a large pot of boiling water (four cups of water per pound of meat) and simmer three to five minutes.
Broiled scallops and peeled and deveined shrimp will be cooked in 3 to 5 minutes.
Broiled shucked clams and oysters will be cooked in 3 to 5 minutes.
Oysters and clams should be steamed until their shells open completely. Throw away any that do not open.
Most seafood should be cooked to an internal temperature of 145 degrees. Consuming raw or undercooked seafood or shellfish may increase your risk of foodborne illness, especially if you have a medical condition.
“Work With What You Got!”
© Victoria Hart Glavin Tiny New York Kitchen © 2016 All Rights Reserved

A Couple Of Flintstone Steaks On The Grill This Fine Sunday Evening

Soaking Wood Chips In Beer For Grilling
Here is a secret. You can turn your gas or charcoal grill into a smoker by just using beer. Soak wood chips in beer before you fire up the grill. The beer will be imparted into your smoked food.
Soak wood chips in beer for at least 30 minutes. The wet wood chips will produce more smoke and flavor. Drain wood chips and sprinkle a handful of soaked chips over the hot coals when they are ready and covered with a white ash. Put the lid on the grill and wait for the smoke to start to pour out of the grill. Then place the food on the cooking grate.
For charcoal grills, position it so that the vent is on the side of the grill opposite the charcoal. This will draw the heat and smoke over the food and out of the vent.
For gas grills, when using wood chips with a gas grill, follow the smoker box instructions for best results.
A couple of handfuls of wood chips will provide 10 to 20 minutes of smoke, depending on how hot the fire is.
Keep the grill lid closed as much as possible to allow the smoke to fully permeate the food.
Always use heat-resistant barbecue mitts or gloves when operating your grill.
“Work With What You Got!”
© Victoria Hart Glavin Tiny New York Kitchen © 2015 All Rights Reserved

Burgers 101
Whether you’re cooking on a gas or charcoal grill or in a fry pan on the stovetop, here are tips on making the perfect burger that is meaty and satisfying, yet never dense and bricklike. To make the best burgers, use a light touch with the meat.
DON’T FEAR THE FAT For the juiciest beef burgers, use ground chuck (80% lean/20% fat) or sirloin (85% lean/15% fat). Leaner cuts and grass-fed beef will yield a drier burger. When buying chicken or turkey, opt for dark meat. It’s still lower in fat than beef and will result in a much tastier burger than white meat.
FRESH IS BEST Keep in mind that you don’t need to buy ground meat. You can choose any boneless cut and then ask your butcher to grind it for you or grind it yourself. Use a coarser grind to avoid a mushy texture. For a special treat add some freshly ground short ribs, dry-aged steak, brisket or a combination.
MAKE AN IMPRESSION The edges of a burger cook faster than the center, which can cause the burger to puff up into a sphere. To avoid this, when shaping the patty, press your thumb into the center to make a dimple about the size of a quarter.
HOLD THE SALT Wait to add salt until after the patties are formed and just before cooking, and then season generously. Salt inside a patty will start to dissolve the protein strands, which will adversely affect the texture of the burger.
GRILL OR GRIDDLE Burger lovers are divided about the best cooking method. Grilling adds terrific smoky flavor, but some insist that a griddle or fry pan allows the flavorful fat to stay with the burger during cooking. Whichever method you choose, DO NOT press down on the meat with the spatula because it will release the juices and fat. Resist that urge!
DON’T FLIP OUT Flip the burgers only once, and only after they have formed a nice brown seal. Don’t flip too soon, and don’t move the burgers around. When the burgers are ready to be flipped, they should dislodge from the cooking surface easily. If they stick, let them cook for a few moments more.
COOKED TO PERFECTION The surest way to measure a burger’s doneness is to check the internal temperature with an instant-read thermometer. The thickest part of a beef burger should register 130 degrees for medium-rare, 140 degrees for medium, and 150 degrees for well done. Let your burgers rest for a couple of minutes before serving to allow the internal juices to redistribute evenly through the meat.
“Work With What You Got!”
© Victoria Hart Glavin Tiny New York Kitchen © 2015 All Rights Reserved

Whenever I come across bison at the butchers I snap it up right away. It’s so much leaner than beef, which I like. I love to grill it and serve with a green salad and corn on the cob. I made sure to marinade these bison steaks a good 24 hours to ensure that they would come out tender and not dry. If you can find bison in your area I highly recommend picking some up. Often times Whole Foods will tend to carry it.
“Work With What You Got!”
© Victoria Hart Glavin Tiny New York Kitchen © 2015 All Rights Reserved


